ข้อ 1. 📌 การเตรียมตัวก่อนใช้งาน (Setup ตัวเกม Lineage2M)
Step 1. 📌 Pre-Installation (Lineage2M Game Setup)
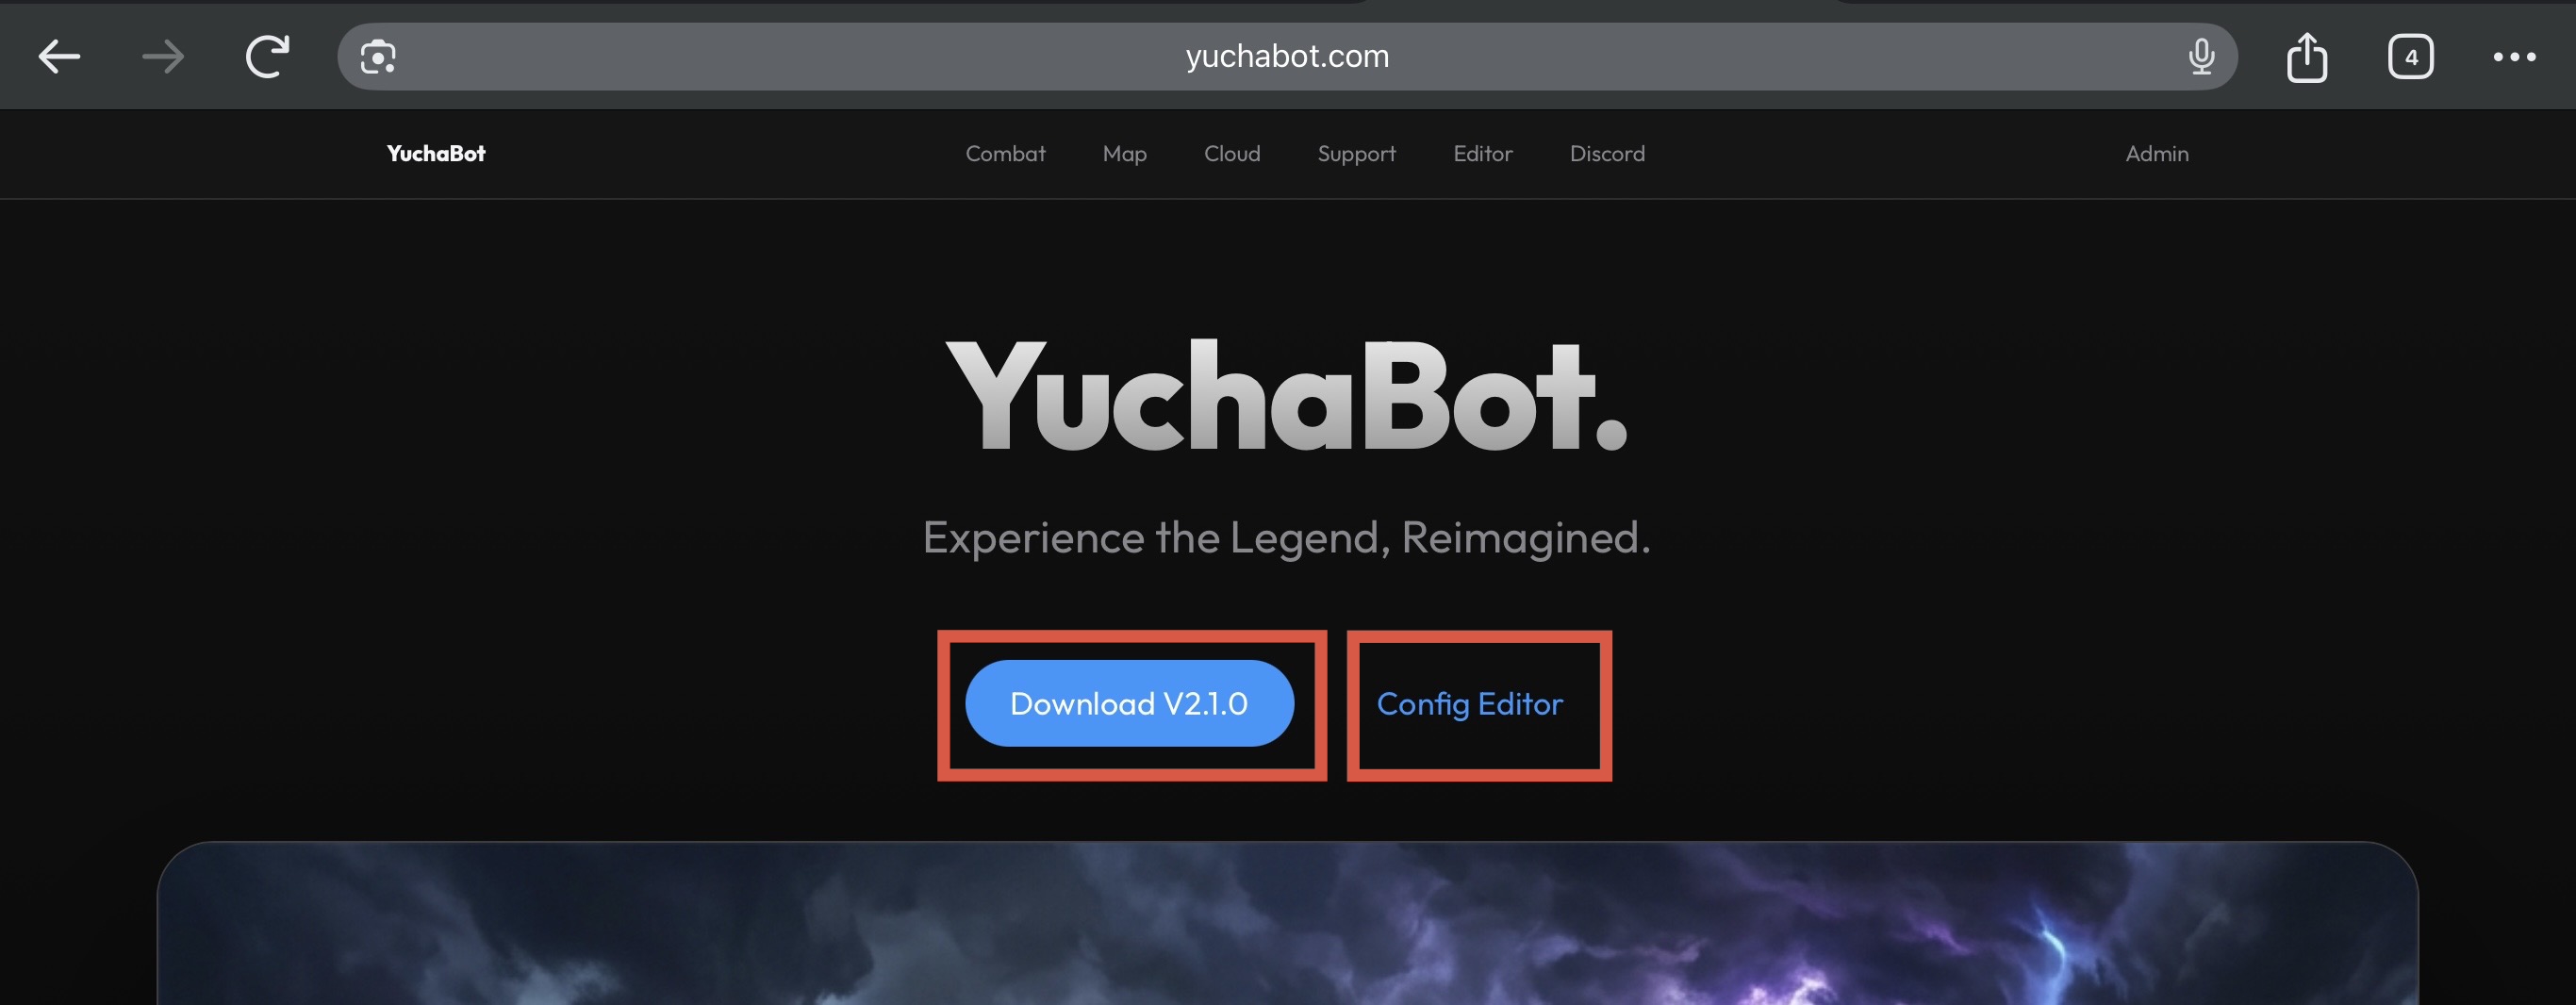
1.1 📥 ดาวน์โหลดบอท
1.1 📥 Download Bot
Download ตัวบอทฟรีได้จากลิงก์ตามรูปภาพได้ทันทีครับ
Download the free bot version from the link shown in the image.
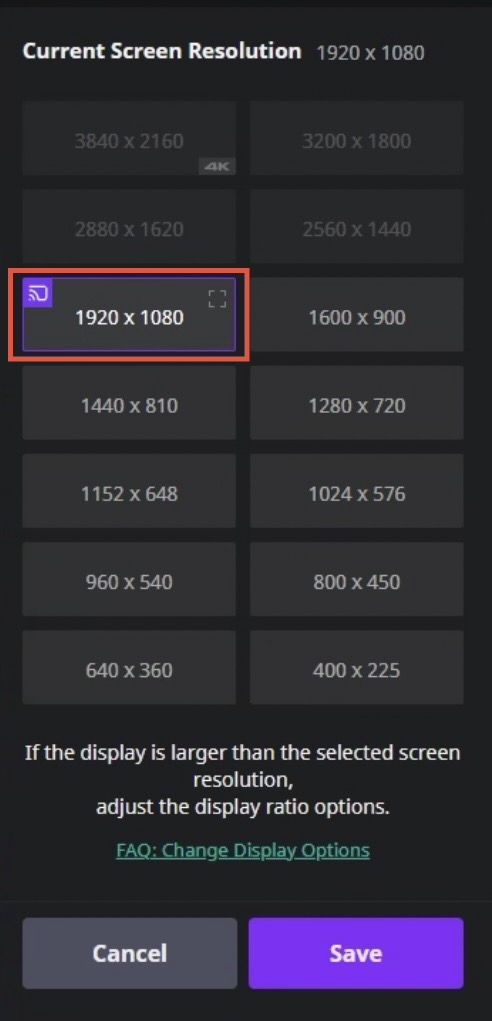
1.2 🖥️ ตั้งค่าความละเอียดหน้าจอ
1.2 🖥️ Resolution Setup
ปรับ Resolution ของตัวเกมเป็น 1920x1080 หรือ 1600x900 (รองรับทั้ง 2 ความละเอียดนี้)
Set game resolution to 1920x1080 or 1600x900 (both resolutions are fully supported).
1.3 📊 ปรับขนาด HUD
1.3 📊 HUD Scaling
ปรับ HUD เป็น 75% หรือ 100% เพื่อความแม่นยำในการตรวจจับของบอท (รองรับทั้ง 2 ขนาดนี้)
Set HUD scale to 75% or 100% for optimal detection accuracy (both scales are fully supported).
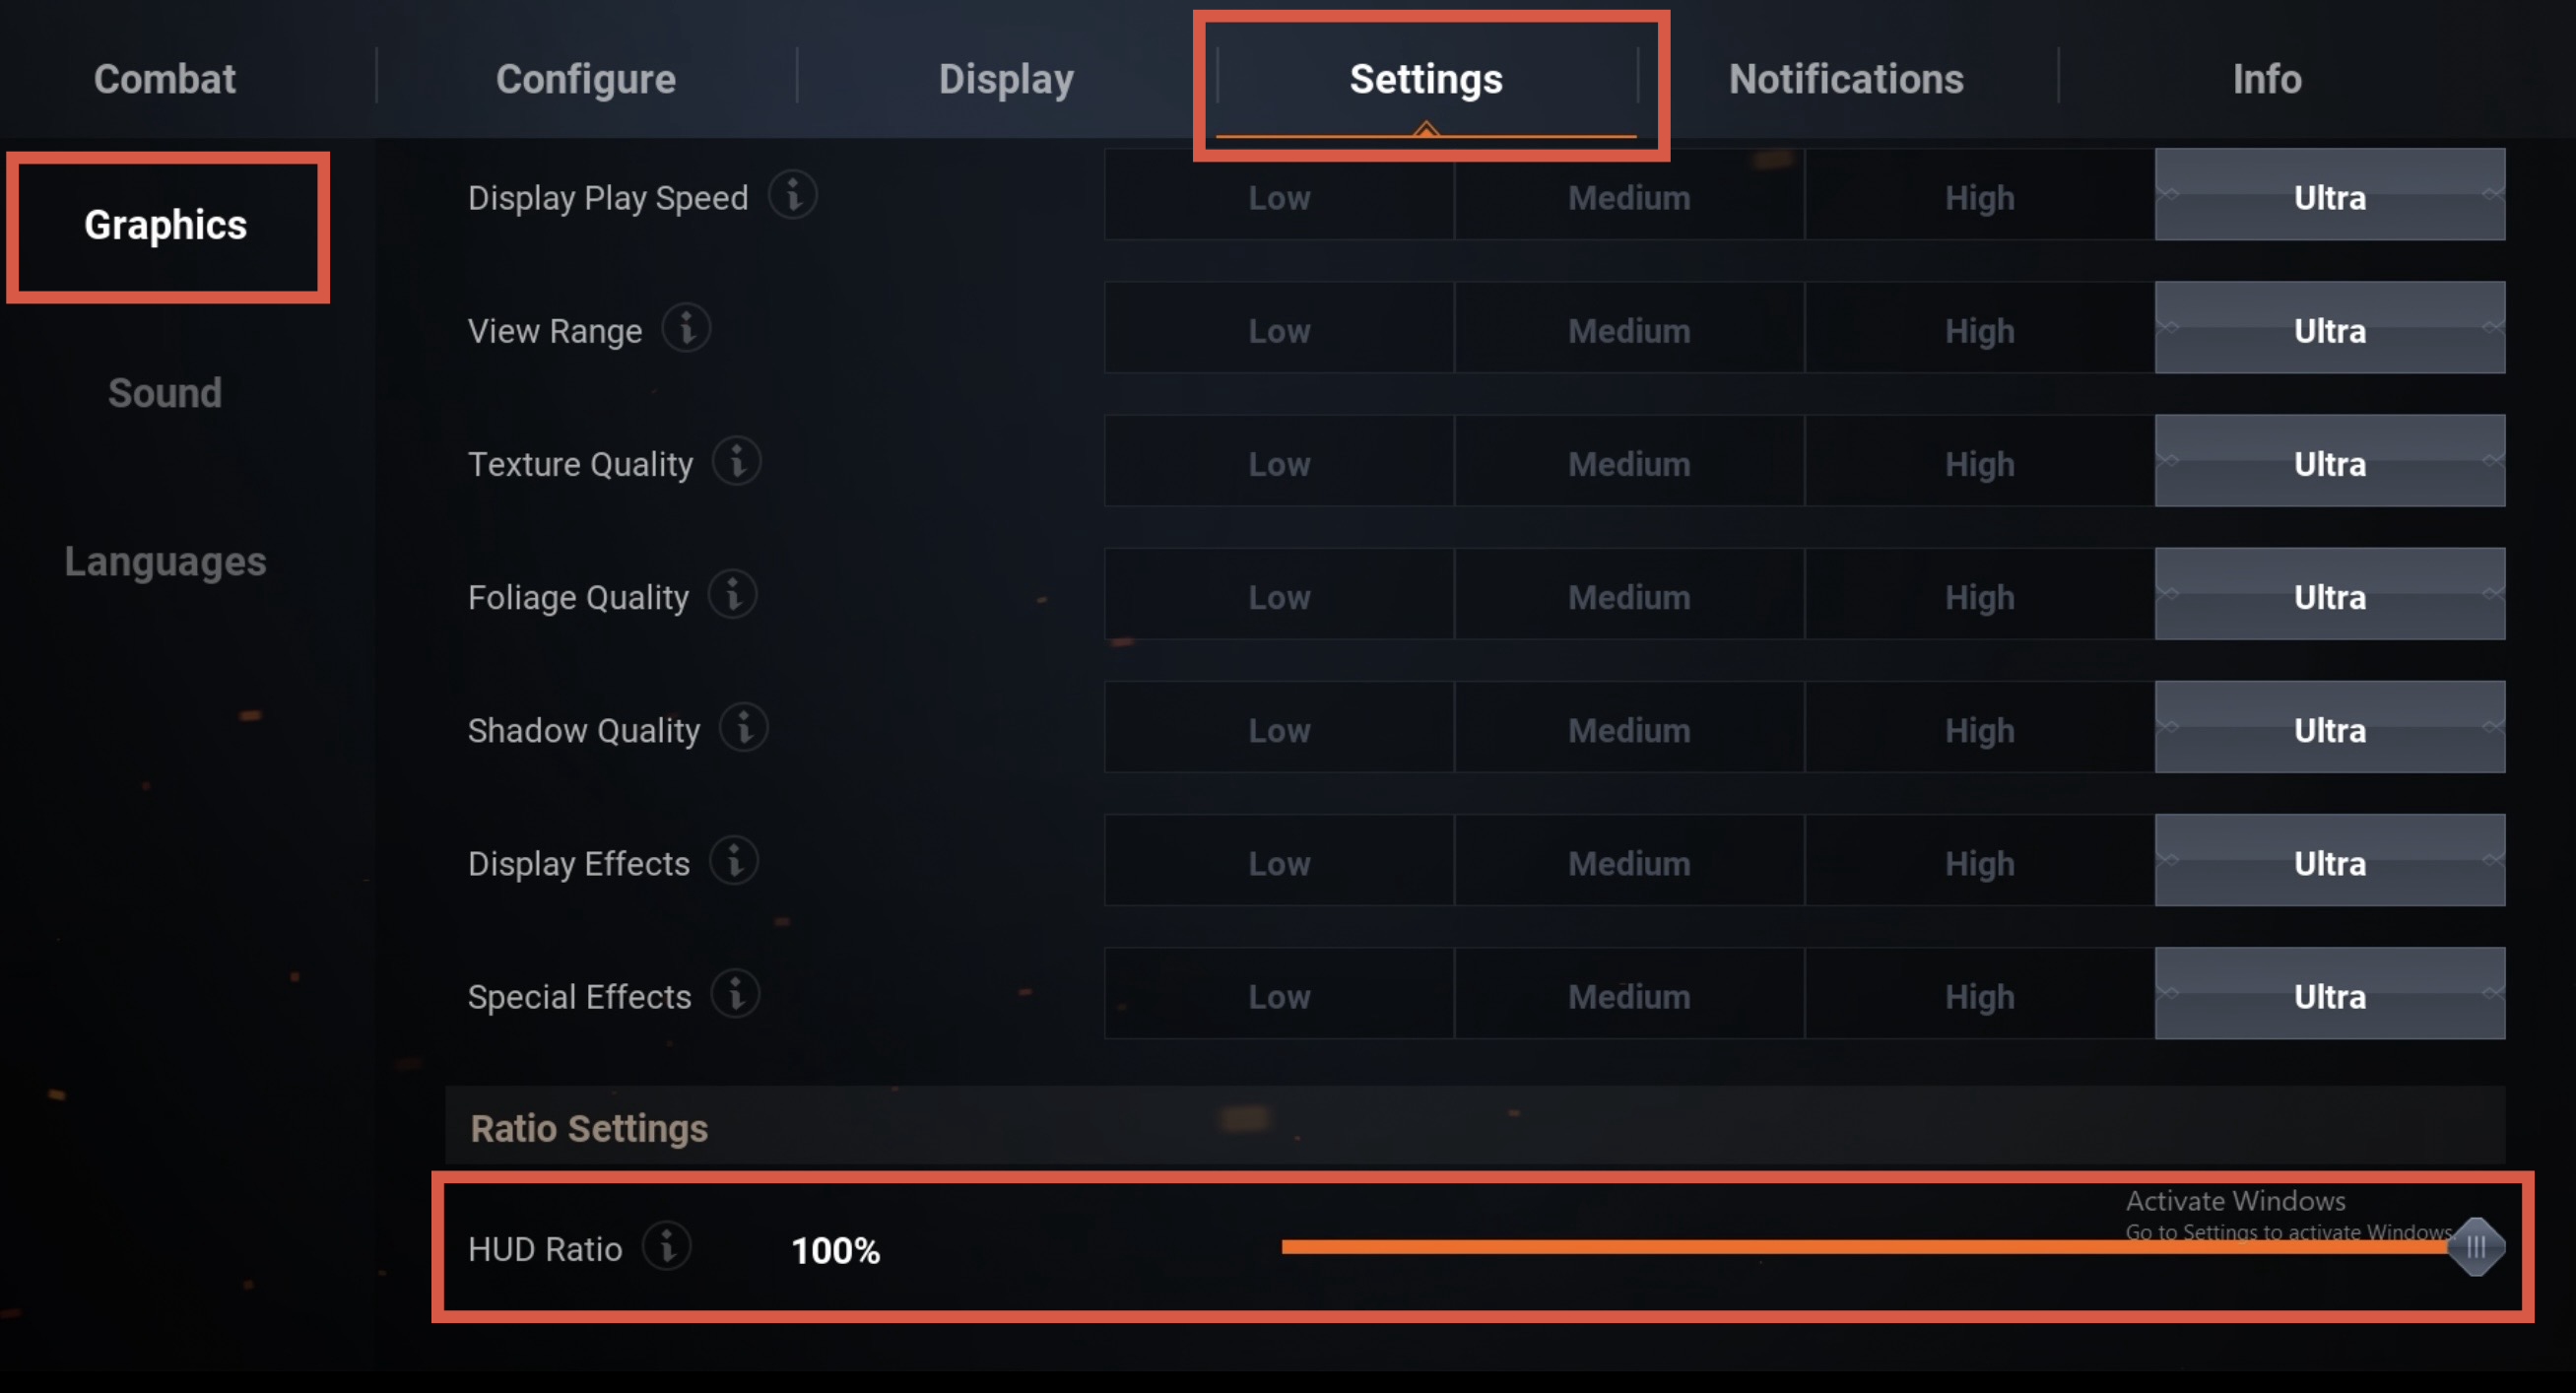
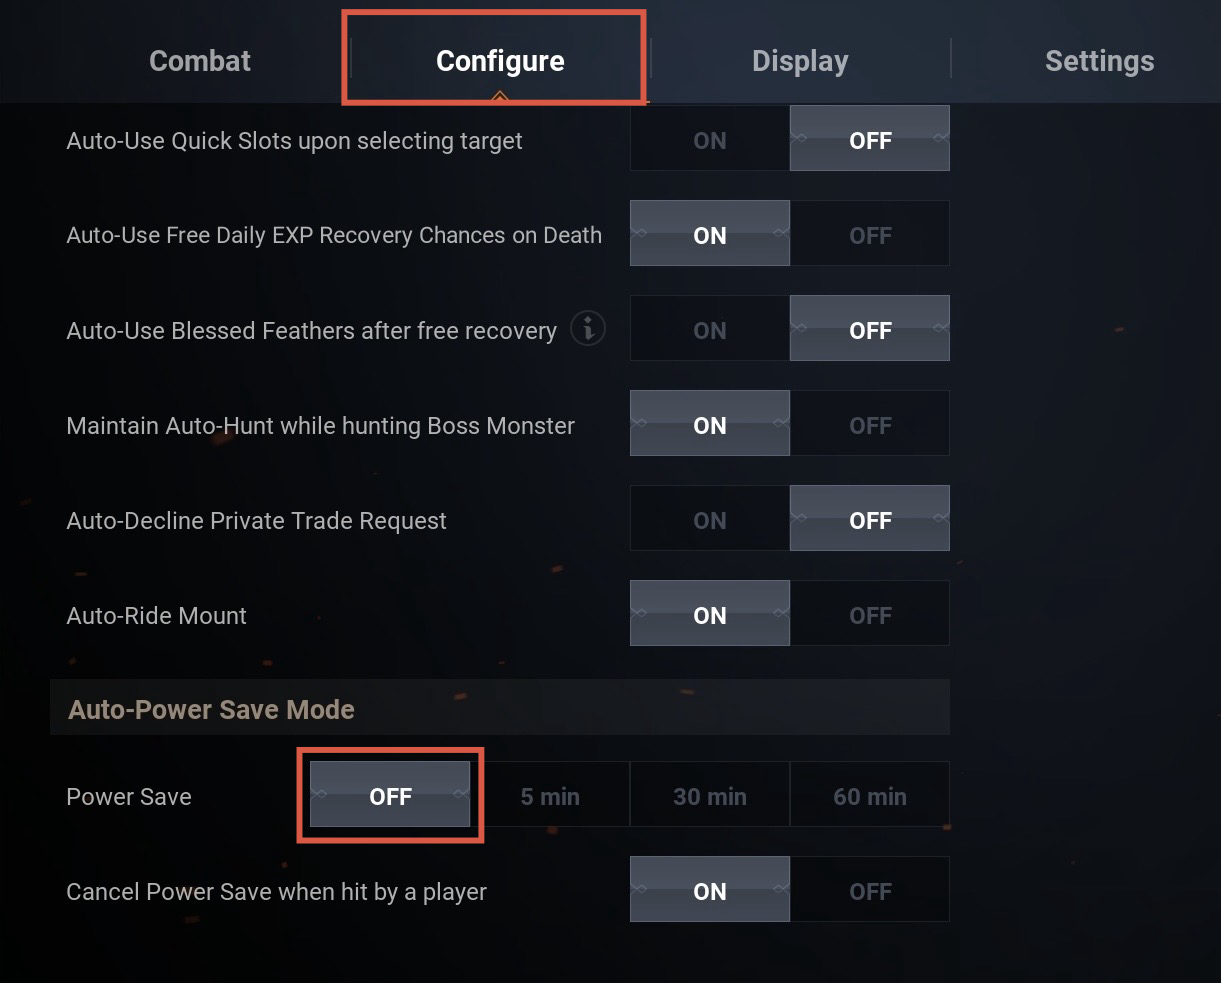
ปรับการพักหน้าจอออก เนื่องจาก บอทใช้วิธีดูหน้าจอ เหมือนกับผู้เล่นปกติ
Disable screen timeout / power saving mode as the bot uses screen recognition to play just like a normal player.
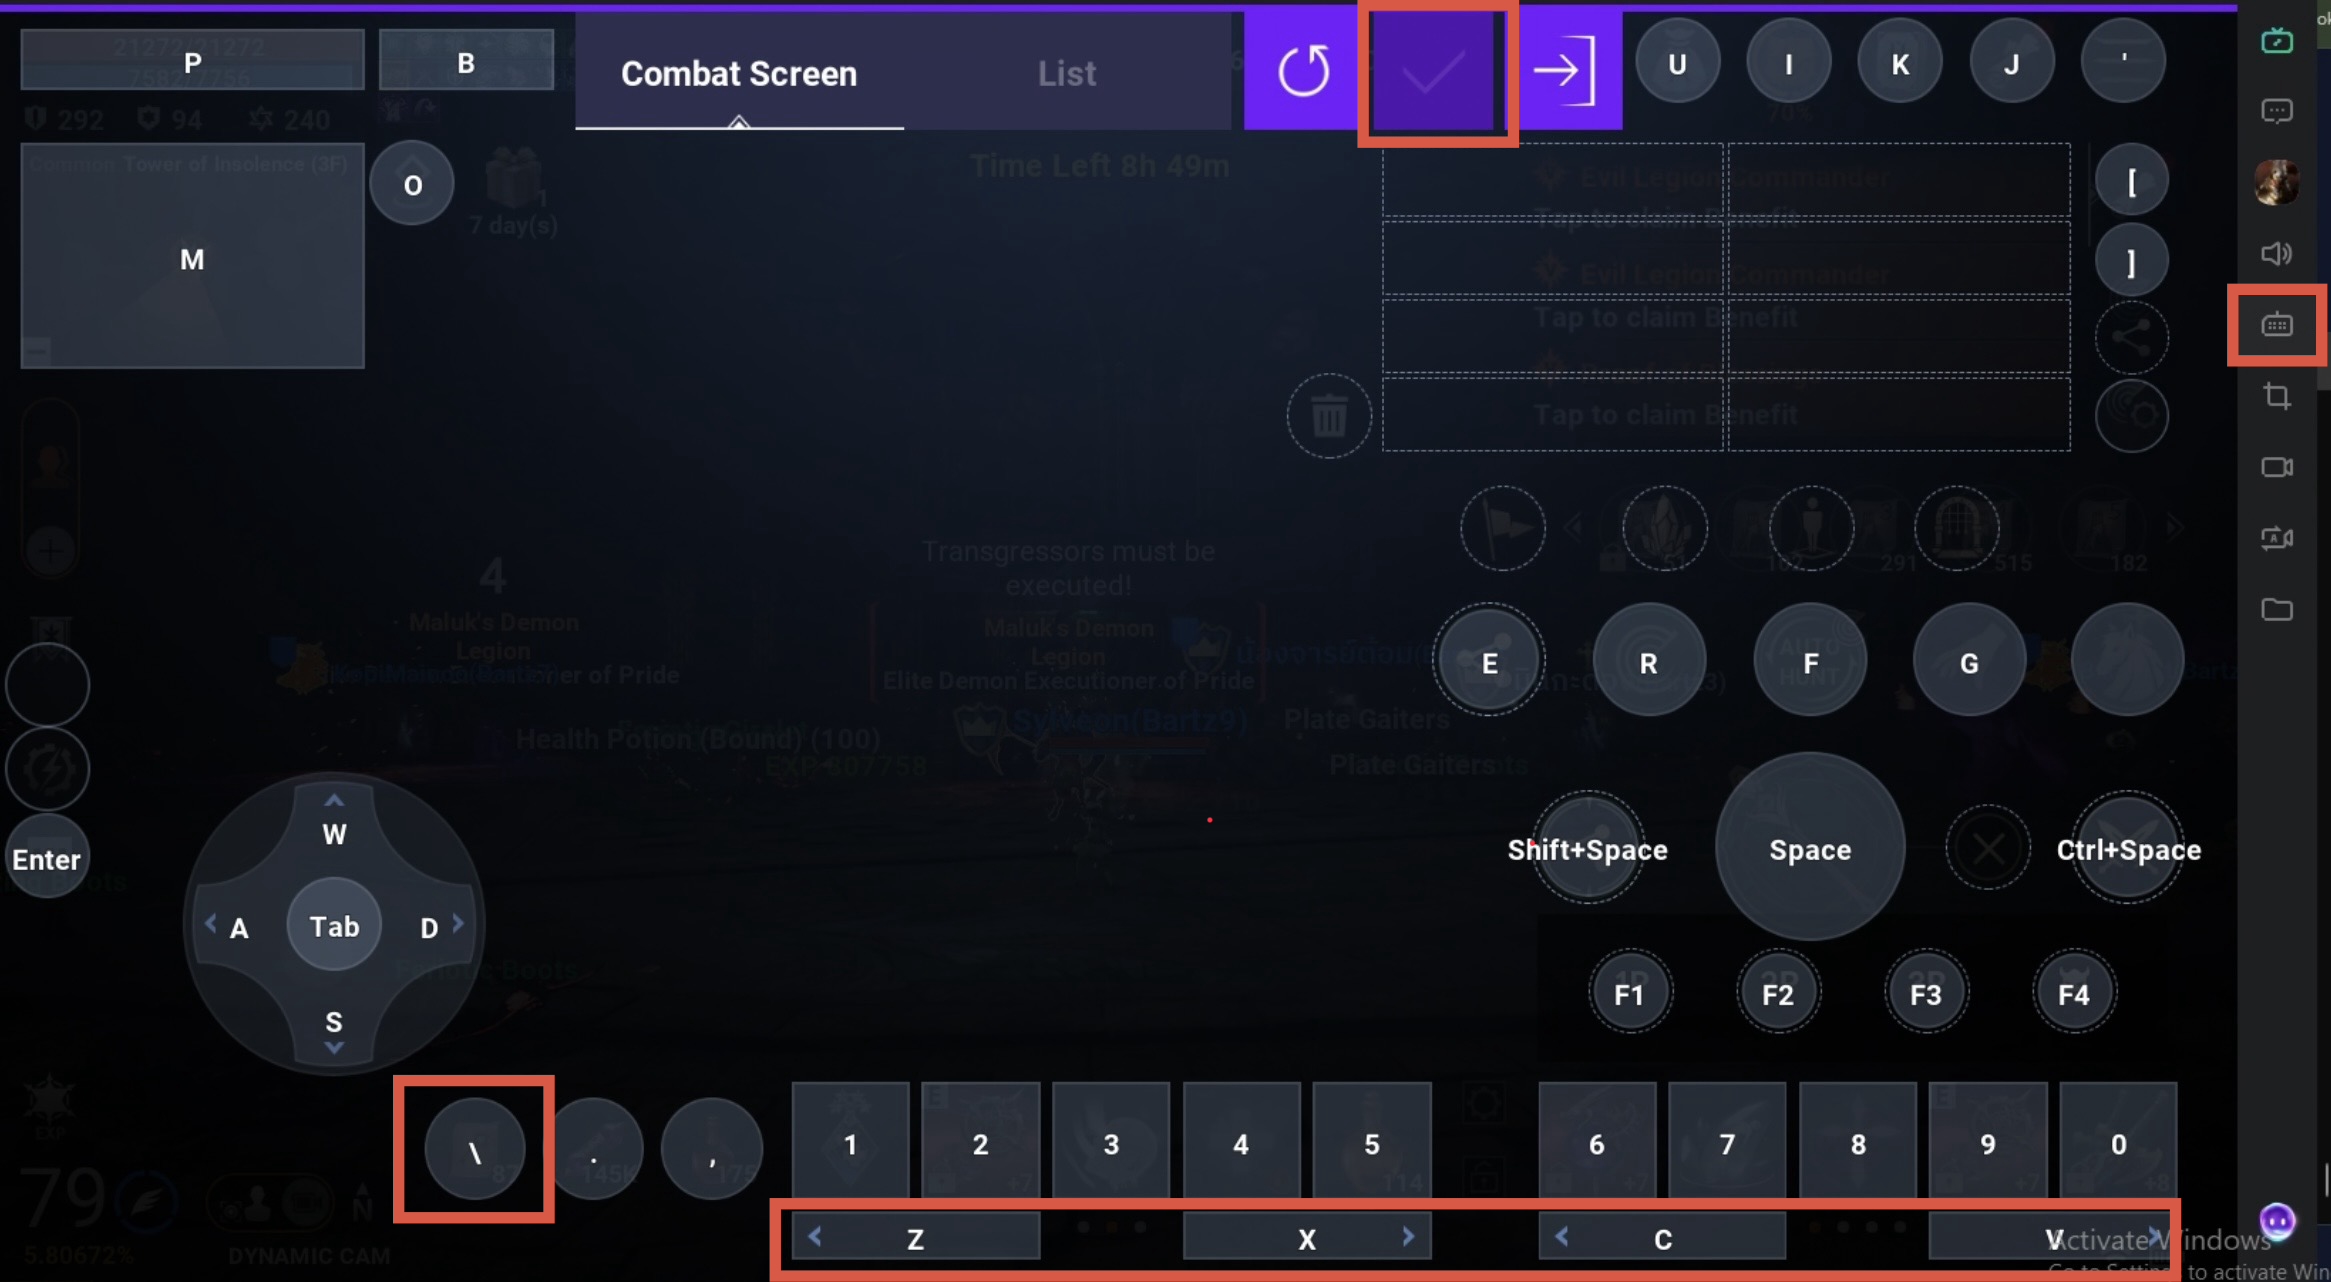
1.4 ⌨️ ตั้งค่าปุ่มกด (Key Bindings)
1.4 ⌨️ Key Bindings
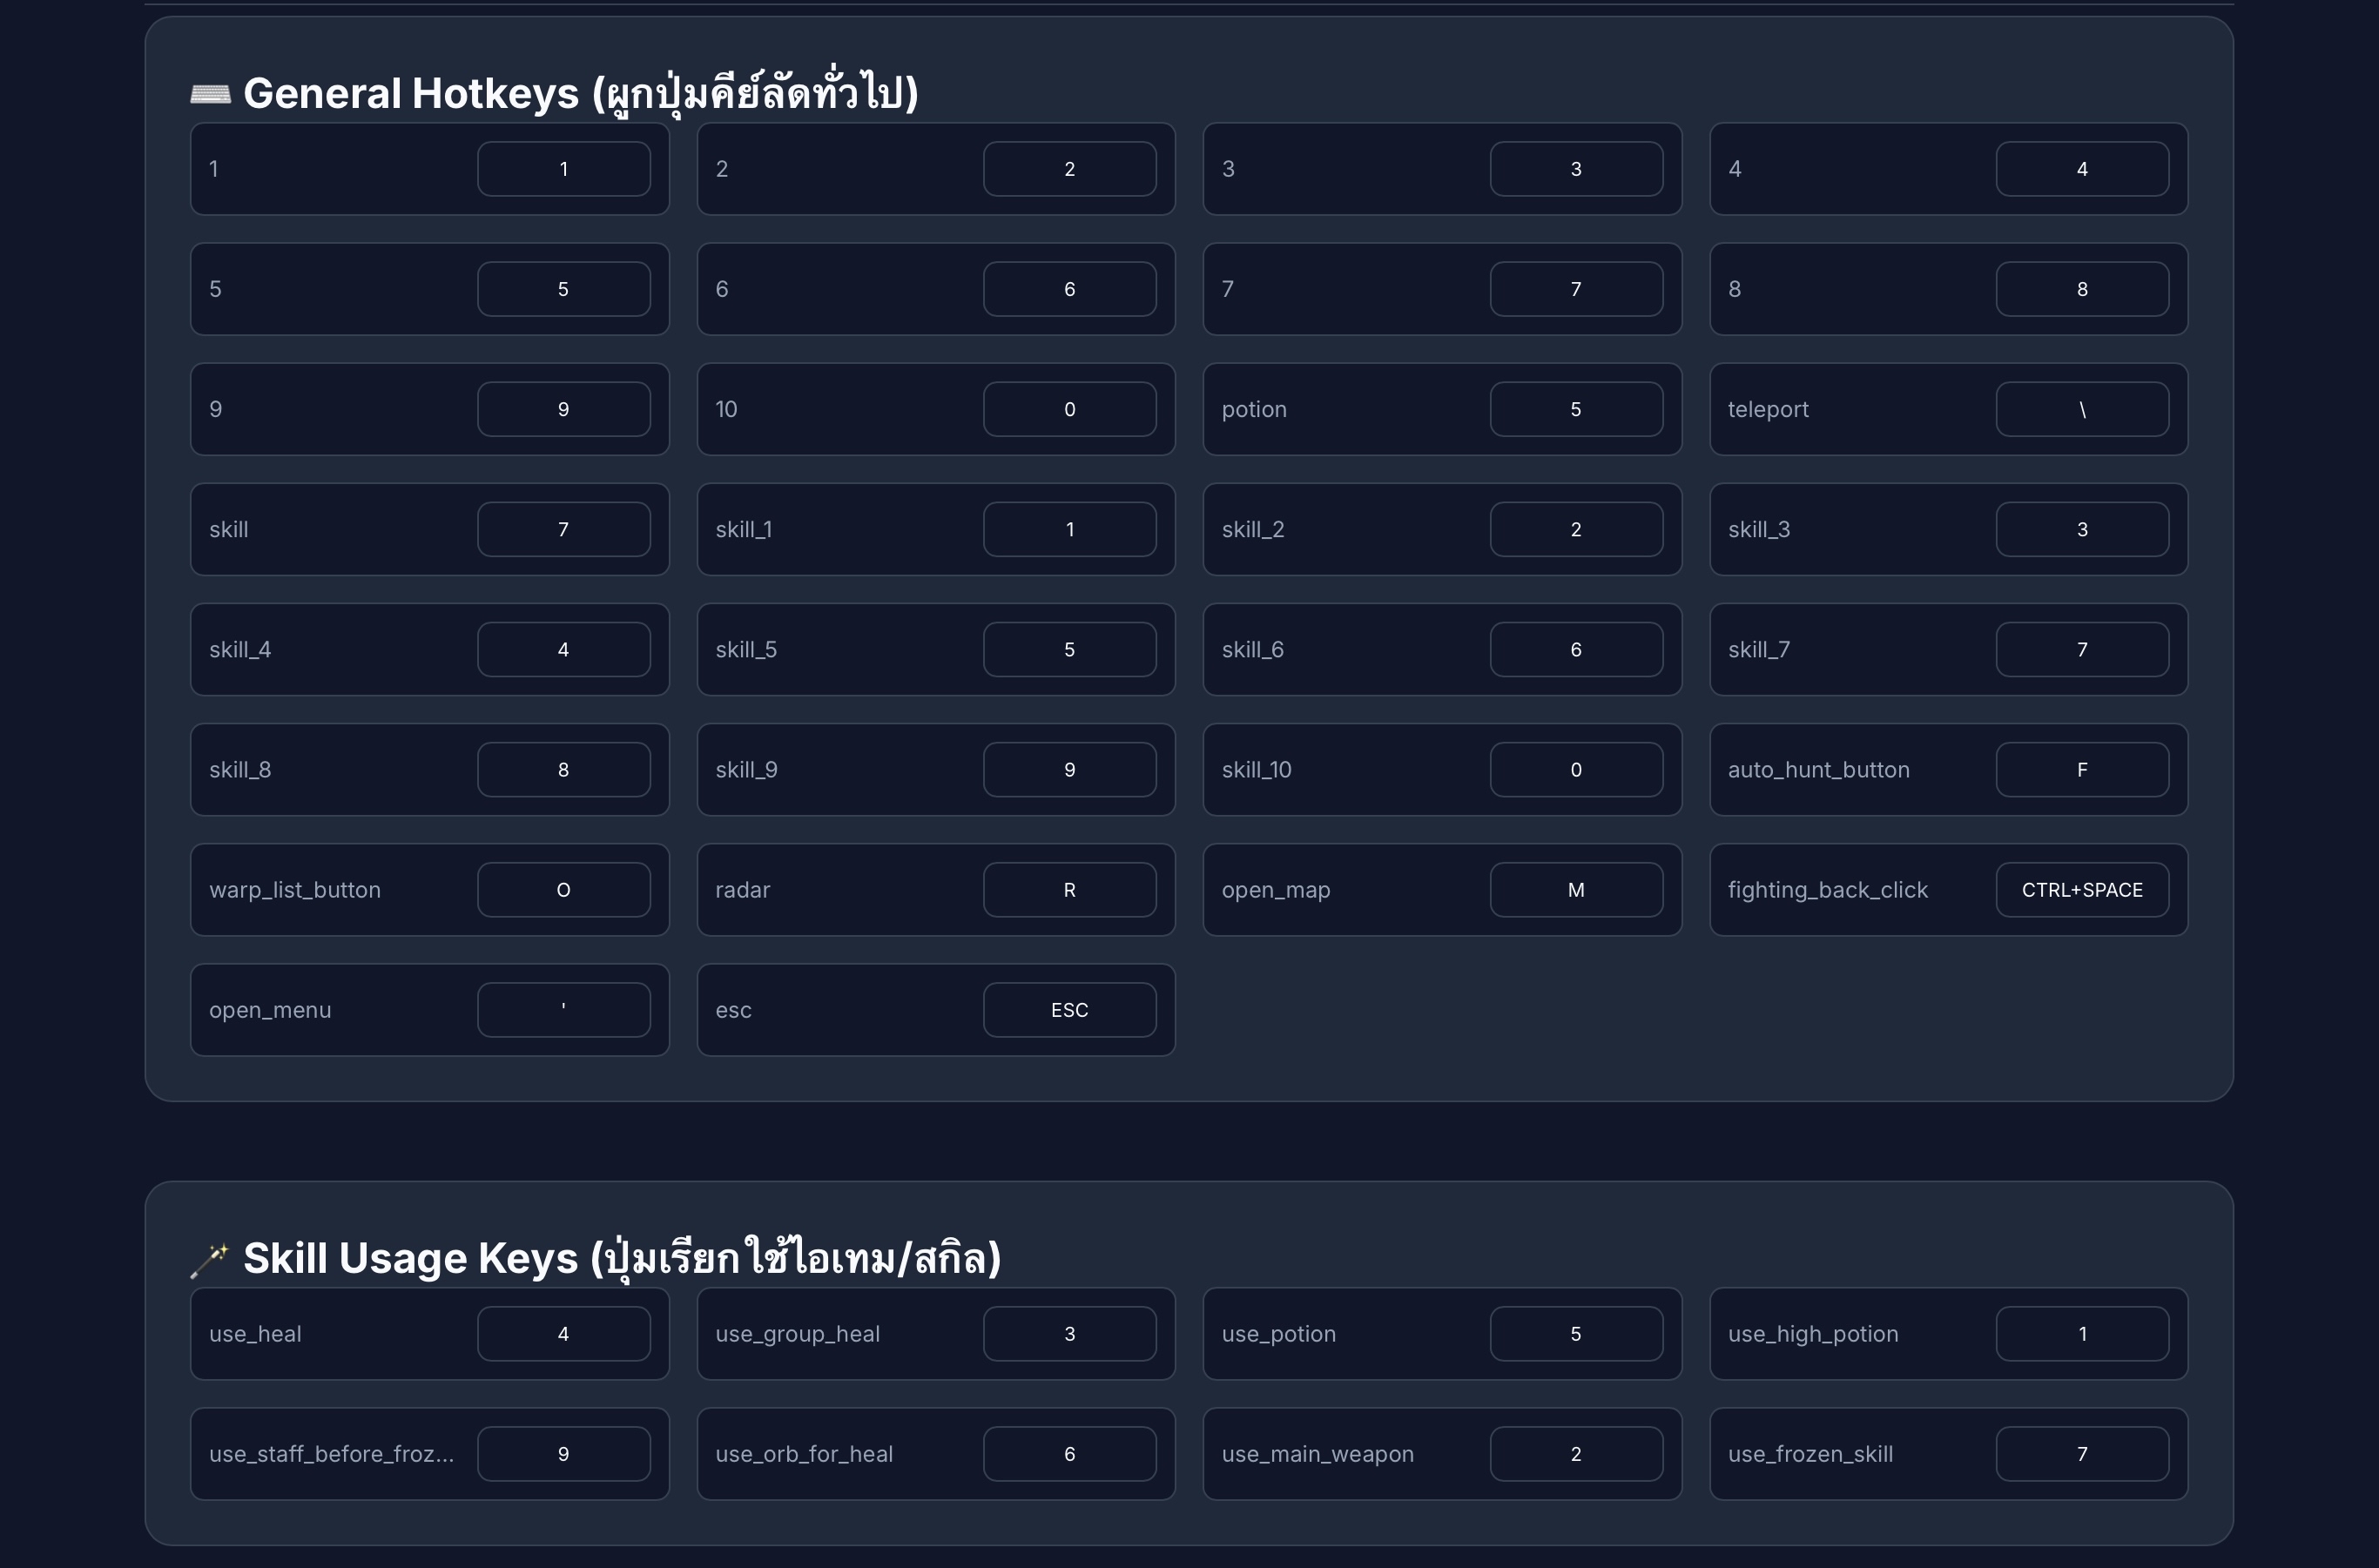
ปรับเพิ่ม Key ที่สำคัญ โดยค่าเริ่มต้น (Default) จะเป็นไปตามรูปภาพ แต่คุณสามารถปรับแต่งเองได้ภายหลังในหน้า Config Editor
Configure essential keys. Default settings are shown above, but you can customize them later in the Config Editor.
1.5 🎒 การวางไอเทมฟาร์ม
1.5 🎒 Item Layout
การวาง Item สำหรับการฟาร์ม โดยค่าเริ่มต้นจะจัดตามรูปภาพ หากต้องการเปลี่ยนตำแหน่งสามารถปรับได้ในหน้า Config Editor
Arrange farming items as shown. Default placement is recommended, but customization is available in the Config Editor.

- 🧪 ขวดยาใหญ่ (High Potion): สามารถให้บอท auto ใช้ได้ตอน HP ต่ำกว่า 30%
- ⚔️ อาวุธหลักของตัวละคร (Main Weapon)
- 🛡️ ฮีลหมู่ (Group Heal)
- 🩹 ฮีลธรรมดา (Single Heal)
- 🟠 ยาส้ม / หรือยาขาว (Orange/White Potion): บอทสามารถ auto ใช้เองได้ตอน HP ต่ำกว่า 71%
- 🔮 Orb: เพื่อไว้ใช้ฮีล (ฮีลเดี่ยว/ฮีลหมู่)
- ❄️ สกิลแช่แข็ง (Frozen Skill)
- ✨ สกิลรักษา (Cure): ไว้ใช้แก้ตอนที่โดนตาบอด (Blind/Poison)
- 🪄 คทา (Staff): ใช้สำหรับเปลี่ยนมาใช้แช่แข็งตัวเองเวลาหนี (Frozen Escape)
- 🗡️ ดาบคู่ (Dual Blades): ใช้สำหรับสลับเพื่อบัฟตัวเอง (Skill Rotation)
- 🧪 High Potion: Auto-used by bot when HP falls below 30%.
- ⚔️ Character Main Weapon
- 🛡️ Group Heal Skill
- 🩹 Single Heal Skill
- 🟠 Orange / White Potion: Auto-used by bot when HP falls below 71%.
- 🔮 Orb Weapon: Equipped to cast healing spells.
- ❄️ Frozen Skill: Self-freeze utility for emergency escapes.
- ✨ Cure Skill: Used to cure Blind/Poison debuffs.
- 🪄 Staff Weapon: Swapped to cast the self-freeze skill.
- 🗡️ Dual Blades Weapon: Swapped to cast self-buff skills (Skill Rotation).
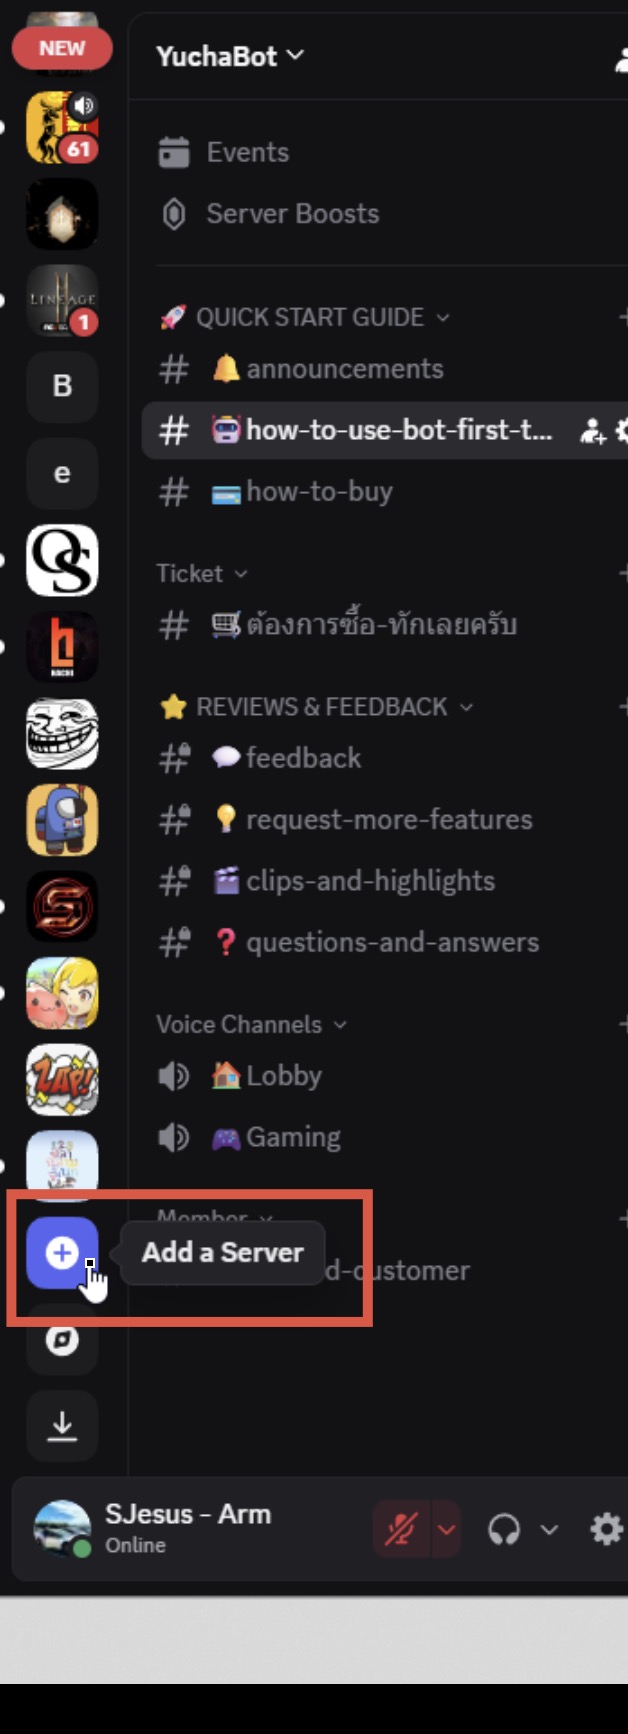
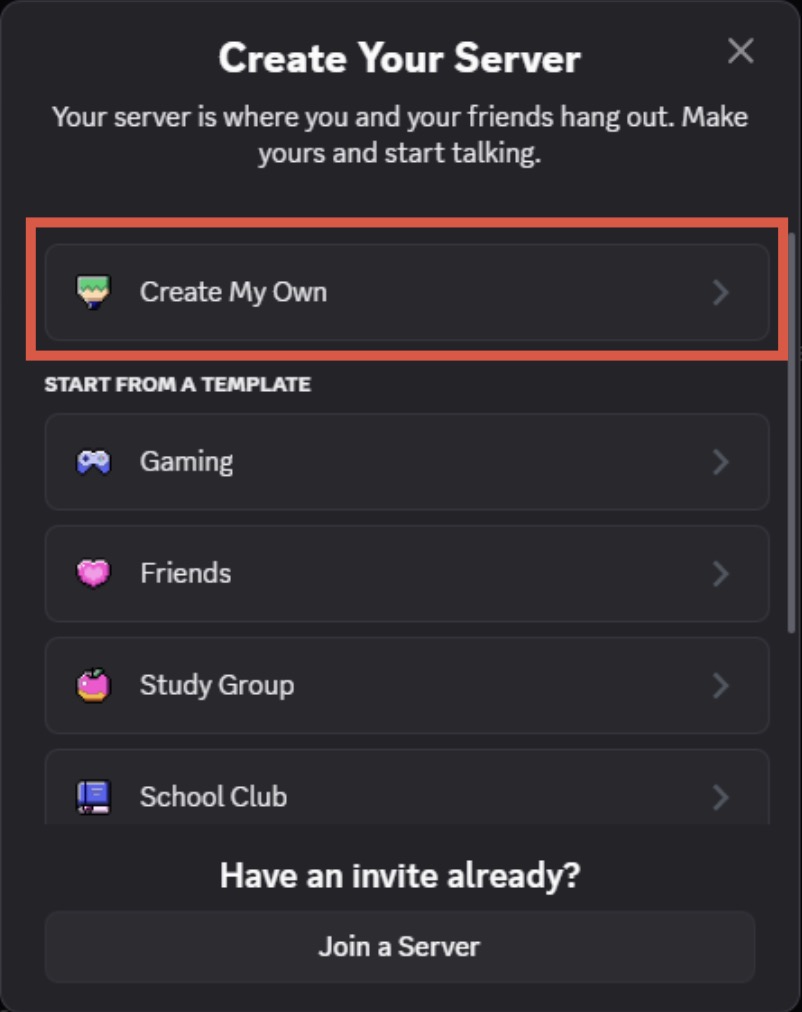
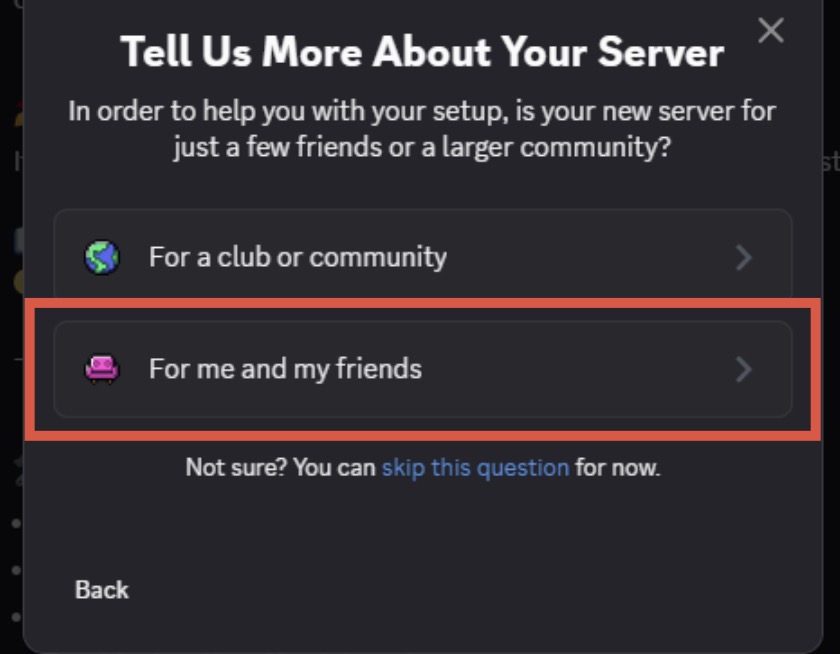
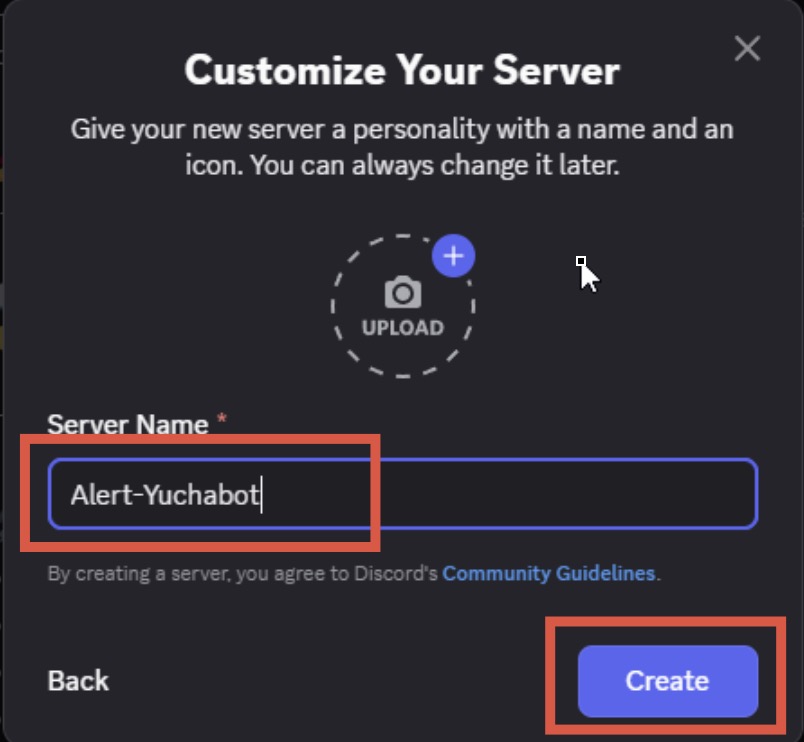
ข้อ 2. 🚀 การเปิดใช้งาน Yuchabot
Step 2. 🚀 Activating Yuchabot
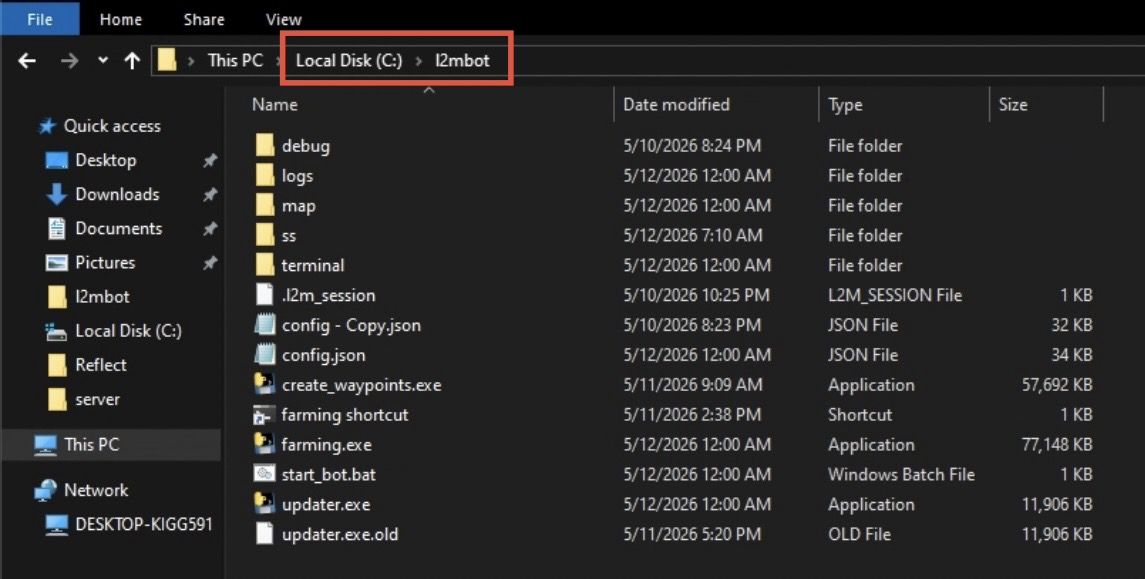
2.1 📂 การจัดวางโฟลเดอร์
2.1 📂 Folder Placement
แตกไฟล์ Zip ที่ดาวน์โหลดมา แล้วนำโฟลเดอร์ l2mbot ไปวางไว้ที่ Drive C: เพื่อความเสถียรในการทำงาน
Extract the downloaded Zip file and move the l2mbot folder to Drive C: for optimal stability.
2.2 ⚡ เริ่มต้นการทำงาน (Startup)
2.2 ⚡ Starting the Bot
ดับเบิลคลิกไฟล์ start_bot.bat จะมีหน้าต่าง Console ปรากฏขึ้นมาให้ใส่ Username / Password (หากต้องการทดสอบแบบ Guest ให้กด Enter ข้ามได้ทันที)
Double-click start_bot.bat. A console window will appear; enter your credentials or simply press Enter to use as a Guest.
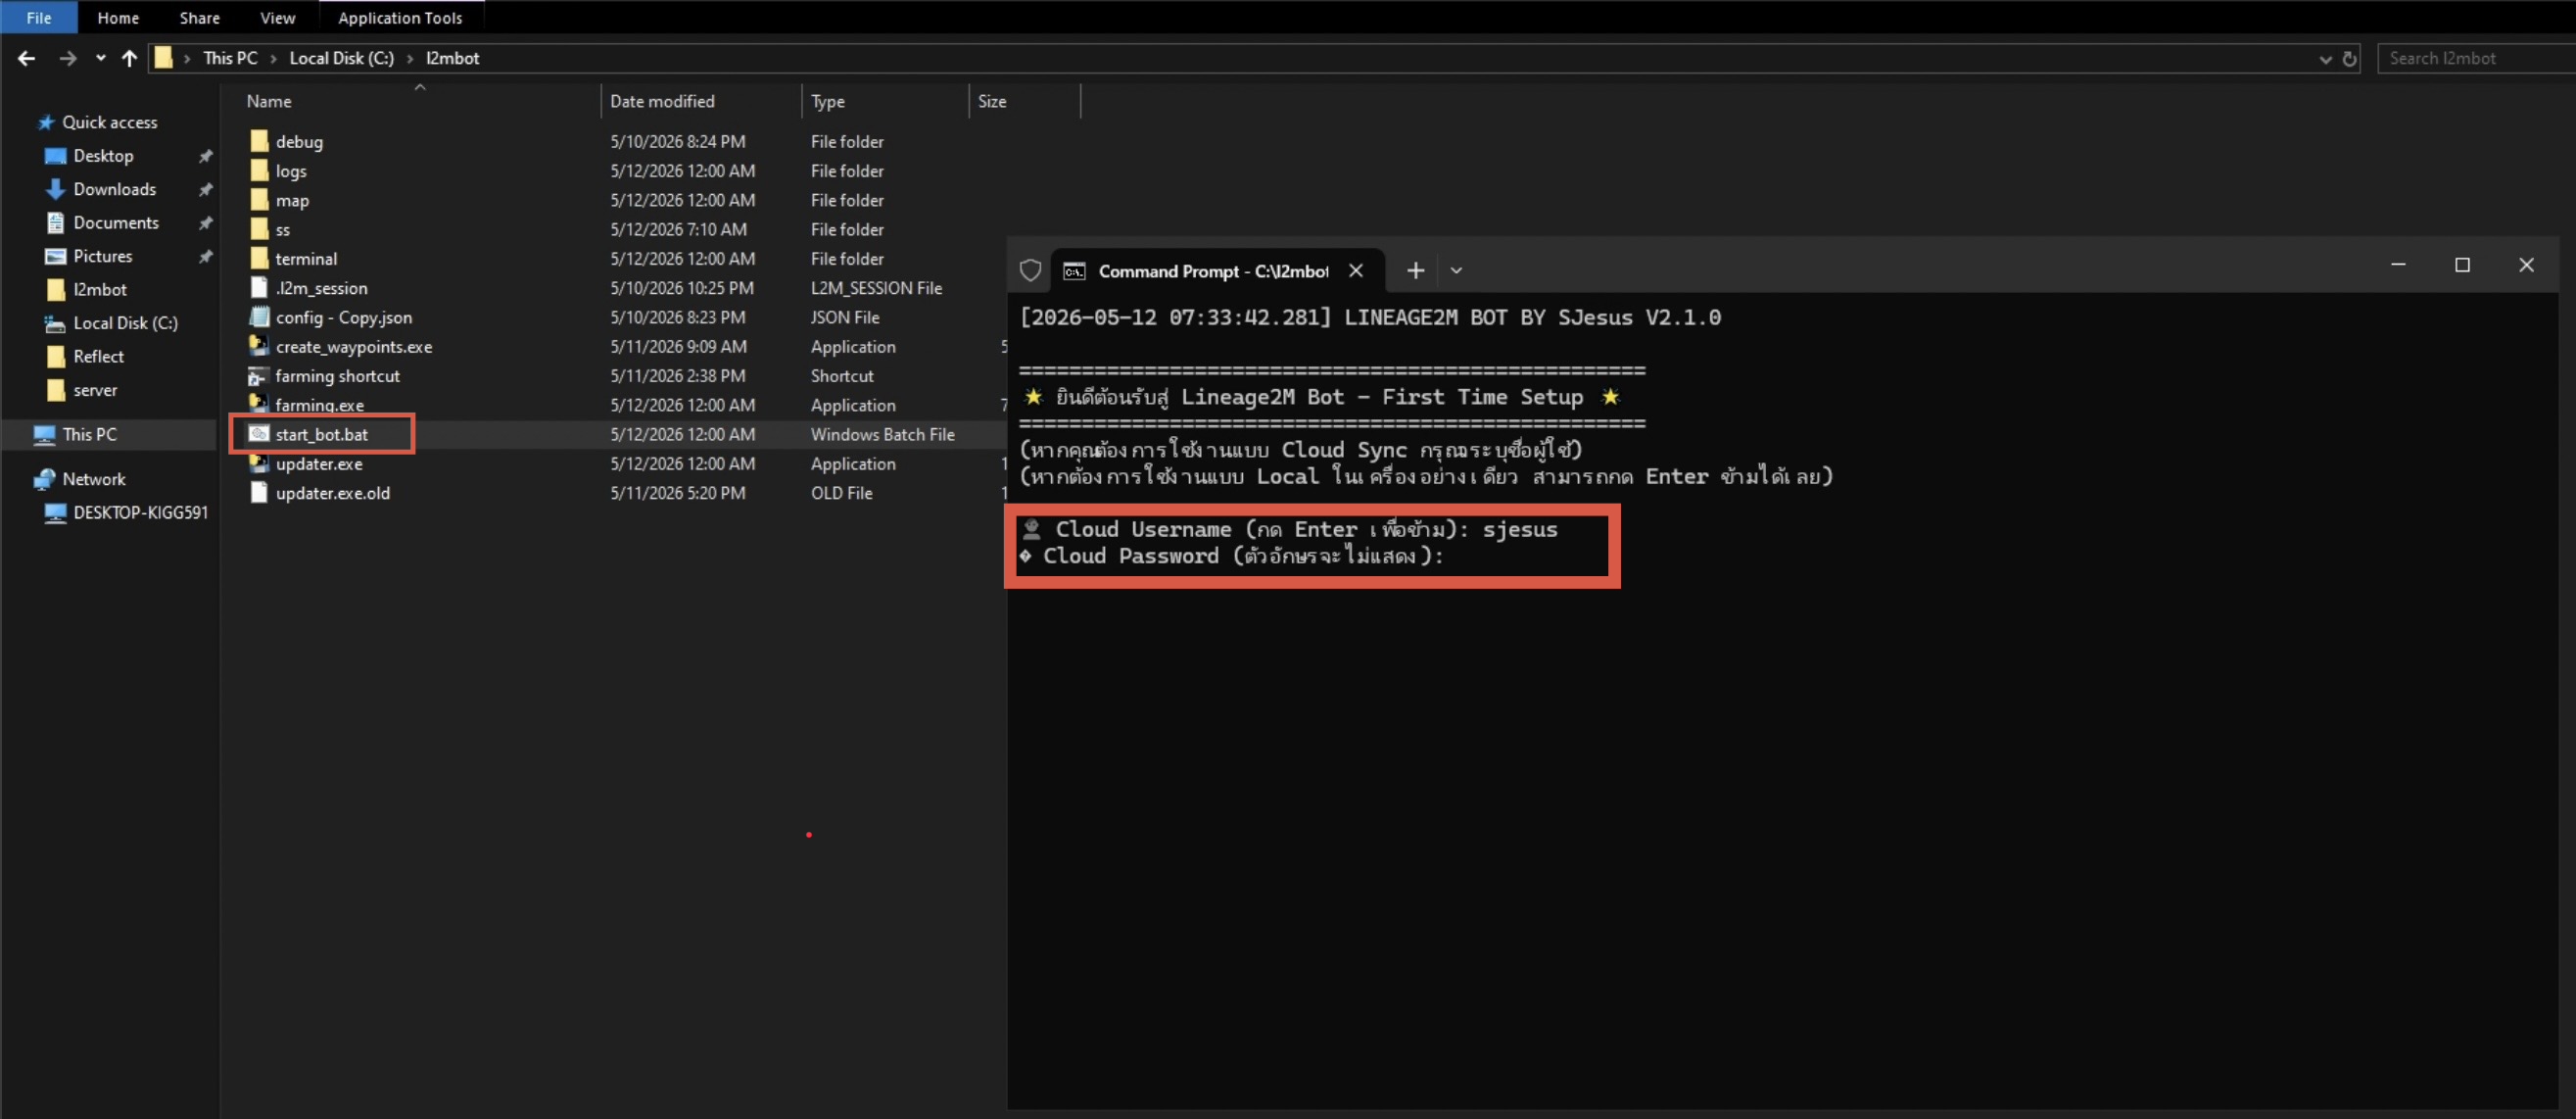
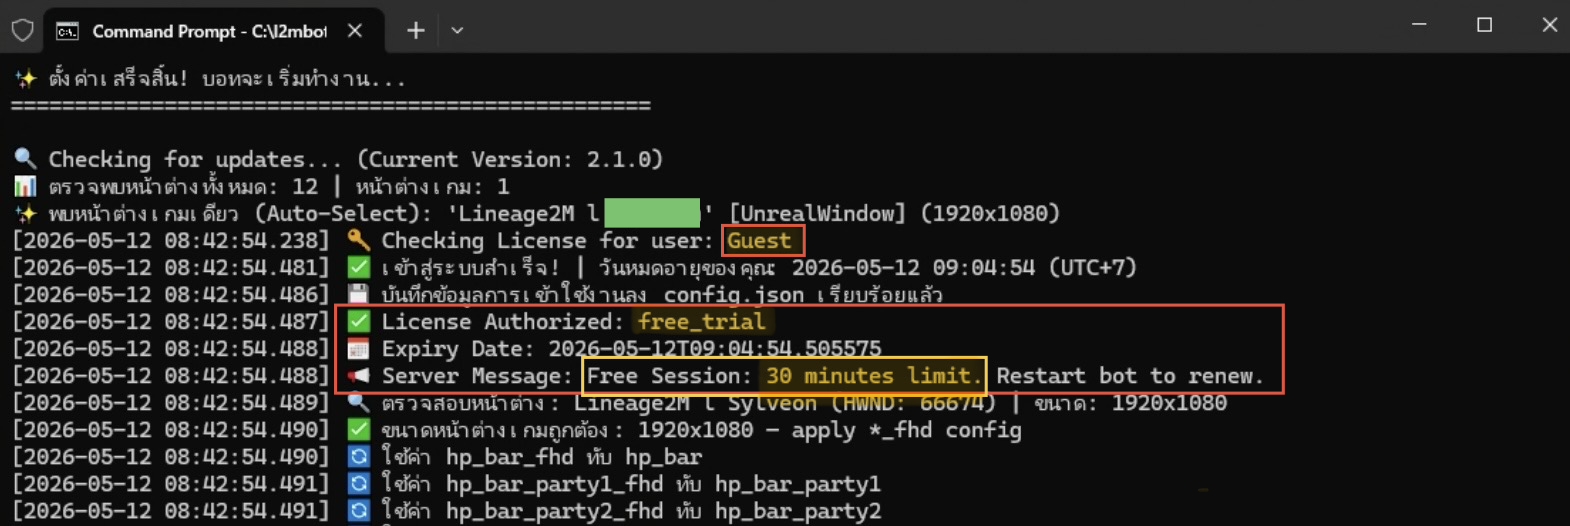
2.3 👤 การใช้งานแบบ Guest
2.3 👤 Guest Access
หากเข้าใช้งานโดยไม่มี Username / Password ระบบจะให้ทดลองใช้งานได้ 30 นาที (เมื่อหมดเวลา สามารถปิด-เปิดใหม่เพื่อรับ 30 นาทีได้ทุกครั้ง)
Guest mode allows 30 minutes of usage. You can restart the bot to refresh this session anytime.
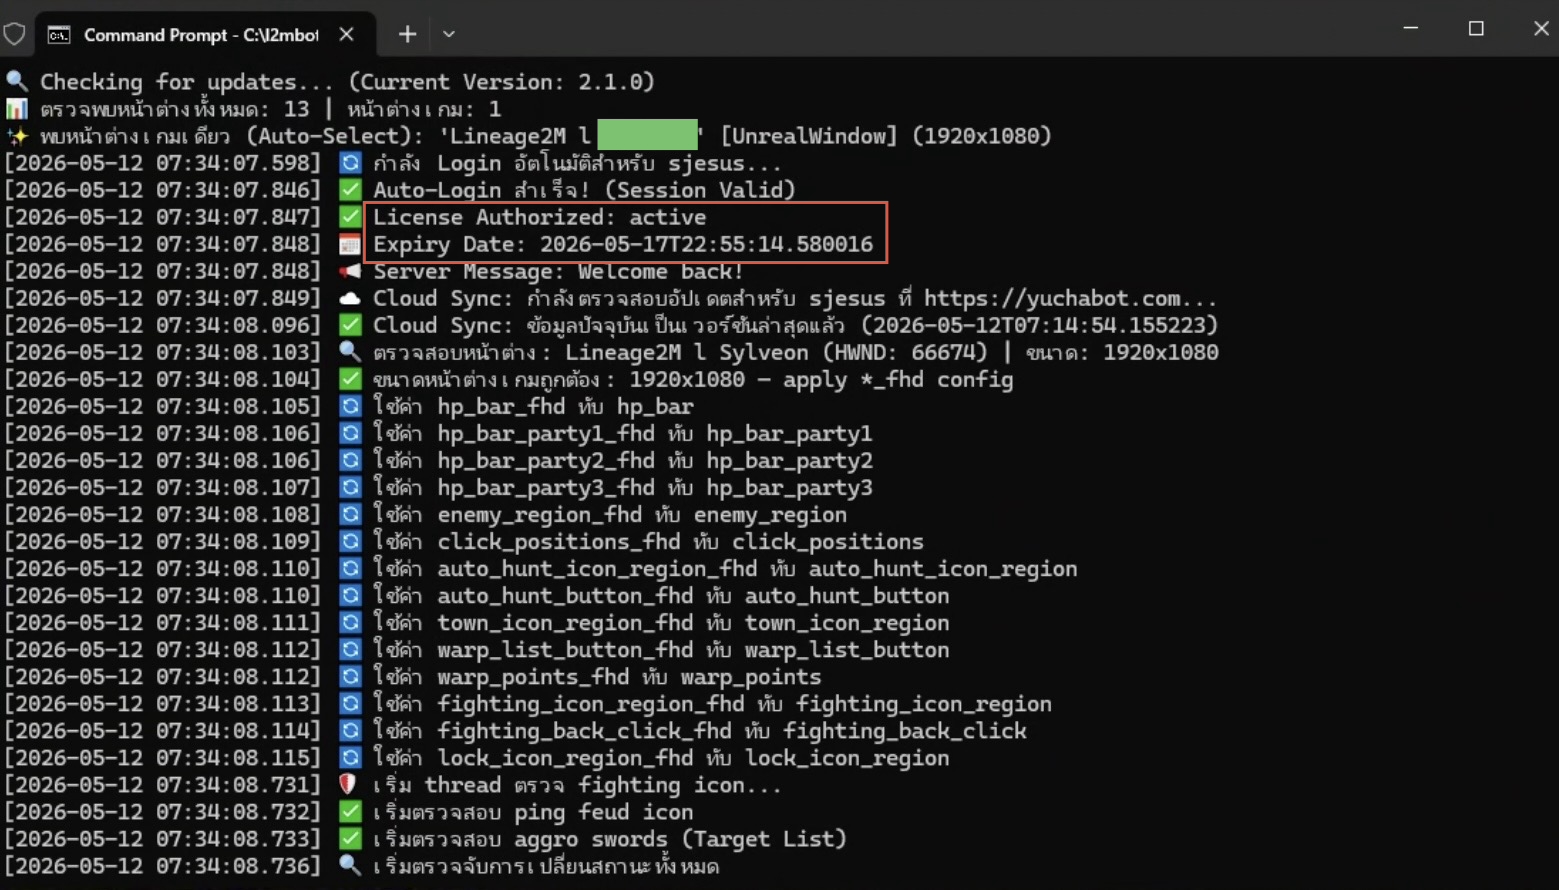
2.4 ☁️ การใช้งานแบบสมาชิก (Cloud Sync)
2.4 ☁️ User Account (Cloud Sync)
หากเข้าใช้งานด้วย Username / Password ระบบจะทำการดึงข้อมูลส่วนตัวมาจาก Cloud ทั้งเวลาการใช้งานคงเหลือ และค่า Config ส่วนตัวที่คุณตั้งไว้
Logging in with credentials will synchronize your personal settings and remaining license hours from the Cloud.
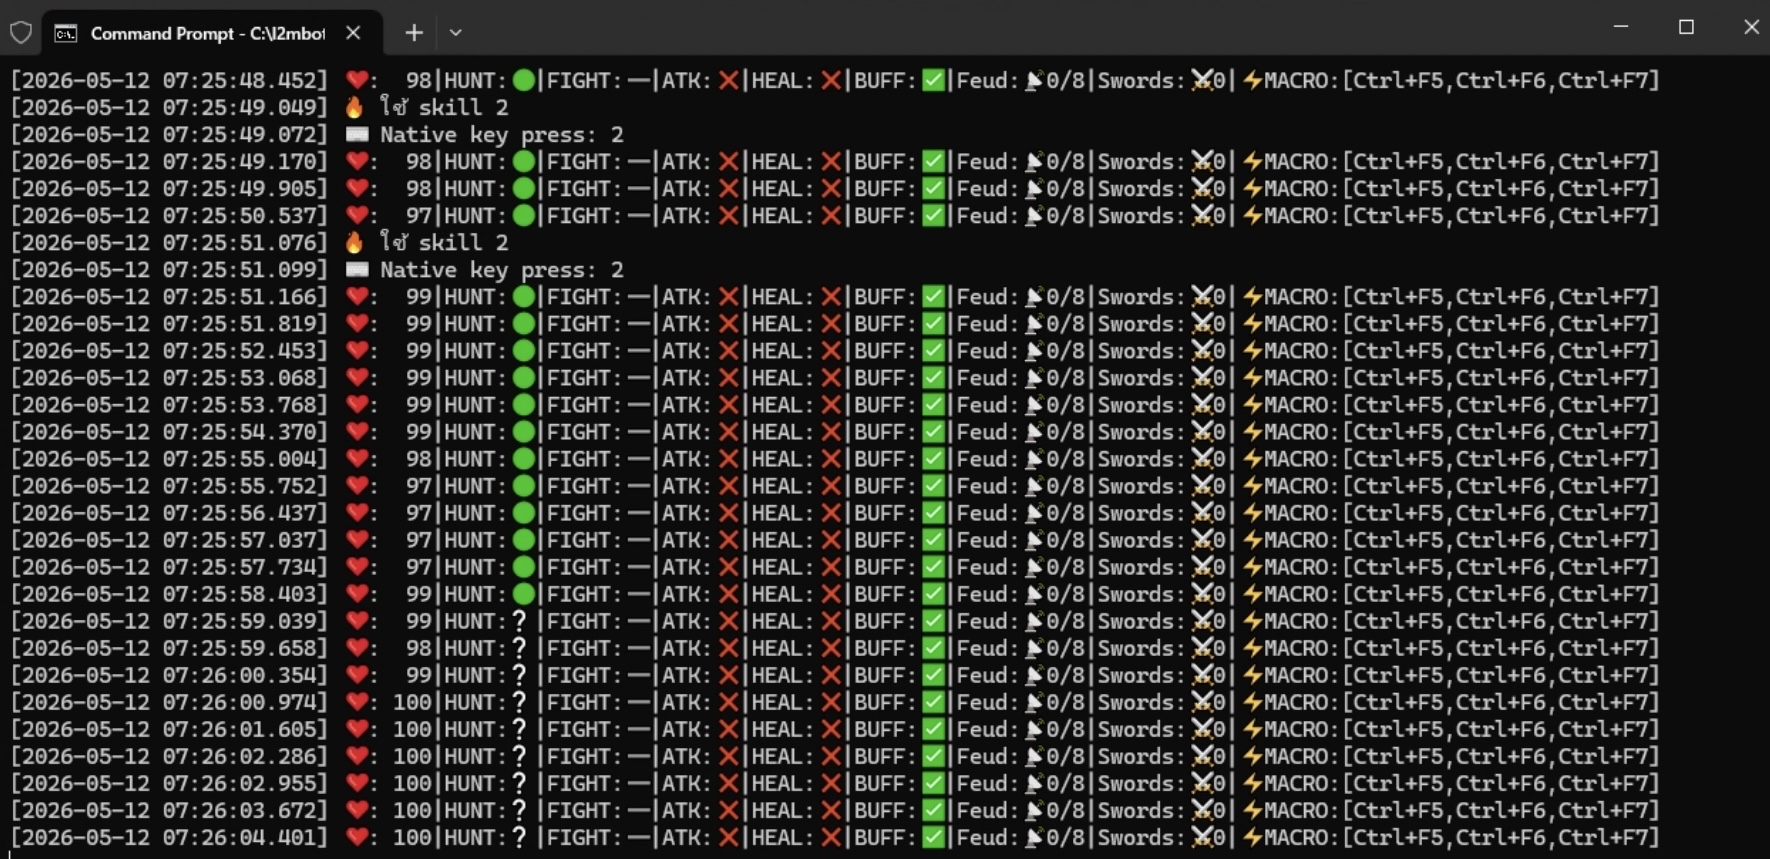
2.5 📊 แดชบอร์ดการทำงาน
2.5 📊 Dashboard Overview
- ❤️ HP: ปริมาณเลือดปัจจุบันของตัวละคร
- ⚔️ Fight: สถานะการต่อสู้ (Fighting)
- 🔥 ATK: ระบบตั้งตีสวนกลับอัตโนมัติ
- 💚 HEAL: สถานะการใช้สกิลฮีล (สาย Orb)
- 👤 Feud: ตรวจจับศัตรู/ตาแดงในพื้นที่
- 🗡️ Sword: จำนวนมอนสเตอร์ที่กำลังโจมตีเราอยู่
- ⚙️ MACRO: รายชื่อ Macro ที่กำลังเปิดใช้งานอยู่
- ❤️ HP: Current Character Health Point
- ⚔️ Fight: Combat status (Fighting)
- 🔥 ATK: Auto Counter-attack system
- 💚 HEAL: Auto-heal skill status (Orb class)
- 👤 Feud: Detected enemies/red names in area
- 🗡️ Sword: Count of monsters attacking you
- ⚙️ MACRO: List of currently active macros
ข้อ 3. ☁️ การจัดการระบบ Cloud Sync
Step 3. ☁️ Cloud Sync & Account Management
3.1 🔑 การลงทะเบียนและเข้าสู่ระบบ
3.1 🔑 Registration & Login
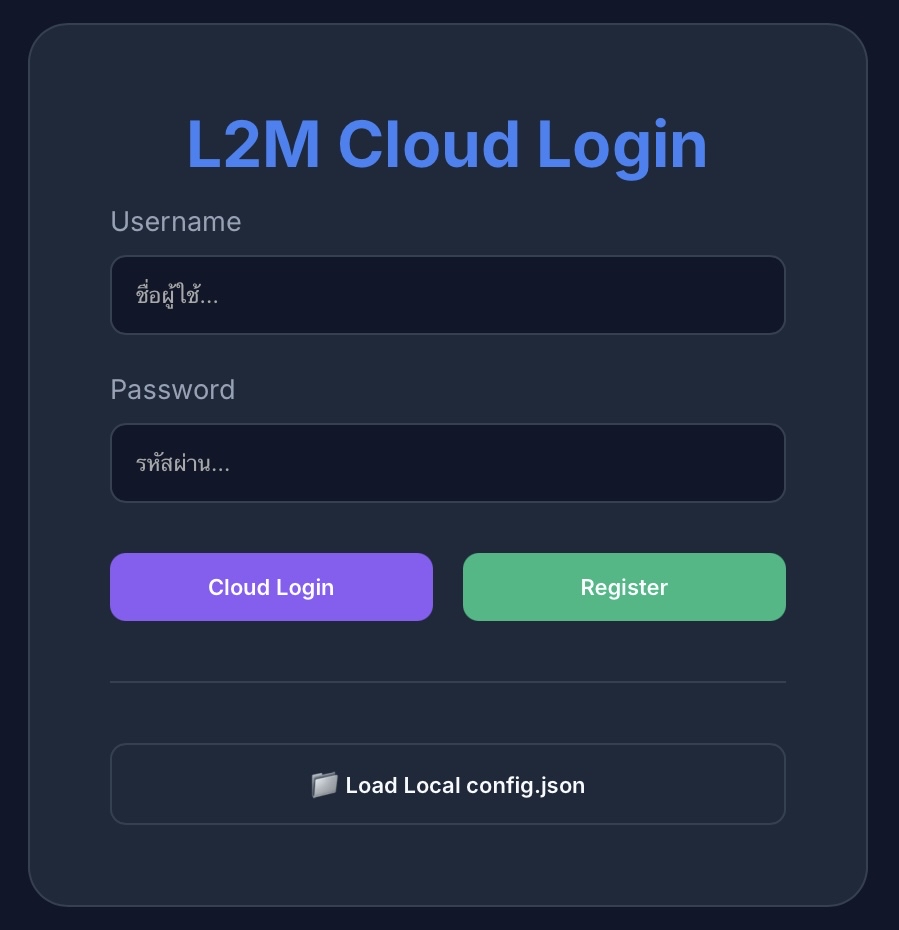
ในหน้า Login คุณสามารถตั้ง Username / Password ที่ต้องการ จากนั้นกดปุ่ม Register เพื่อสร้างบัญชี แล้วจึงกด Login เพื่อเข้าใช้งานครับ
On the Login screen, enter your desired Username / Password. Click Register to create your account, then click Login to proceed.
3.2 ⚙️ เมนูการตั้งค่าหลัก (Main Settings)
3.2 ⚙️ Main Settings Dashboard
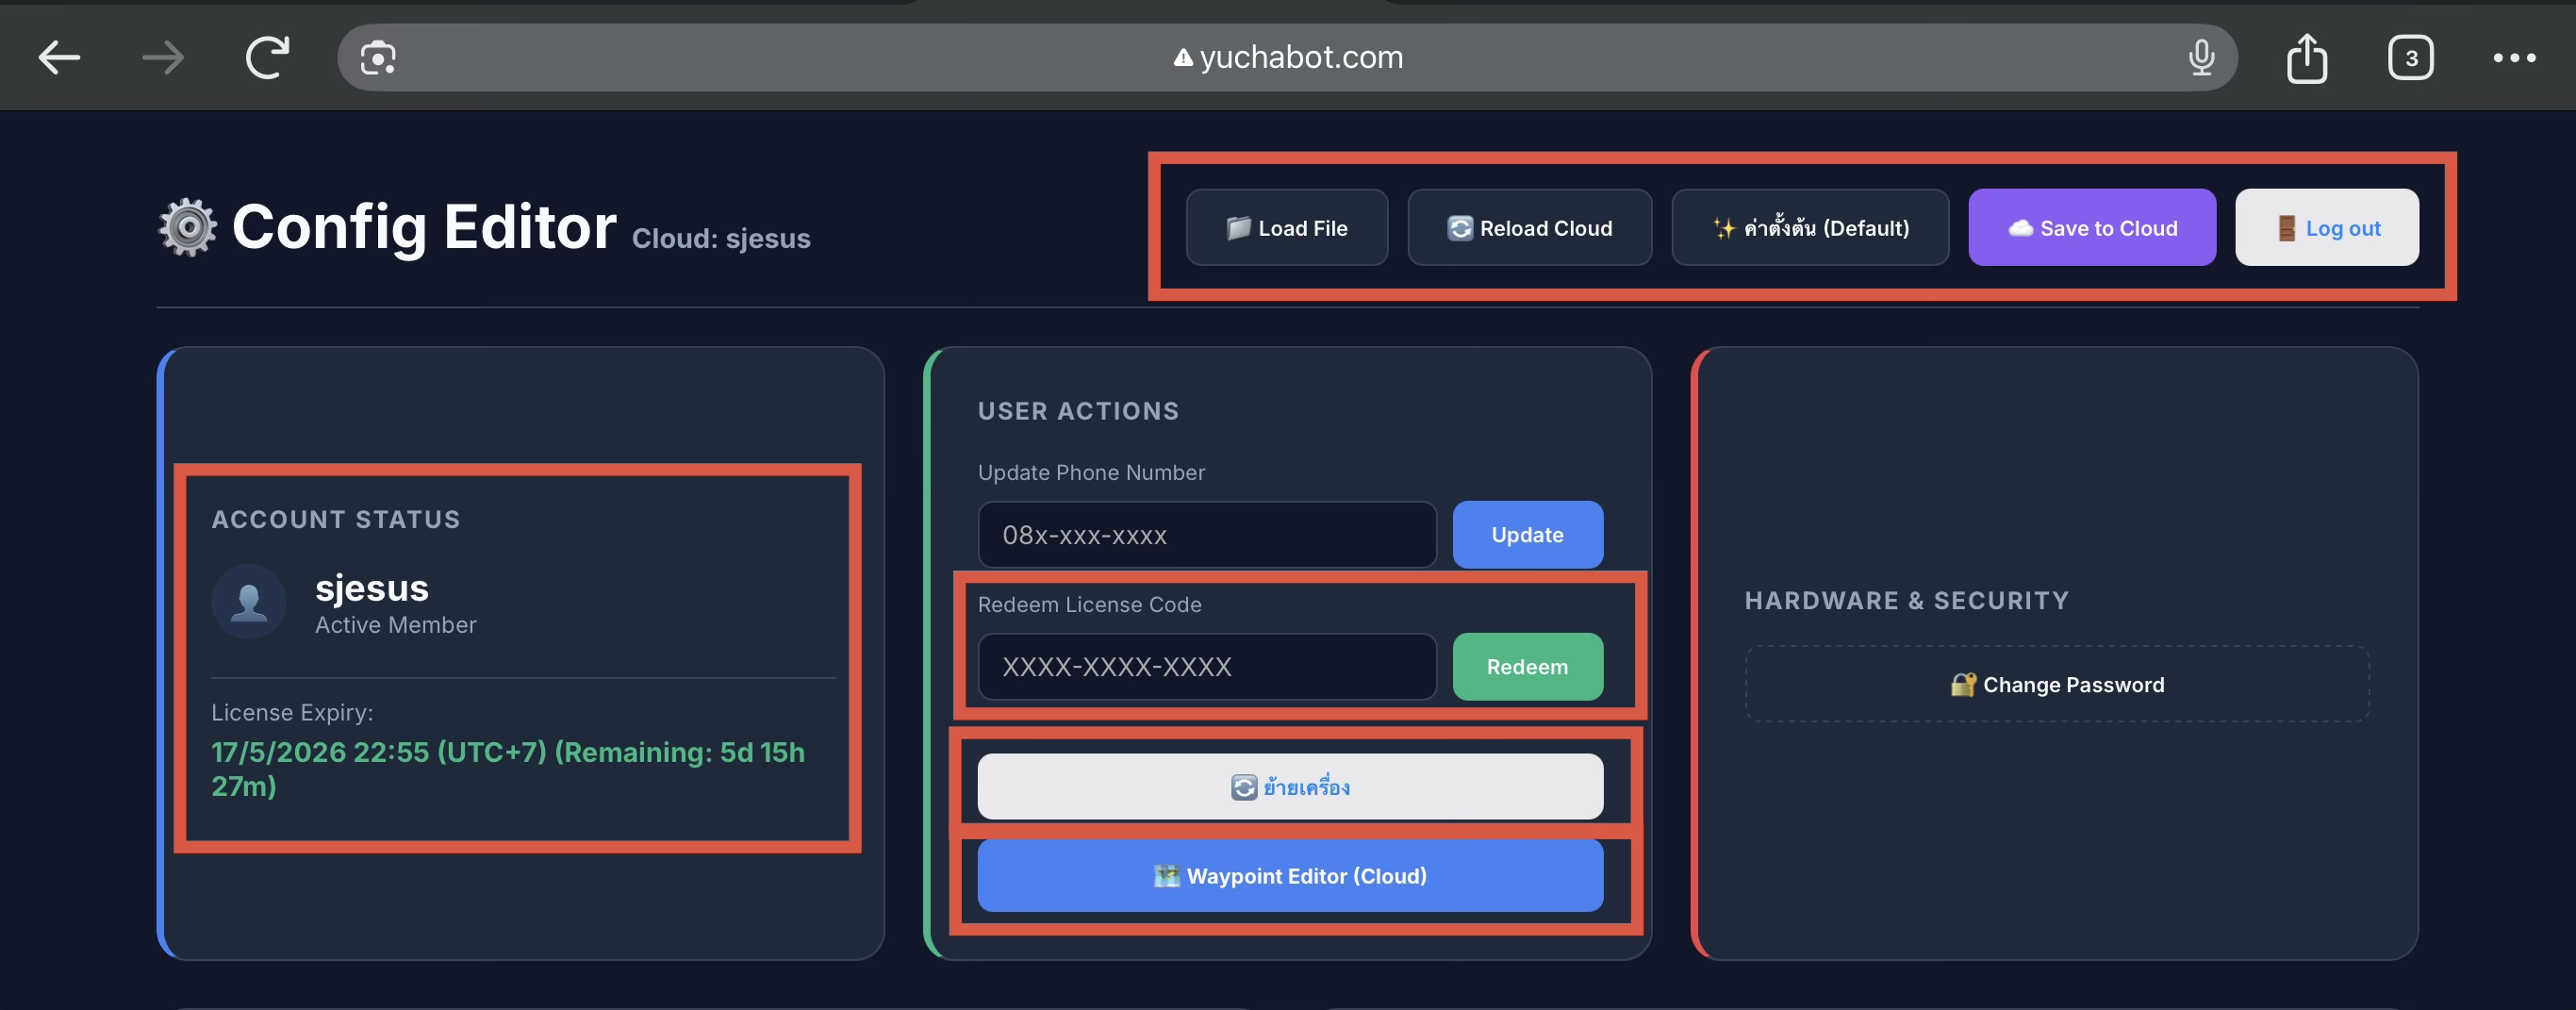
เมนูหลัก (Center & Sides)
- ซ้าย: แสดงชื่อผู้ใช้ และเวลาใช้งานคงเหลือ
- Redeem Code: สำหรับเติมวันใช้งานบอท
- ปุ่มสีขาว "ย้ายเครื่อง": ใช้สำหรับปลดล็อคเพื่อย้ายไปเปิดเครื่องอื่น
- Map Editor: เข้าสู่หน้าสร้างเส้นทางเดินฟาร์ม
- ขวา: สำหรับเปลี่ยนรหัสผ่าน (Change Password)
- Left: Shows Username and remaining bot time.
- Redeem Code: Enter codes to top-up bot hours.
- White Button "Transfer": Unlock account to use on another PC.
- Map Editor: Open the waypoint creation tool.
- Right: Change your account password.
แถบควบคุมบน (Top Bar)
- Load File: โหลด Config จากไฟล์ในเครื่อง
- Reload Cloud: ดึงค่าที่บันทึกไว้บน Cloud มาใช้
- ค่าตั้งต้น: รีเซ็ตค่าทั้งหมดเป็น Default
- Save to Cloud: บันทึก Config ปัจจุบันลง Cloud
- Log out: ออกจากระบบ
- Load File: Load config from local JSON file.
- Reload Cloud: Refresh settings from Cloud.
- Default: Reset all parameters to initial state.
- Save to Cloud: Sync current settings to Cloud.
- Log out: Sign out of account.
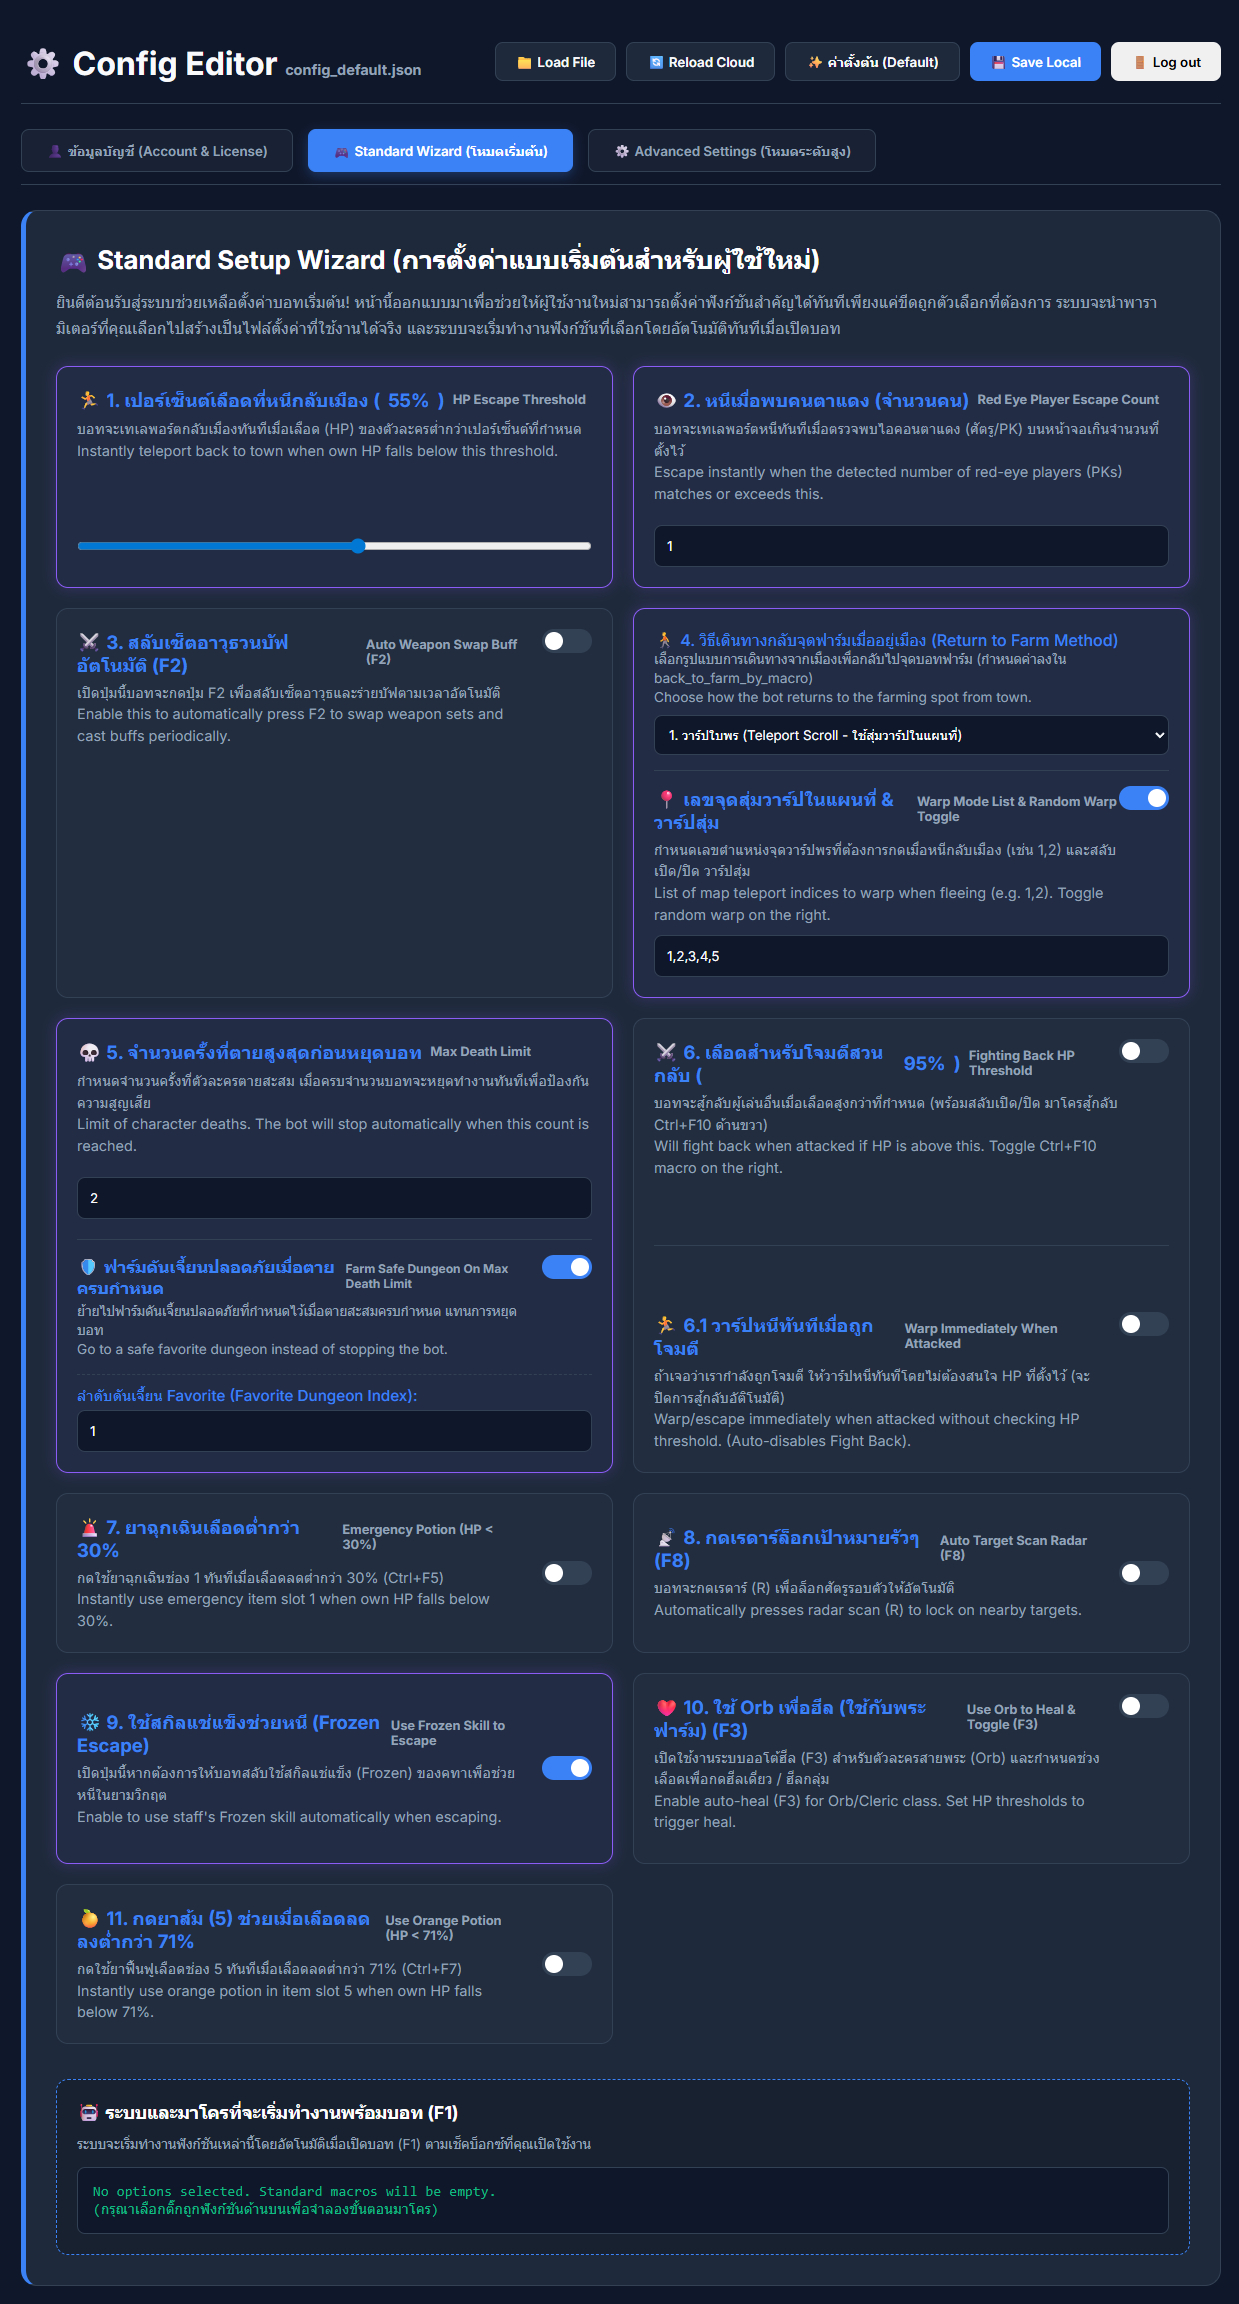
3.2.1 🧙♂️ Standard Wizard
3.2.1 🧙♂️ Standard Wizard
⚠️ ให้ทำการตั้งค่า (Setup) รายละเอียดระบบตามที่ต้องการในแต่ละหัวข้อ ซึ่งการทำงานของบอทจะเป็นไปตามการตั้งค่าในหน้านี้เป็นหลัก โดยเมื่อเปิดบอทขึ้นมา บอทจะทำงานตามที่เราตั้งค่าไว้นี้ทันที และหากต้องการปิดการทำงานบอท ให้กดปุ่ม F1 และถ้าต้องการเปิดการทำงานใหม่อีกครั้ง ให้กดปุ่ม F1 เช่นเดียวกันเพื่อสลับ ปิด/เปิด
⚠️ Please configure the settings according to your needs in each section, as the bot's operations will be primarily driven by the setup on this page. Once the bot is started, it will run based on these settings immediately. If you want to disable/pause the bot, press F1, and if you want to enable/resume, press F1 again to toggle Off/On.
3.3 🗺️ ระบบสร้างเส้นทาง (Map Editor)
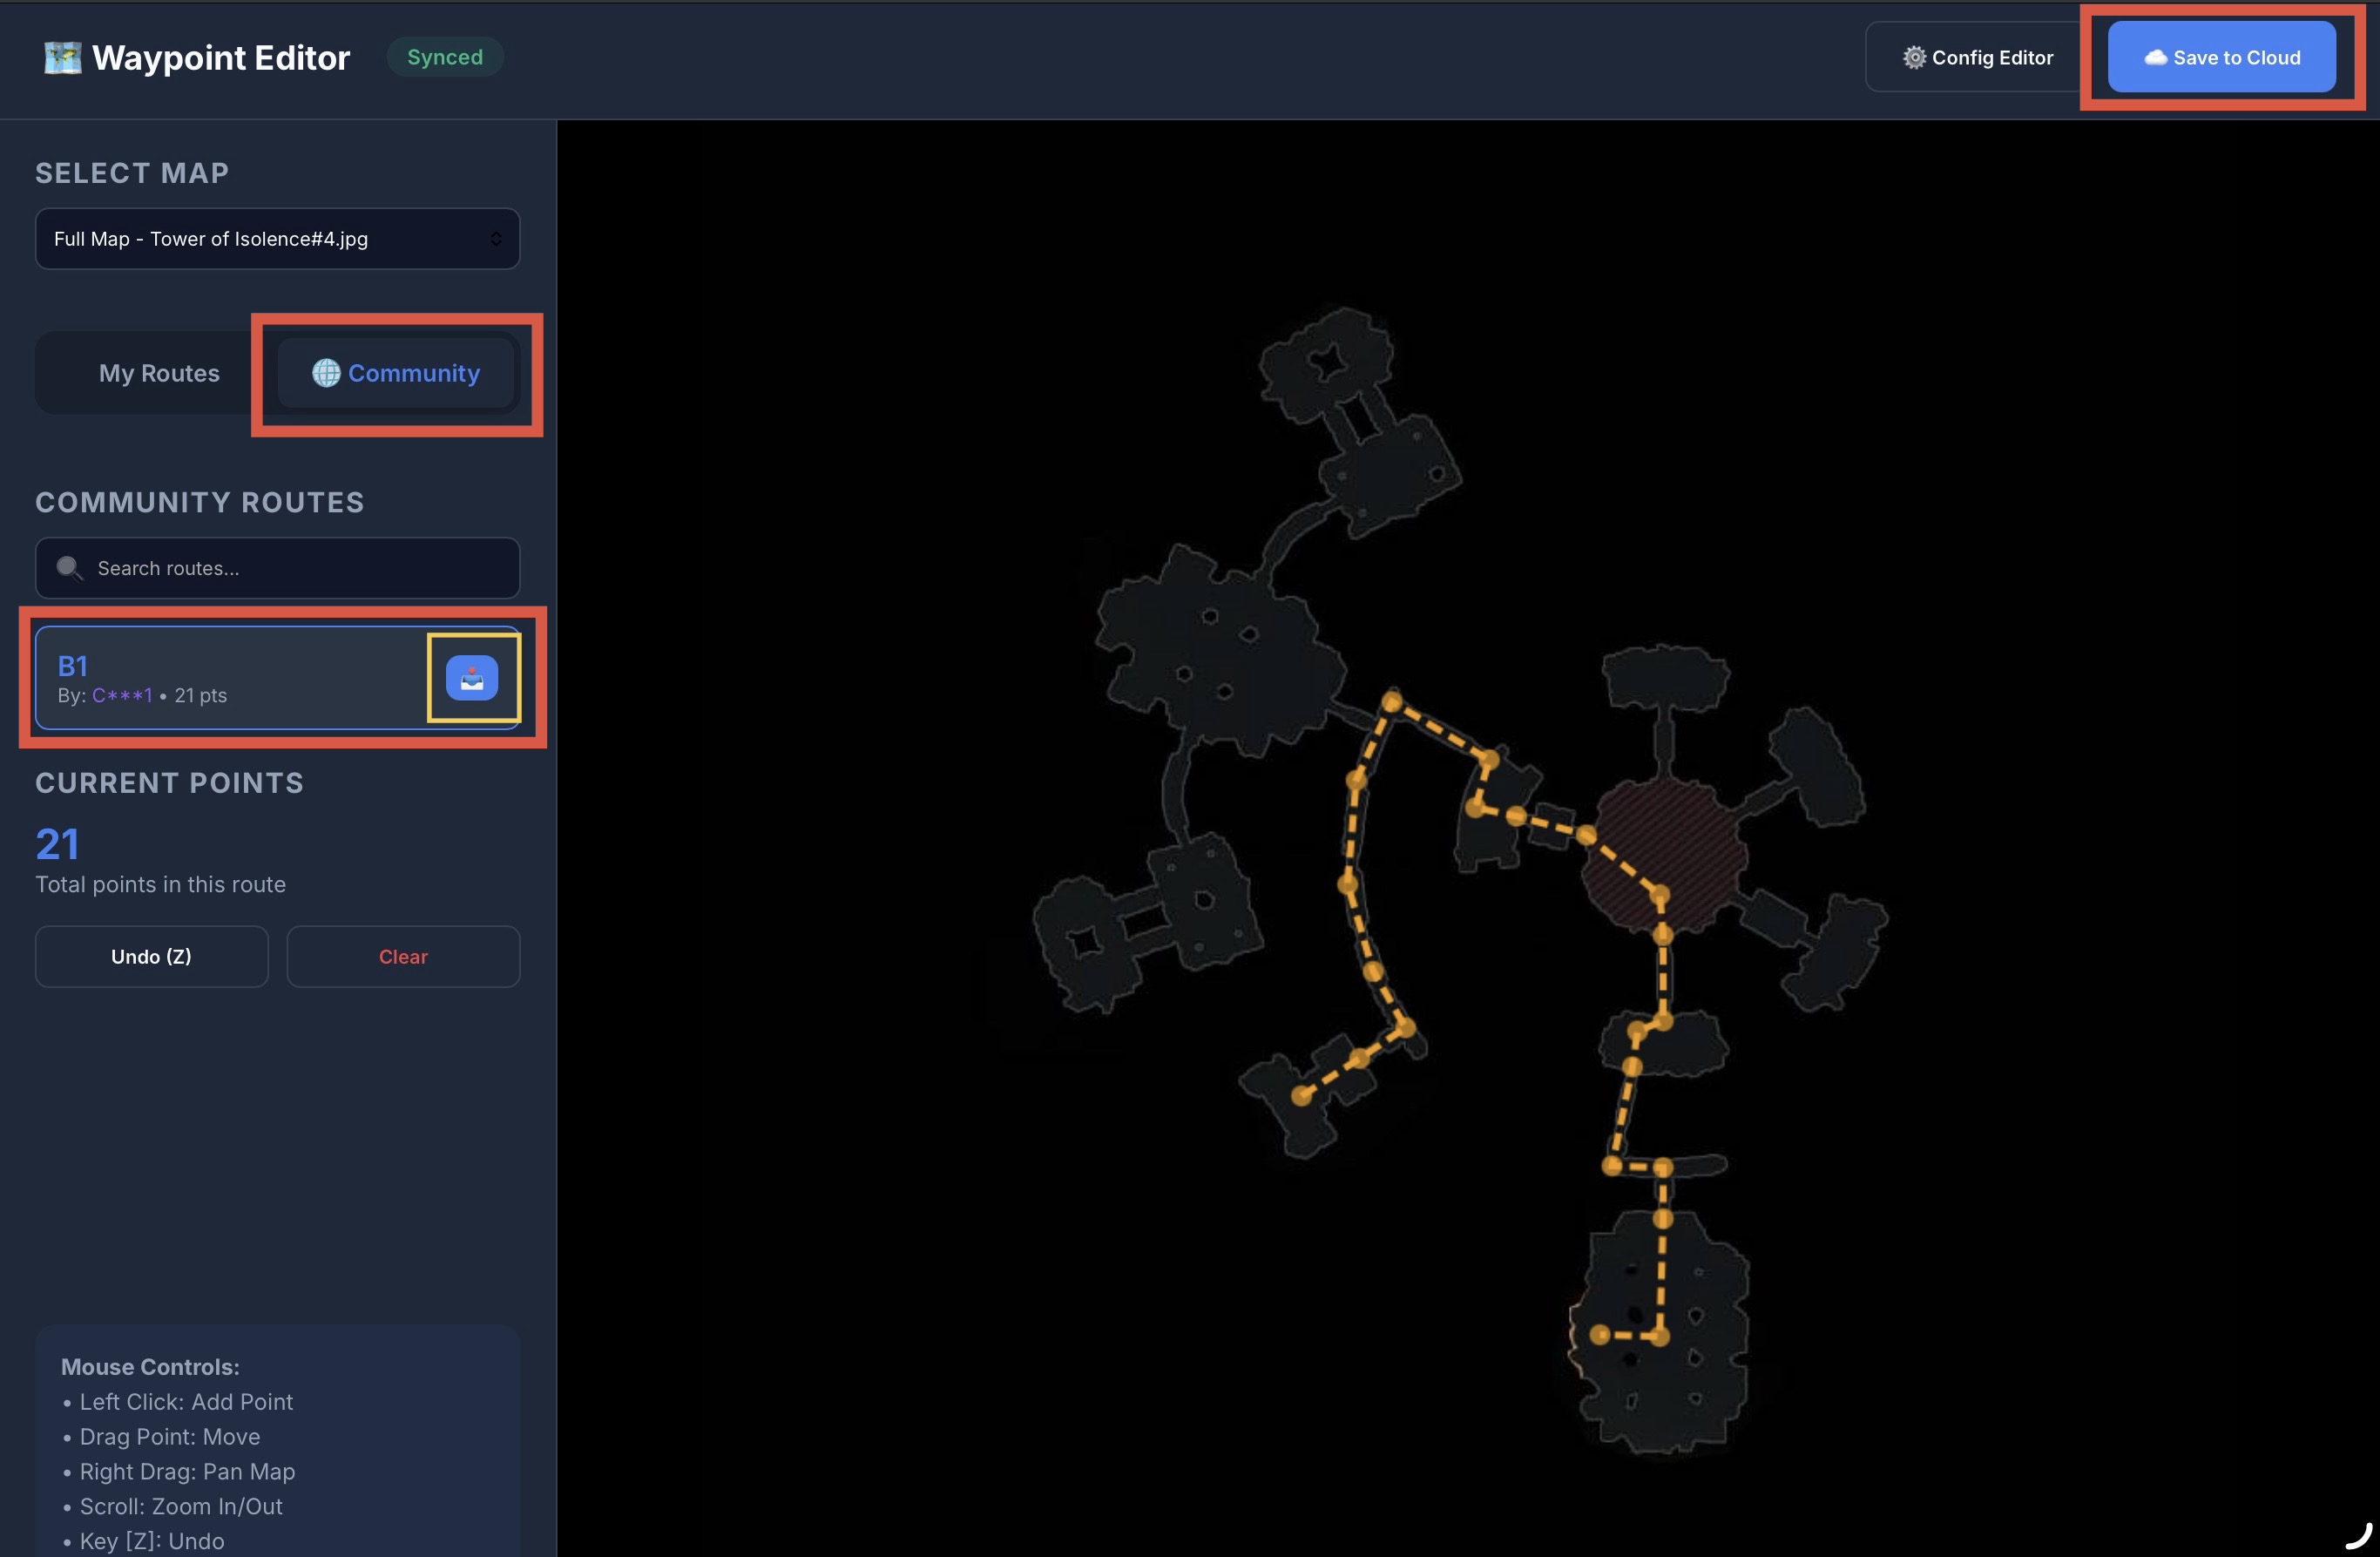
3.3 🗺️ Map Editor & Waypoints
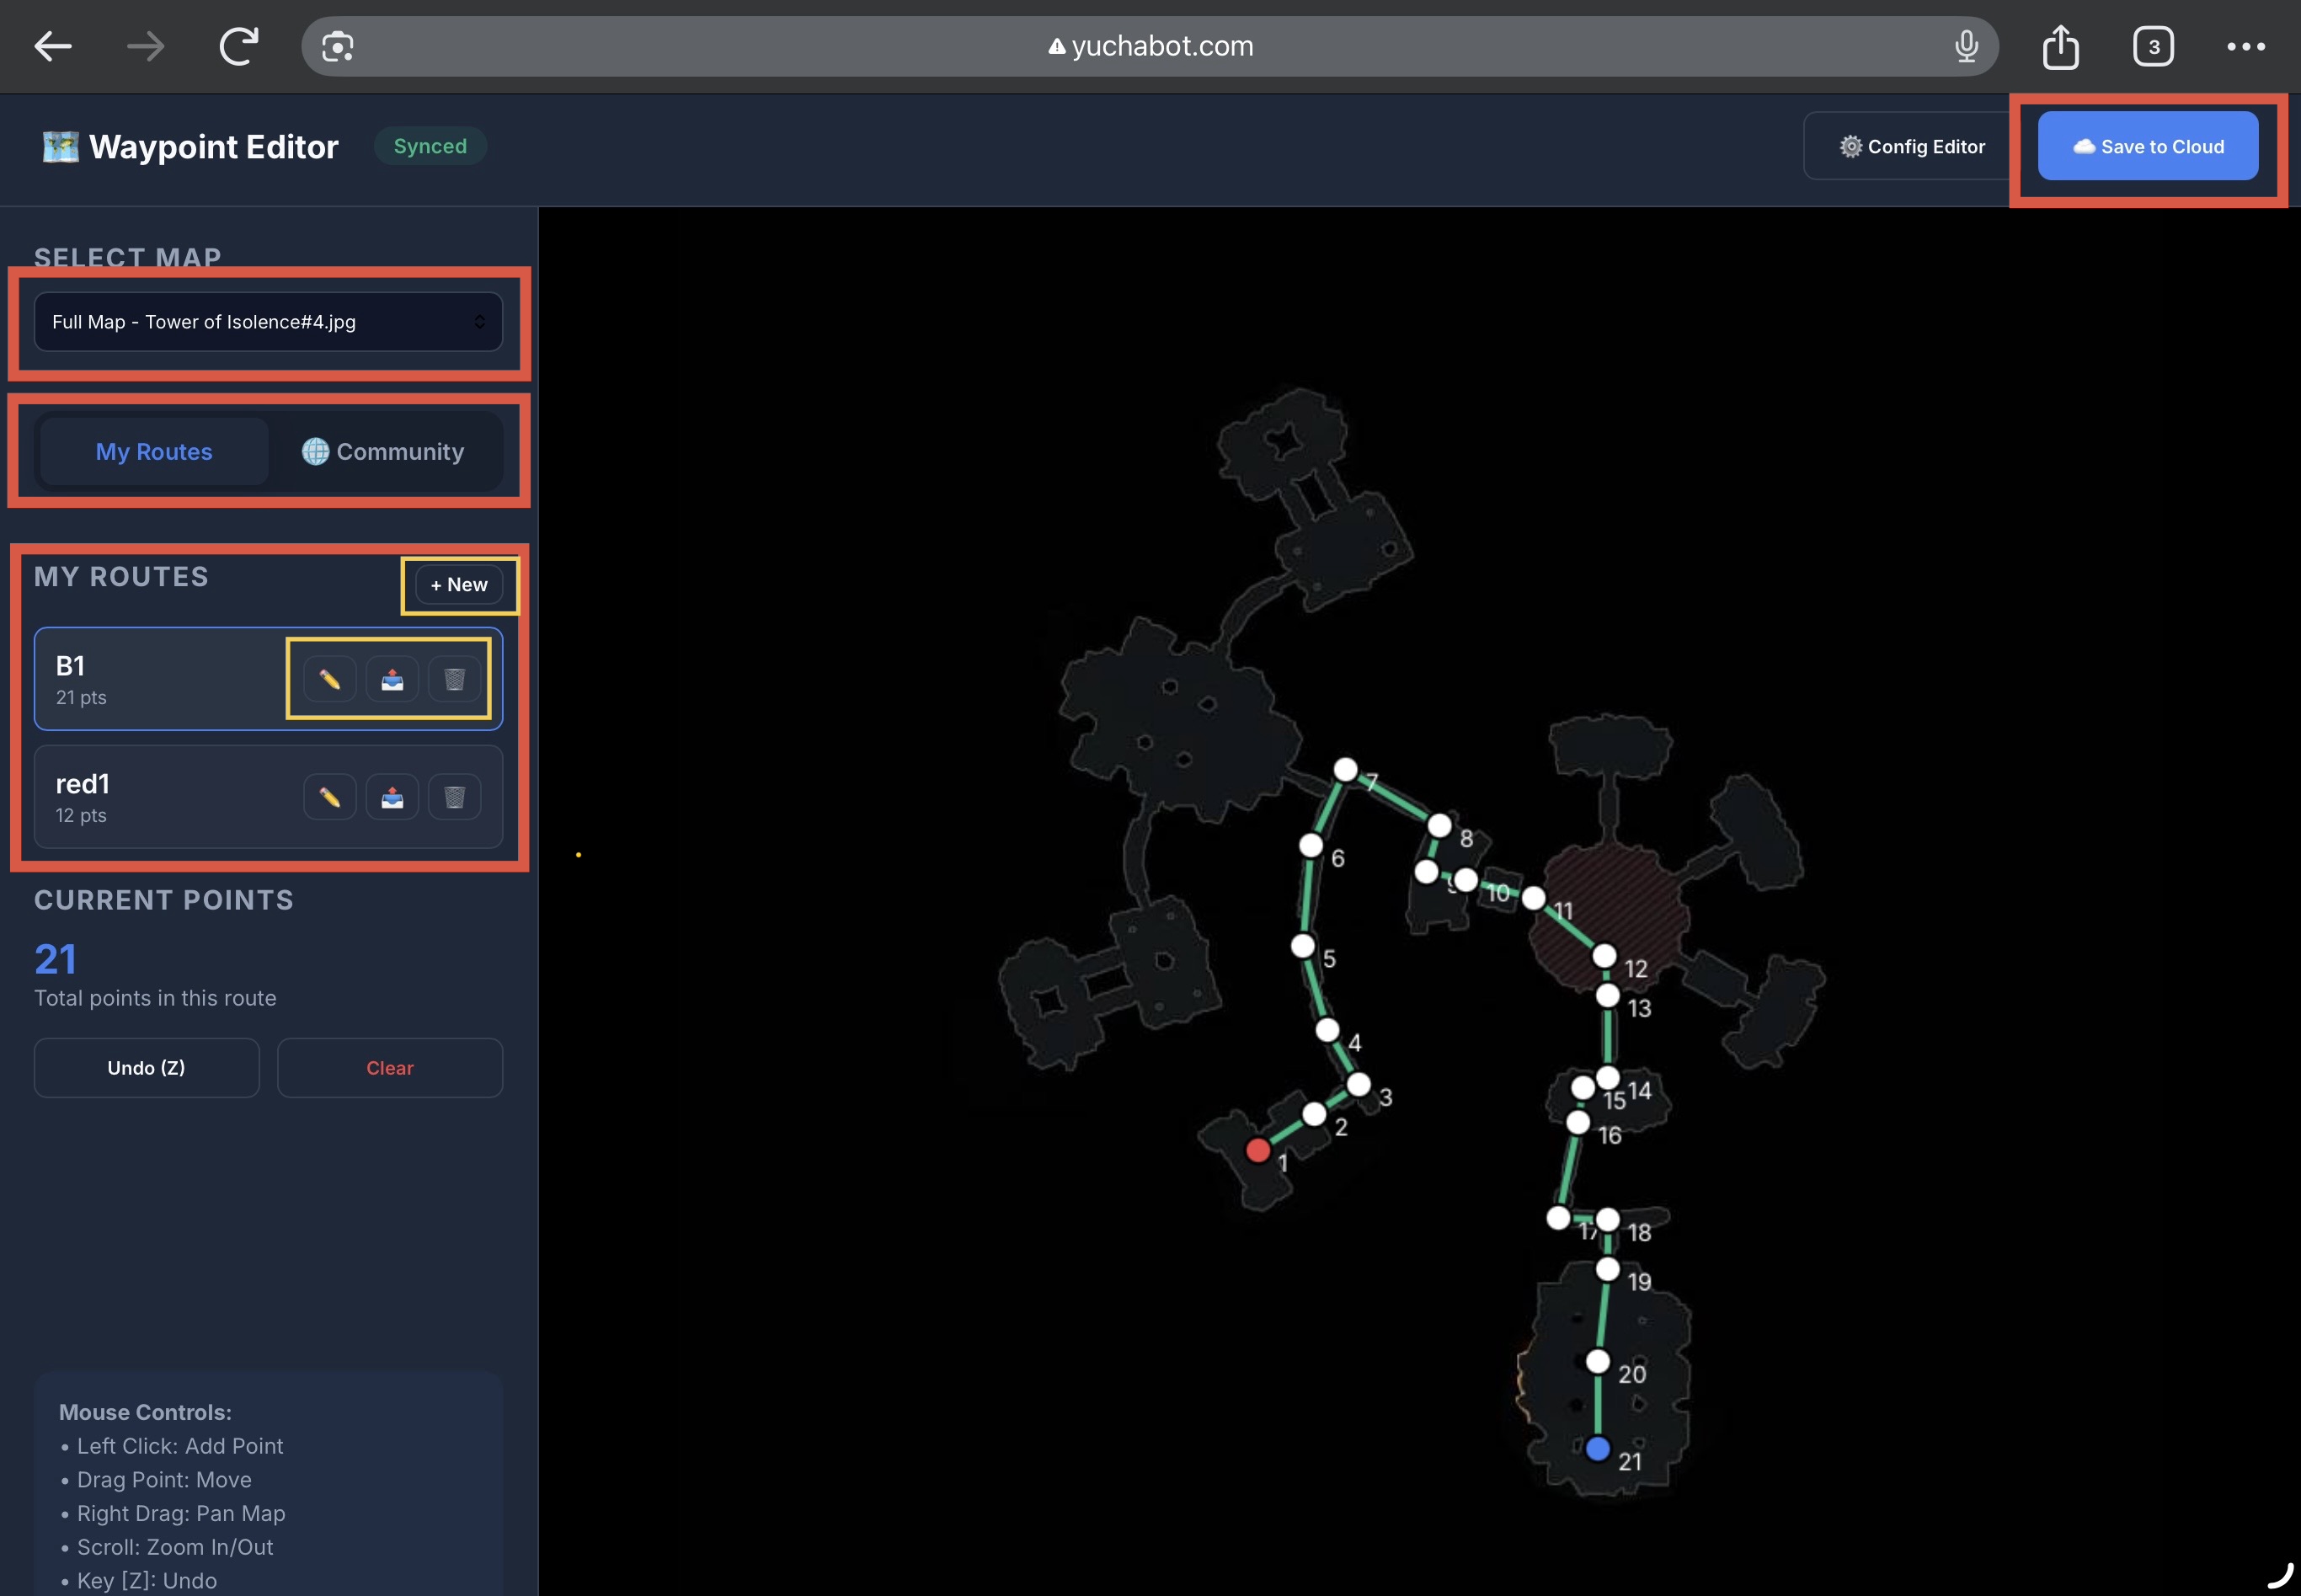
ใช้สำหรับสร้างเส้นทางเดินกลับจุดฟาร์ม เมื่อบอททำการหนีหรือตาย:
- เลือกแผนที่ (Map) ที่ต้องการ และเลือกประเภทเส้นทาง (ส่วนตัว/Community)
- กรอบสีเหลือง: สามารถแก้ไขชื่อ, แชร์ให้เพื่อน (Community) หรือลบเส้นทางได้
- กดปุ่ม **Save** ที่มุมขวาบน เพื่อบันทึกเส้นทางลง Cloud ส่วนตัว
- Create navigation routes for auto-recovery after escape or death.
- Yellow Box: Rename, Share to community, or Delete routes.
- Click **Save** (top right) to store waypoints in your personal Cloud.
3.4 🌐 ระบบแชร์เส้นทาง (Community)
3.4 🌐 Community Route Sharing
คุณสามารถเลือกใช้เส้นทางที่เพื่อนๆ แชร์มาได้ โดยการเลือกหมวด **Community** แล้วกดปุ่มสีฟ้าเพื่อ **Import** เข้ามาเป็นเส้นทางของเรา จากนั้นกด Save ที่ขวาบนครับ
Browse shared routes from other users in the **Community** tab. Click the blue button to **Import**, then click Save (top right) to add it to your profile.
ข้อ 4. ⚙️ การตั้งค่าขั้นสูง (Advance Settings)
Step 4. ⚙️ Advance Settings
4.1 🛠️ พารามิเตอร์ที่สำคัญ
4.1 🛠️ Essential Parameters
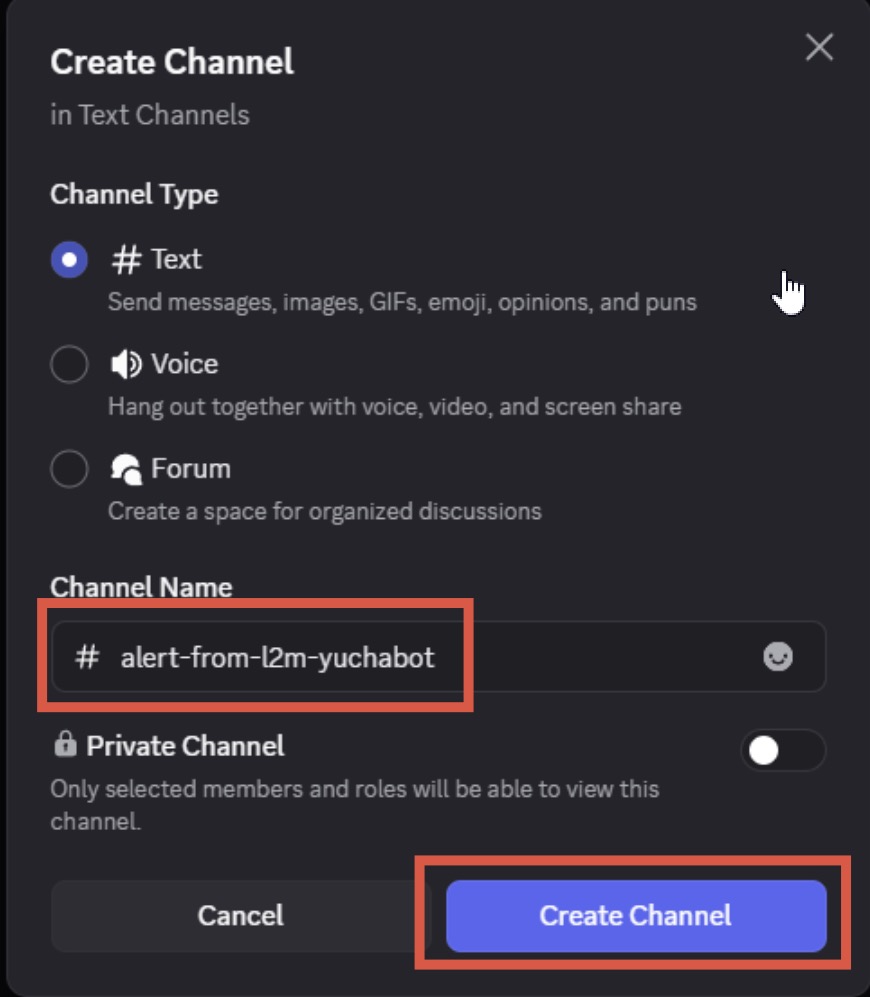
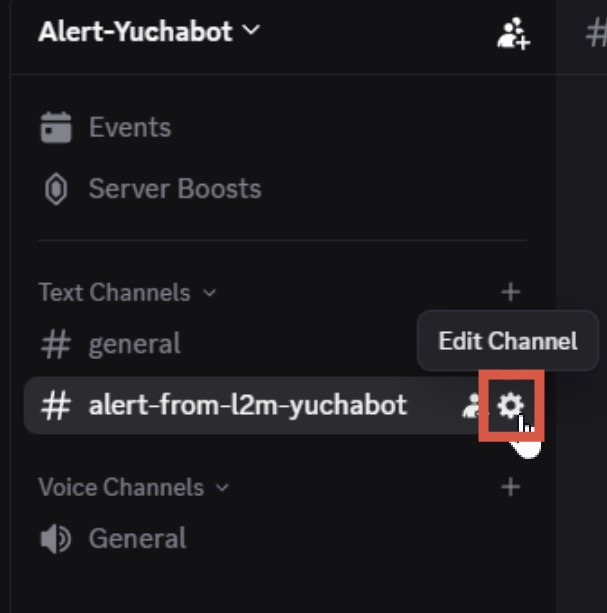
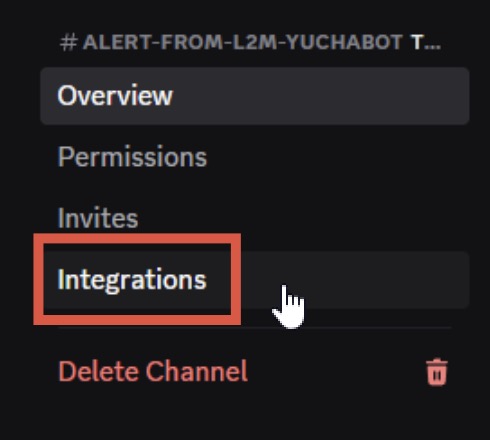
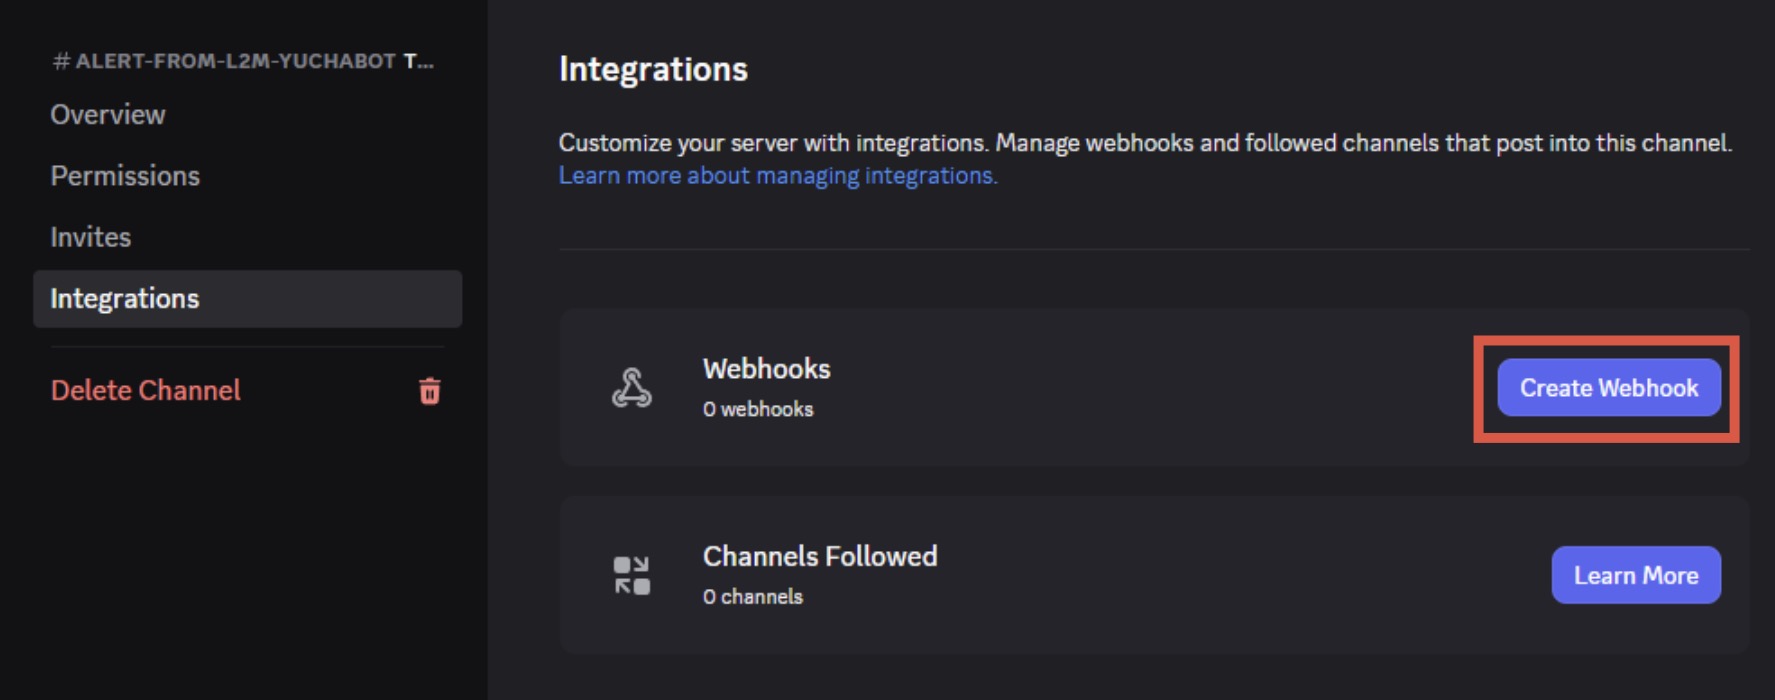
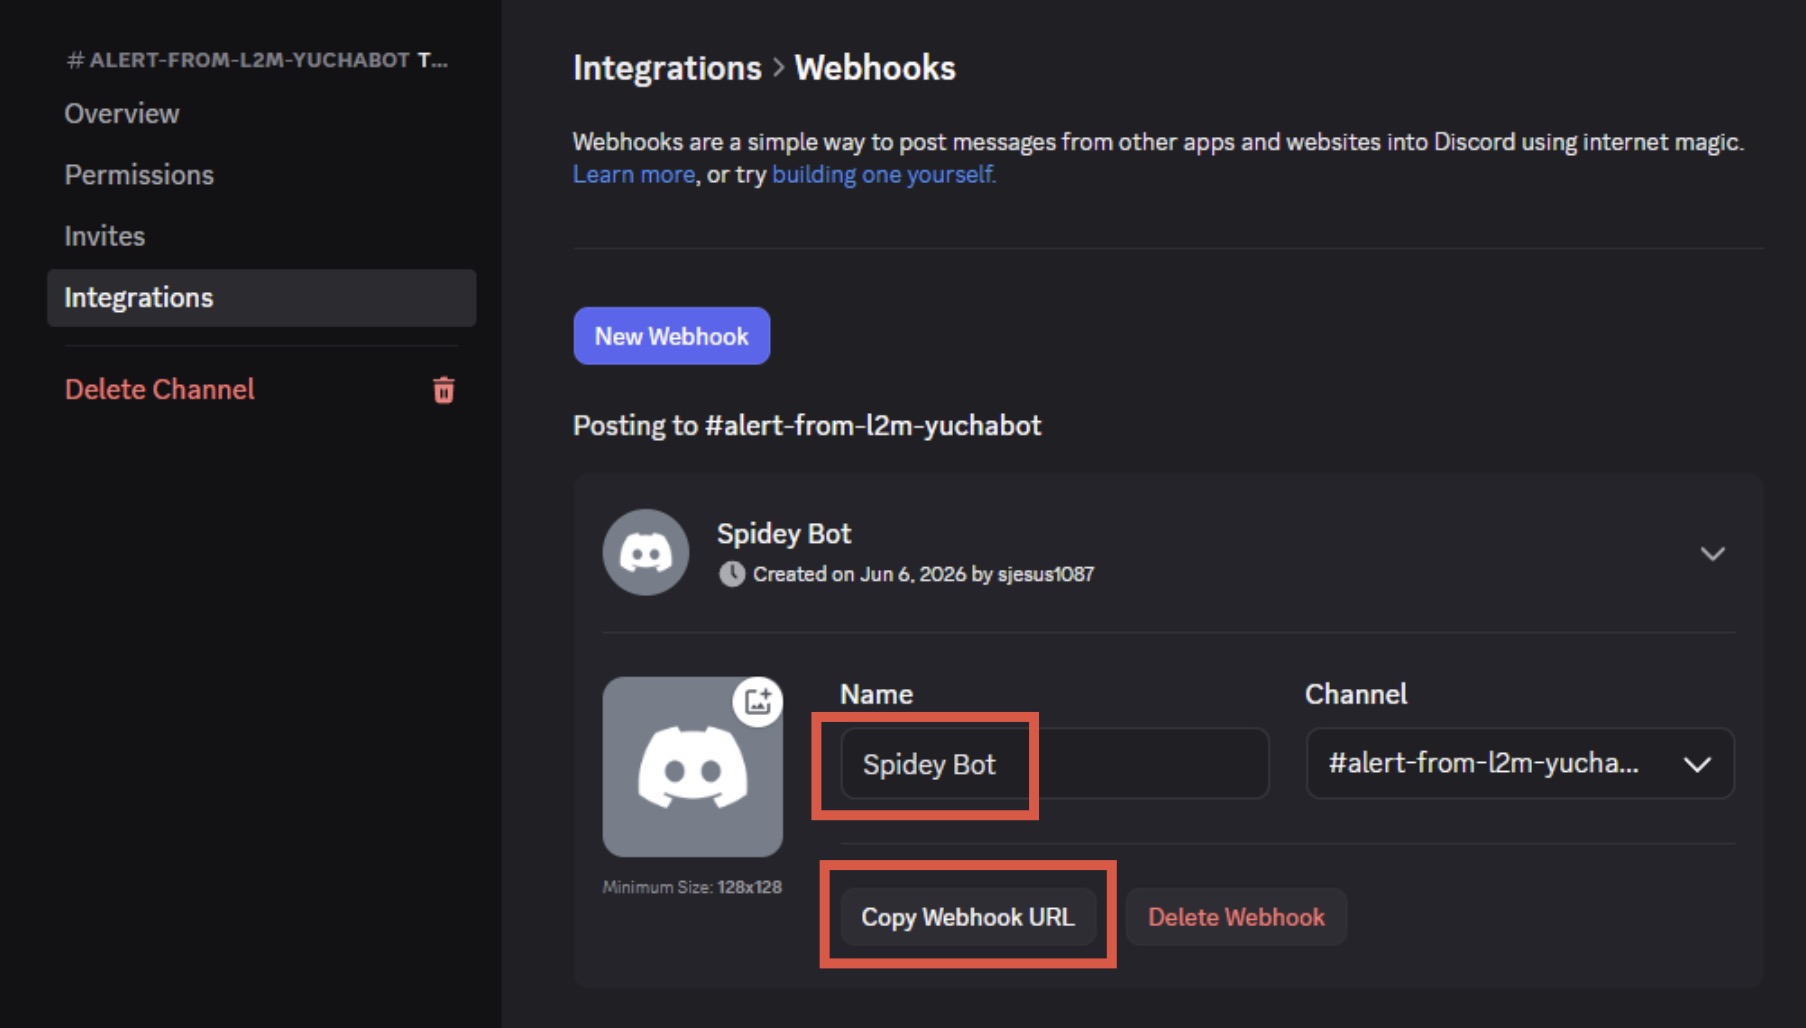
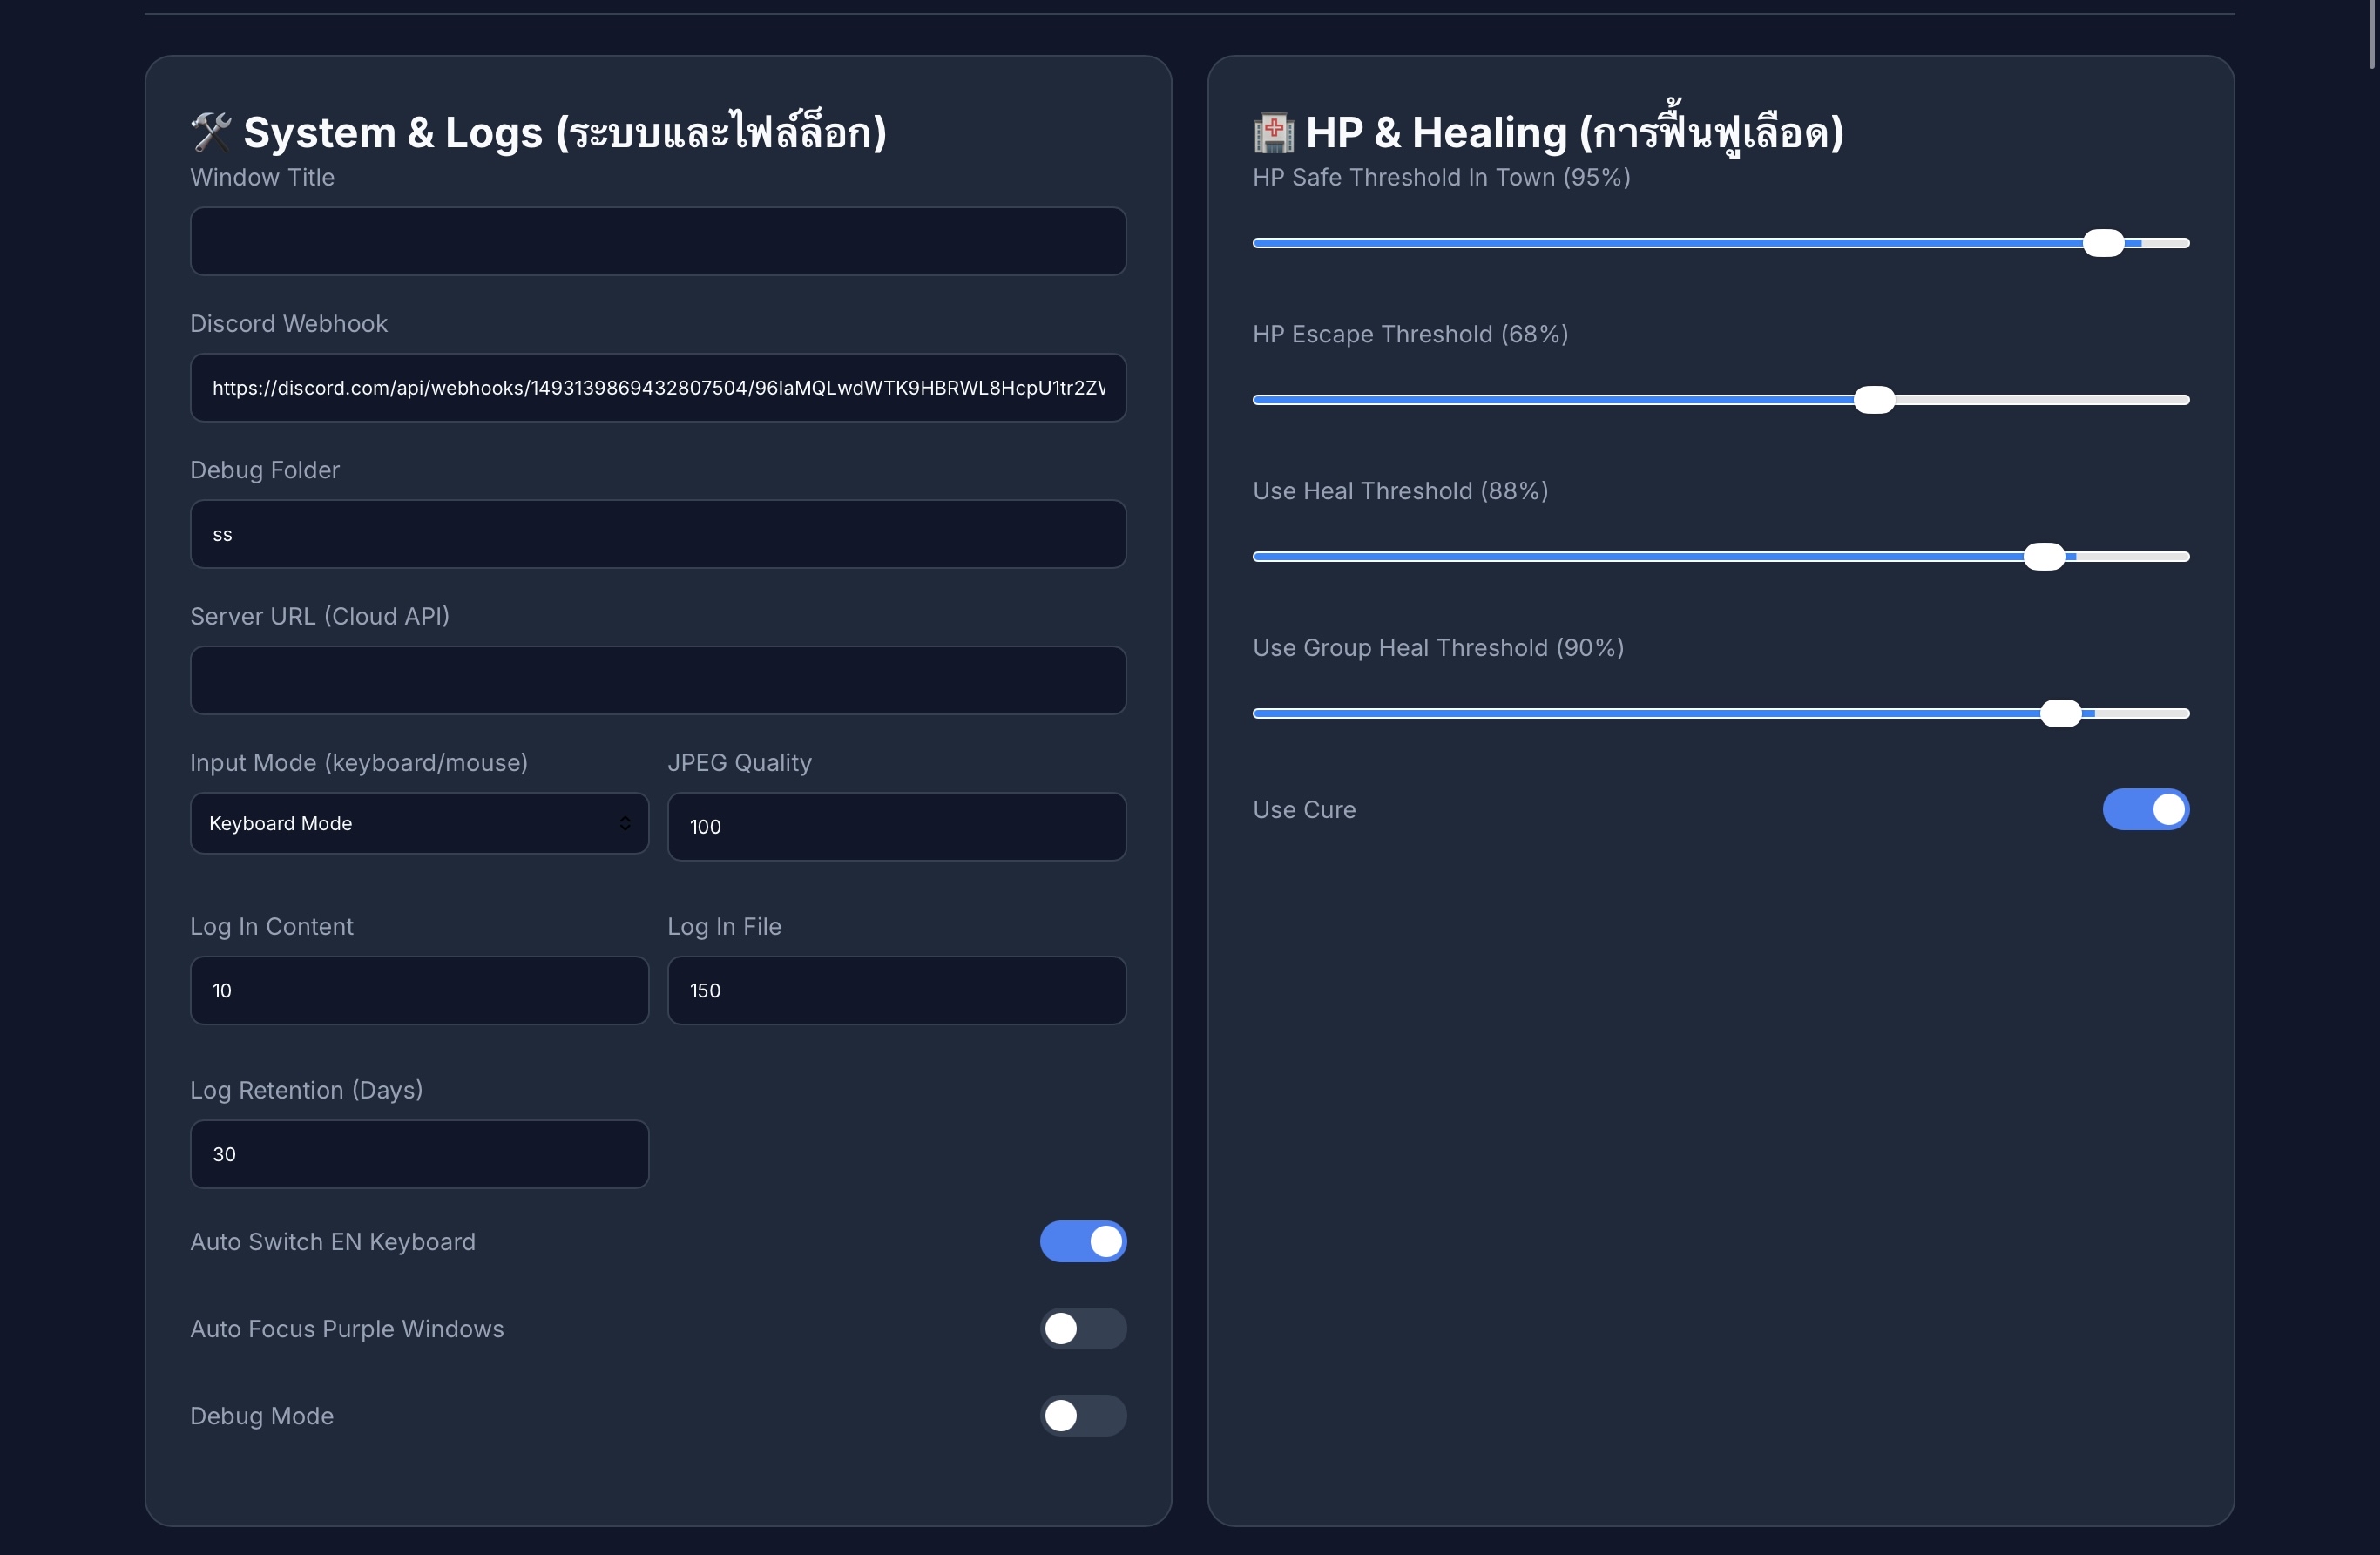
- คลิกขวาที่ Channel ใน Discord > Edit Channel
- ไปที่ Integrations > Create Webhook
- ตั้งชื่อ Webhook แล้วกด Copy Webhook URL
- นำ URL มาใส่ในช่อง Discord Webhook ในหน้า Config ครับ
- Right-click your Discord Channel > Edit Channel
- Go to Integrations > Create Webhook
- Name your webhook and click Copy Webhook URL
- Paste the URL into the Discord Webhook field in the Config editor.
- ⌨️ Auto Switch EN Keyboard: เปลี่ยนภาษาคีย์บอร์ดเป็น EN อัตโนมัติเมื่อเริ่ม
- 🏘️ HP Safe Threshold In Town (95%): เลือดต้องถึง % นี้ก่อนถึงจะกลับไปฟาร์ม
- 🏃 HP Escape Threshold (68%): จุดตัดเลือดที่จะให้บอทวาร์ปหนีทันที
- 💊 Use Heal Threshold (88%): เลือดต่ำกว่า % นี้จะเริ่มกด Heal
- ✨ Use Cure: เลือกใช้งาน Cure เมื่อติดสถานะผิดปกติ (ตาบอด)
- ⌨️ Auto Switch EN Keyboard: Auto change keyboard to EN on startup.
- 🏘️ HP Safe Threshold In Town (95%): HP required before leaving town.
- 🏃 HP Escape Threshold (68%): HP level to trigger emergency warp.
- 💊 Use Heal Threshold (88%): HP level to start auto-healing.
- ✨ Use Cure: Auto-use Cure skill when blinded/debuffed.
4.2 ⚔️ ระบบการต่อสู้และบัฟ (Combat & Buff)
4.2 ⚔️ Combat & Buff Settings
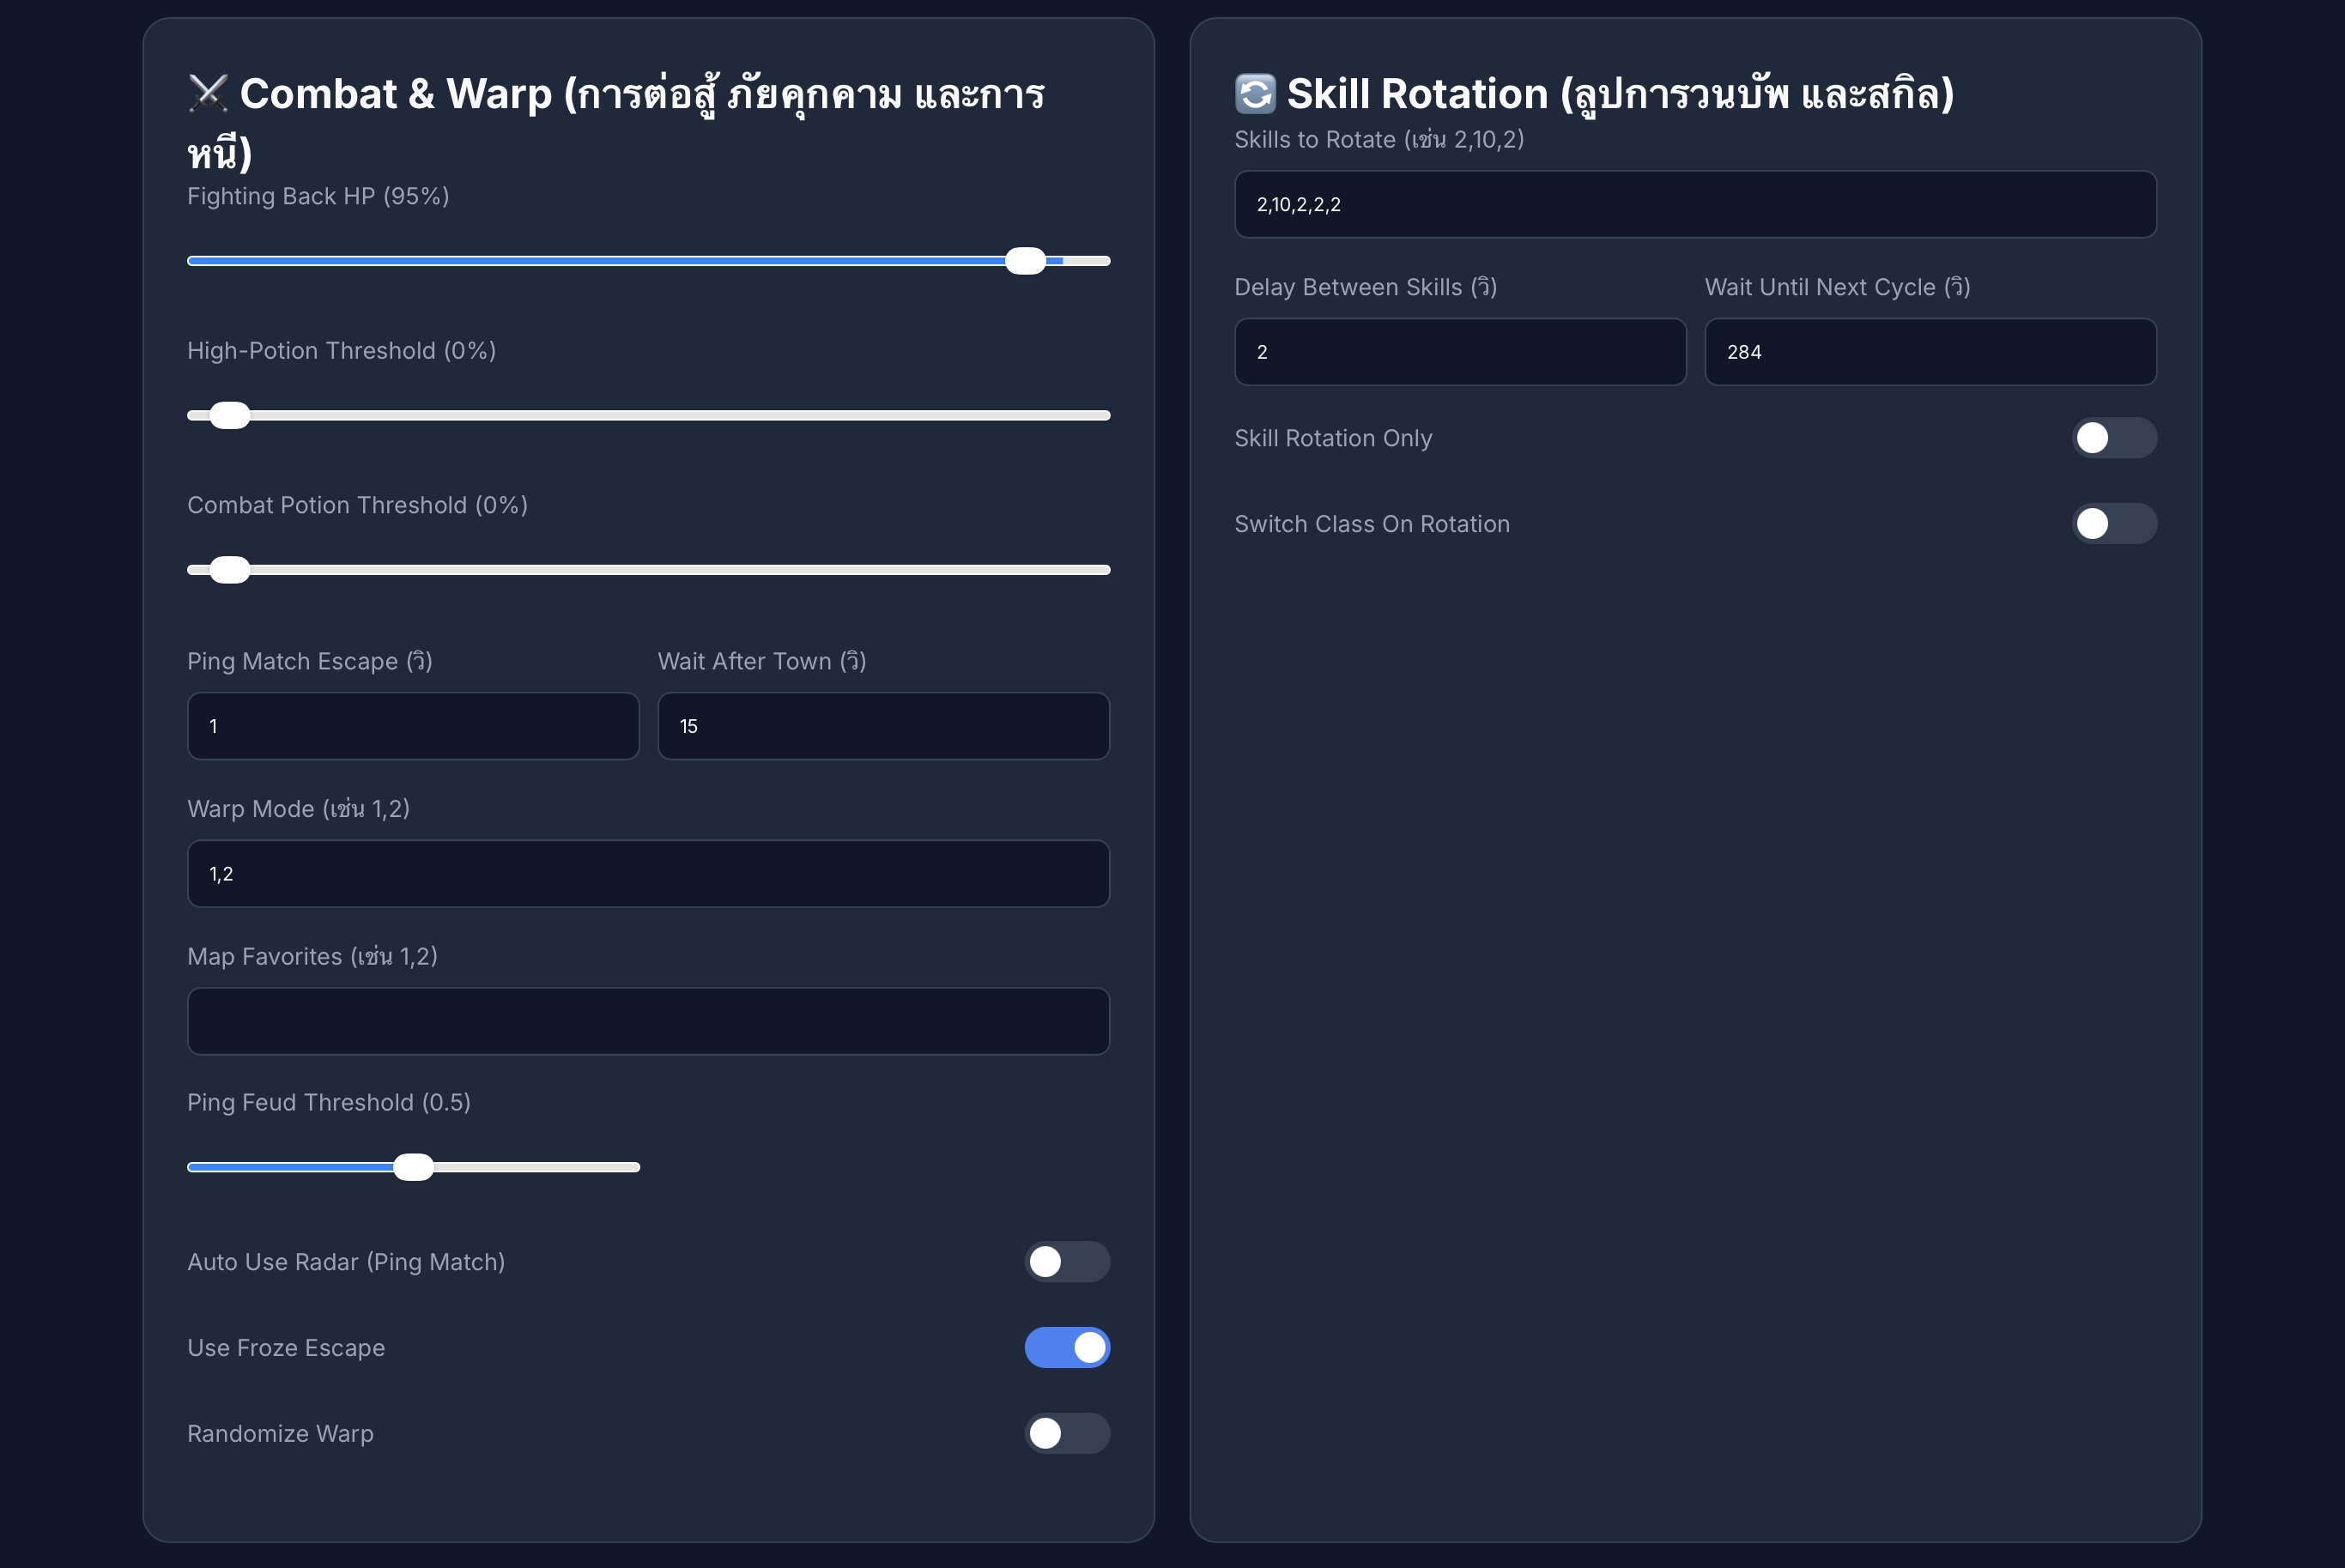
การตอบโต้และยา (Combat & Potions)
- 🥊 Fighting Back HP (95%): บอทจะเริ่มสู้กลับเมื่อเลือดน้อยกว่าค่านี้
- 🟠 High-Potion Threshold: กดใช้ยาส้มเมื่อเลือดถึงจุดที่กำหนด
- ⚪ Combat Potion Threshold: กดใช้ยาขาวเมื่อเลือดถึงจุดที่กำหนด
- 🚩 Ping Match Escape: เจอศัตรู/ตาแดงกี่ตัว ถึงจะทำการวาร์ปหนี
- ⏳ Wait After Town: ระยะเวลาที่จะยืนรอในเมืองก่อนออกไปฟาร์ม
- 🥊 Fighting Back HP (95%): HP level to initiate counter-attack.
- 🟠 High-Potion Threshold: HP level to use Orange Potions.
- ⚪ Combat Potion Threshold: HP level to use White Potions.
- 🚩 Ping Match Escape: Enemy count required to trigger emergency warp.
- ⏳ Wait After Town: Idle time in town before resuming farm.
การวาร์ปและบัฟ (Warp & Skills)
- 🌀 Warp Mode: เลือกจุดวาร์ป (ใส่เลข 1,2,3... ได้ตามต้องการ)
- 🎲 Randomize Warp: สุ่มจุดวาร์ปจากลิสต์ที่ตั้งไว้ใน Warp Mode
- 🔄 Skills to Rotate: ตั้งค่าการสลับอาวุธเพื่อใช้ Buff (เช่น 2,10,2)
- ⏱️ Delay Between Skills: เวลารอระหว่างการกดแต่ละ Skill
- 🔁 Wait Until Next Cycle: เวลารอก่อนเริ่มรอบบัฟถัดไป (เช่น 300 วิ สำหรับบัฟ 5 นาที)
- 🎯 Skill Rotation Only: บังคับใช้เฉพาะระบบสลับบัฟอย่างเดียว
- 🌀 Warp Mode: Target warp points (e.g., 1,2,3,4,5).
- 🎲 Randomize Warp: Randomly pick from your Warp Mode list.
- 🔄 Skills to Rotate: Weapon swap sequence for buffs (e.g., 2,10,2).
- ⏱️ Delay Between Skills: Delay between each skill action.
- 🔁 Wait Until Next Cycle: Buff cycle interval (e.g., 300s for 5m buffs).
- 🎯 Skill Rotation Only: Enforce only weapon-swap rotation logic.
4.3 🛡️ ระบบการกู้คืนและความปลอดภัย (Recovery & Safety)
4.3 🛡️ Recovery & Safety Limits
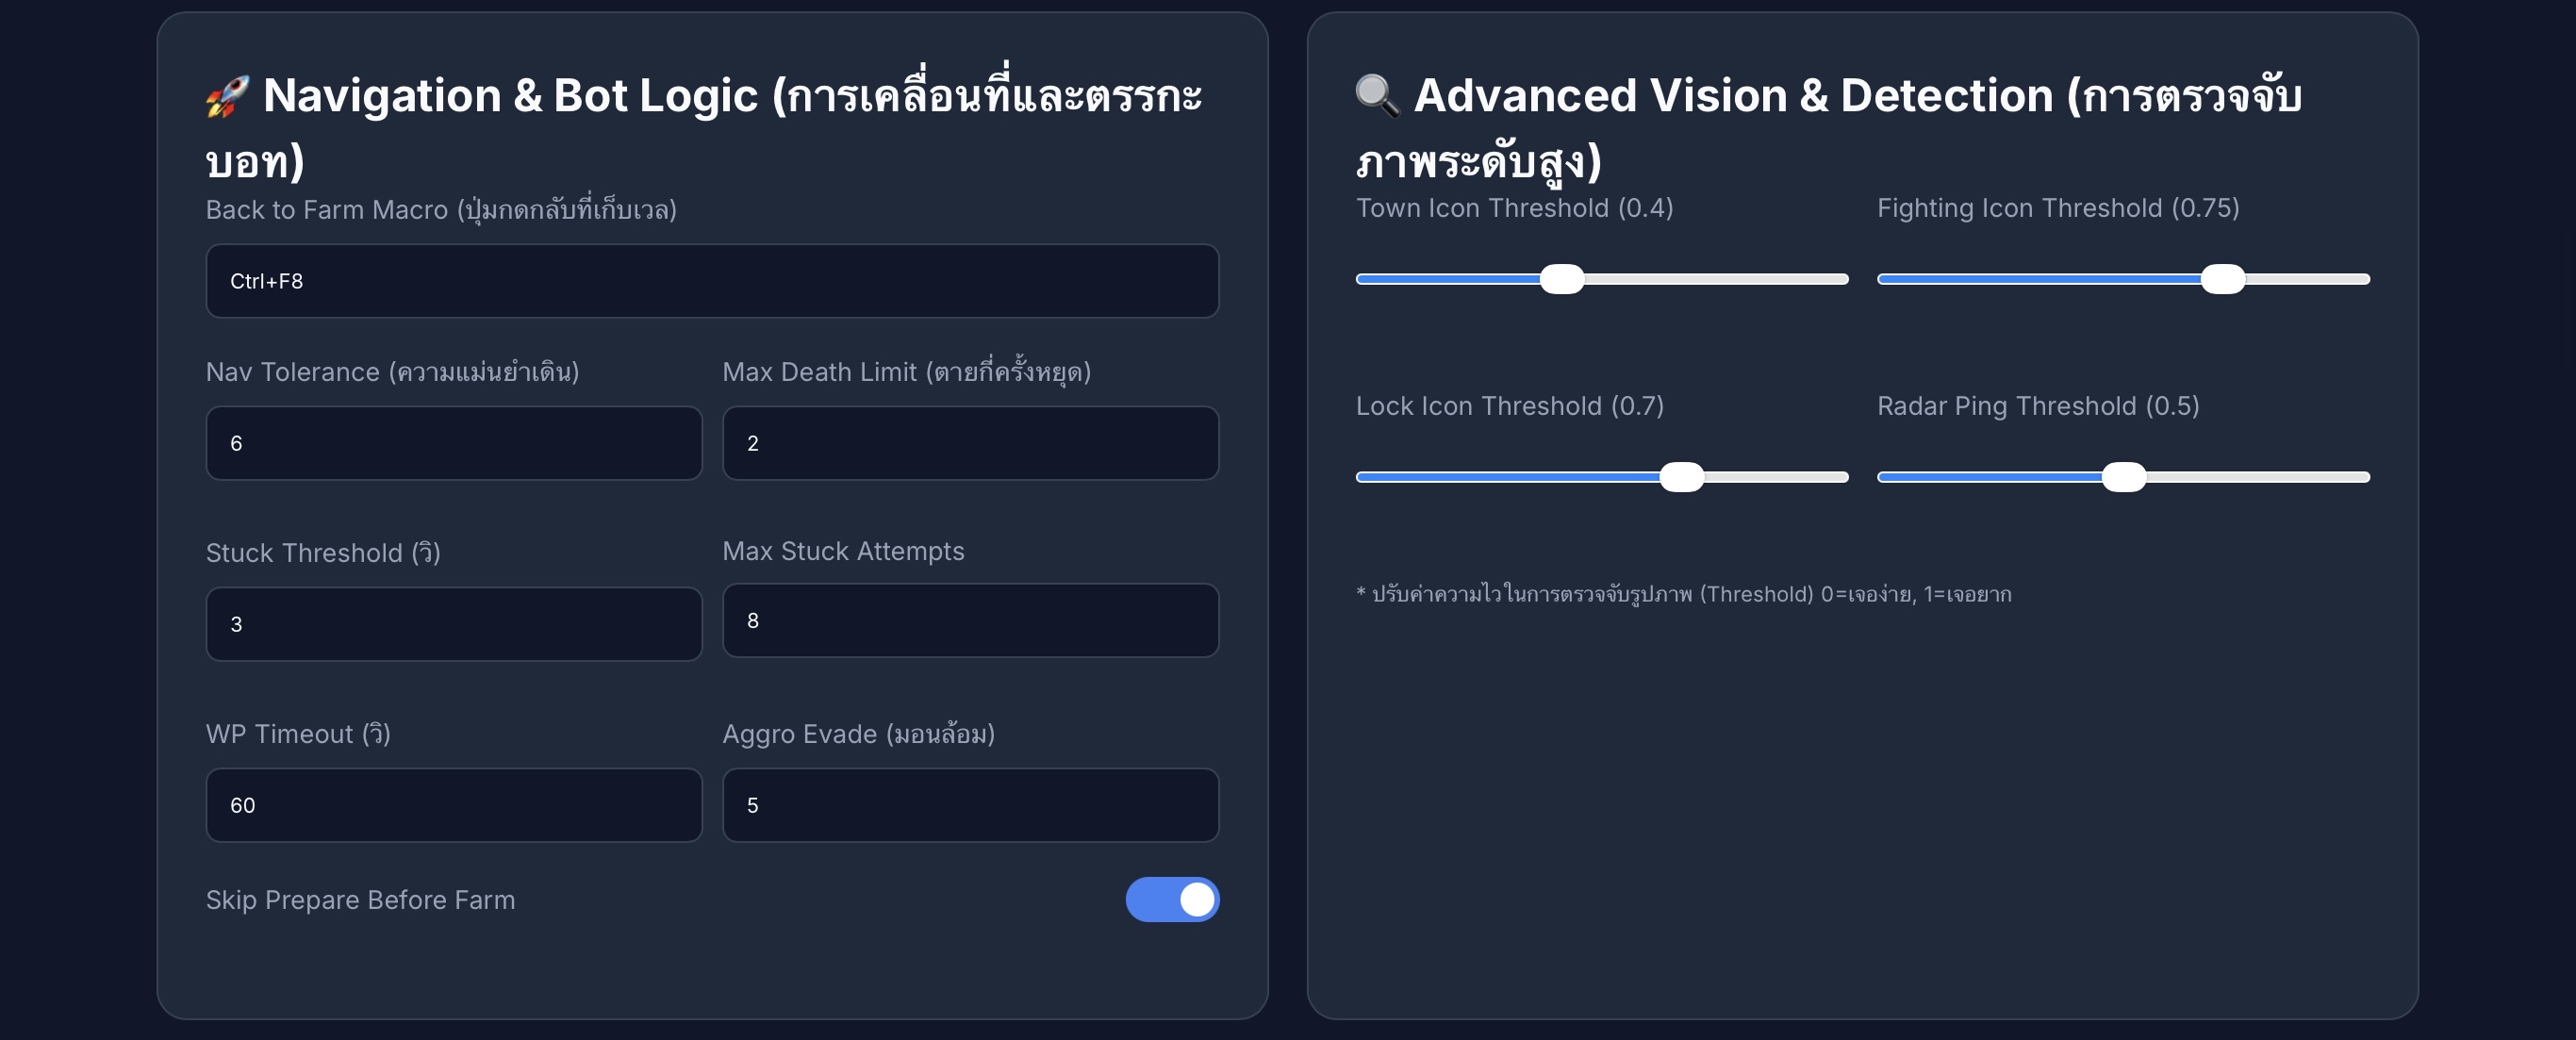
Ctrl+F8 บอทจะกด Macro นั้นเพื่อกลับไปฟาร์มแทน (เหมาะสำหรับพื้นที่ที่ใช้ใบวาร์ปไม่ได้ เช่น หอคอยโอหัง)
⚠️ Back to Farm Macro: Critical setting! If blank, uses normal warp (from 4.2). If a key like Ctrl+F8 is assigned, the bot will execute that macro to return to farm (Ideal for non-teleport areas like Tower of Insolence).
- 💀 Max Death Limit (จำนวนครั้งที่ตาย): กำหนดจำนวนครั้งที่ยอมให้ตัวละครตายได้ ก่อนที่บอทจะหยุดทำงานทั้งหมด (เช่น ใส่เลข 2 หมายความว่าถ้าตายครั้งที่ 2 บอทจะหยุดทันที)
- 💀 Max Death Limit: Maximum allowed deaths before the bot stops completely (e.g., setting to 2 means the bot shuts down on the 2nd death).
4.4 ⌨️ การผูกปุ่มคีย์ลัด (Hotkeys & Skills)
4.4 ⌨️ Key Bindings & Skill Mapping
General Hotkeys: ปุ่มคีย์ลัดทั่วไปที่เกมกำหนดมาให้ หากใช้ตามค่าเริ่มต้น (Default) ไม่จำเป็นต้องแก้ไขส่วนนี้ครับ
General Hotkeys: Standard game keys. No changes required if you are using the default in-game settings.
🪄 Skill Usage Keys (ปุ่มเรียกใช้ไอเทม/สกิล)
🪄 Skill Usage Keys Mapping
- 🩹 use_heal: ตำแหน่งสกิล Orb ฮีลเดี่ยว
- 🛡️ use_group_heal: ตำแหน่งสกิล Orb ฮีลหมู่
- 🟠 use_potion: ตำแหน่งวางยาส้ม
- ⚪ use_high_potion: ตำแหน่งวางยาขาว หรือขวดยา 1 ชม.
- 🪄 use_staff_before_frozen: ตำแหน่งวางคทา (สำหรับสลับใช้)
- 🔮 use_orb_for_heal: ตำแหน่งวาง Orb (สำหรับสลับใช้)
- ⚔️ use_main_weapon: ตำแหน่งวางอาวุธหลัก
- ❄️ use_frozen_skill: ตำแหน่งวางสกิล Frozen
- 🩹 use_heal: Single-target Orb heal skill.
- 🛡️ use_group_heal: Group/Area Orb heal skill.
- 🟠 use_potion: Standard Orange potion slot.
- ⚪ use_high_potion: White potion or 1-hour potion slot.
- 🪄 use_staff_before_frozen: Staff weapon slot (for swap logic).
- 🔮 use_orb_for_heal: Orb weapon slot (for swap logic).
- ⚔️ use_main_weapon: Main primary weapon slot.
- ❄️ use_frozen_skill: Frozen skill slot location.
ข้อ 5. 🎭 มาโครสตูดิโอ (Macro Studio)
Step 5. 🎭 Macro Studio
5.1 🛠️ การสร้างและจัดการมาโคร
5.1 🛠️ Macro Creation & Management
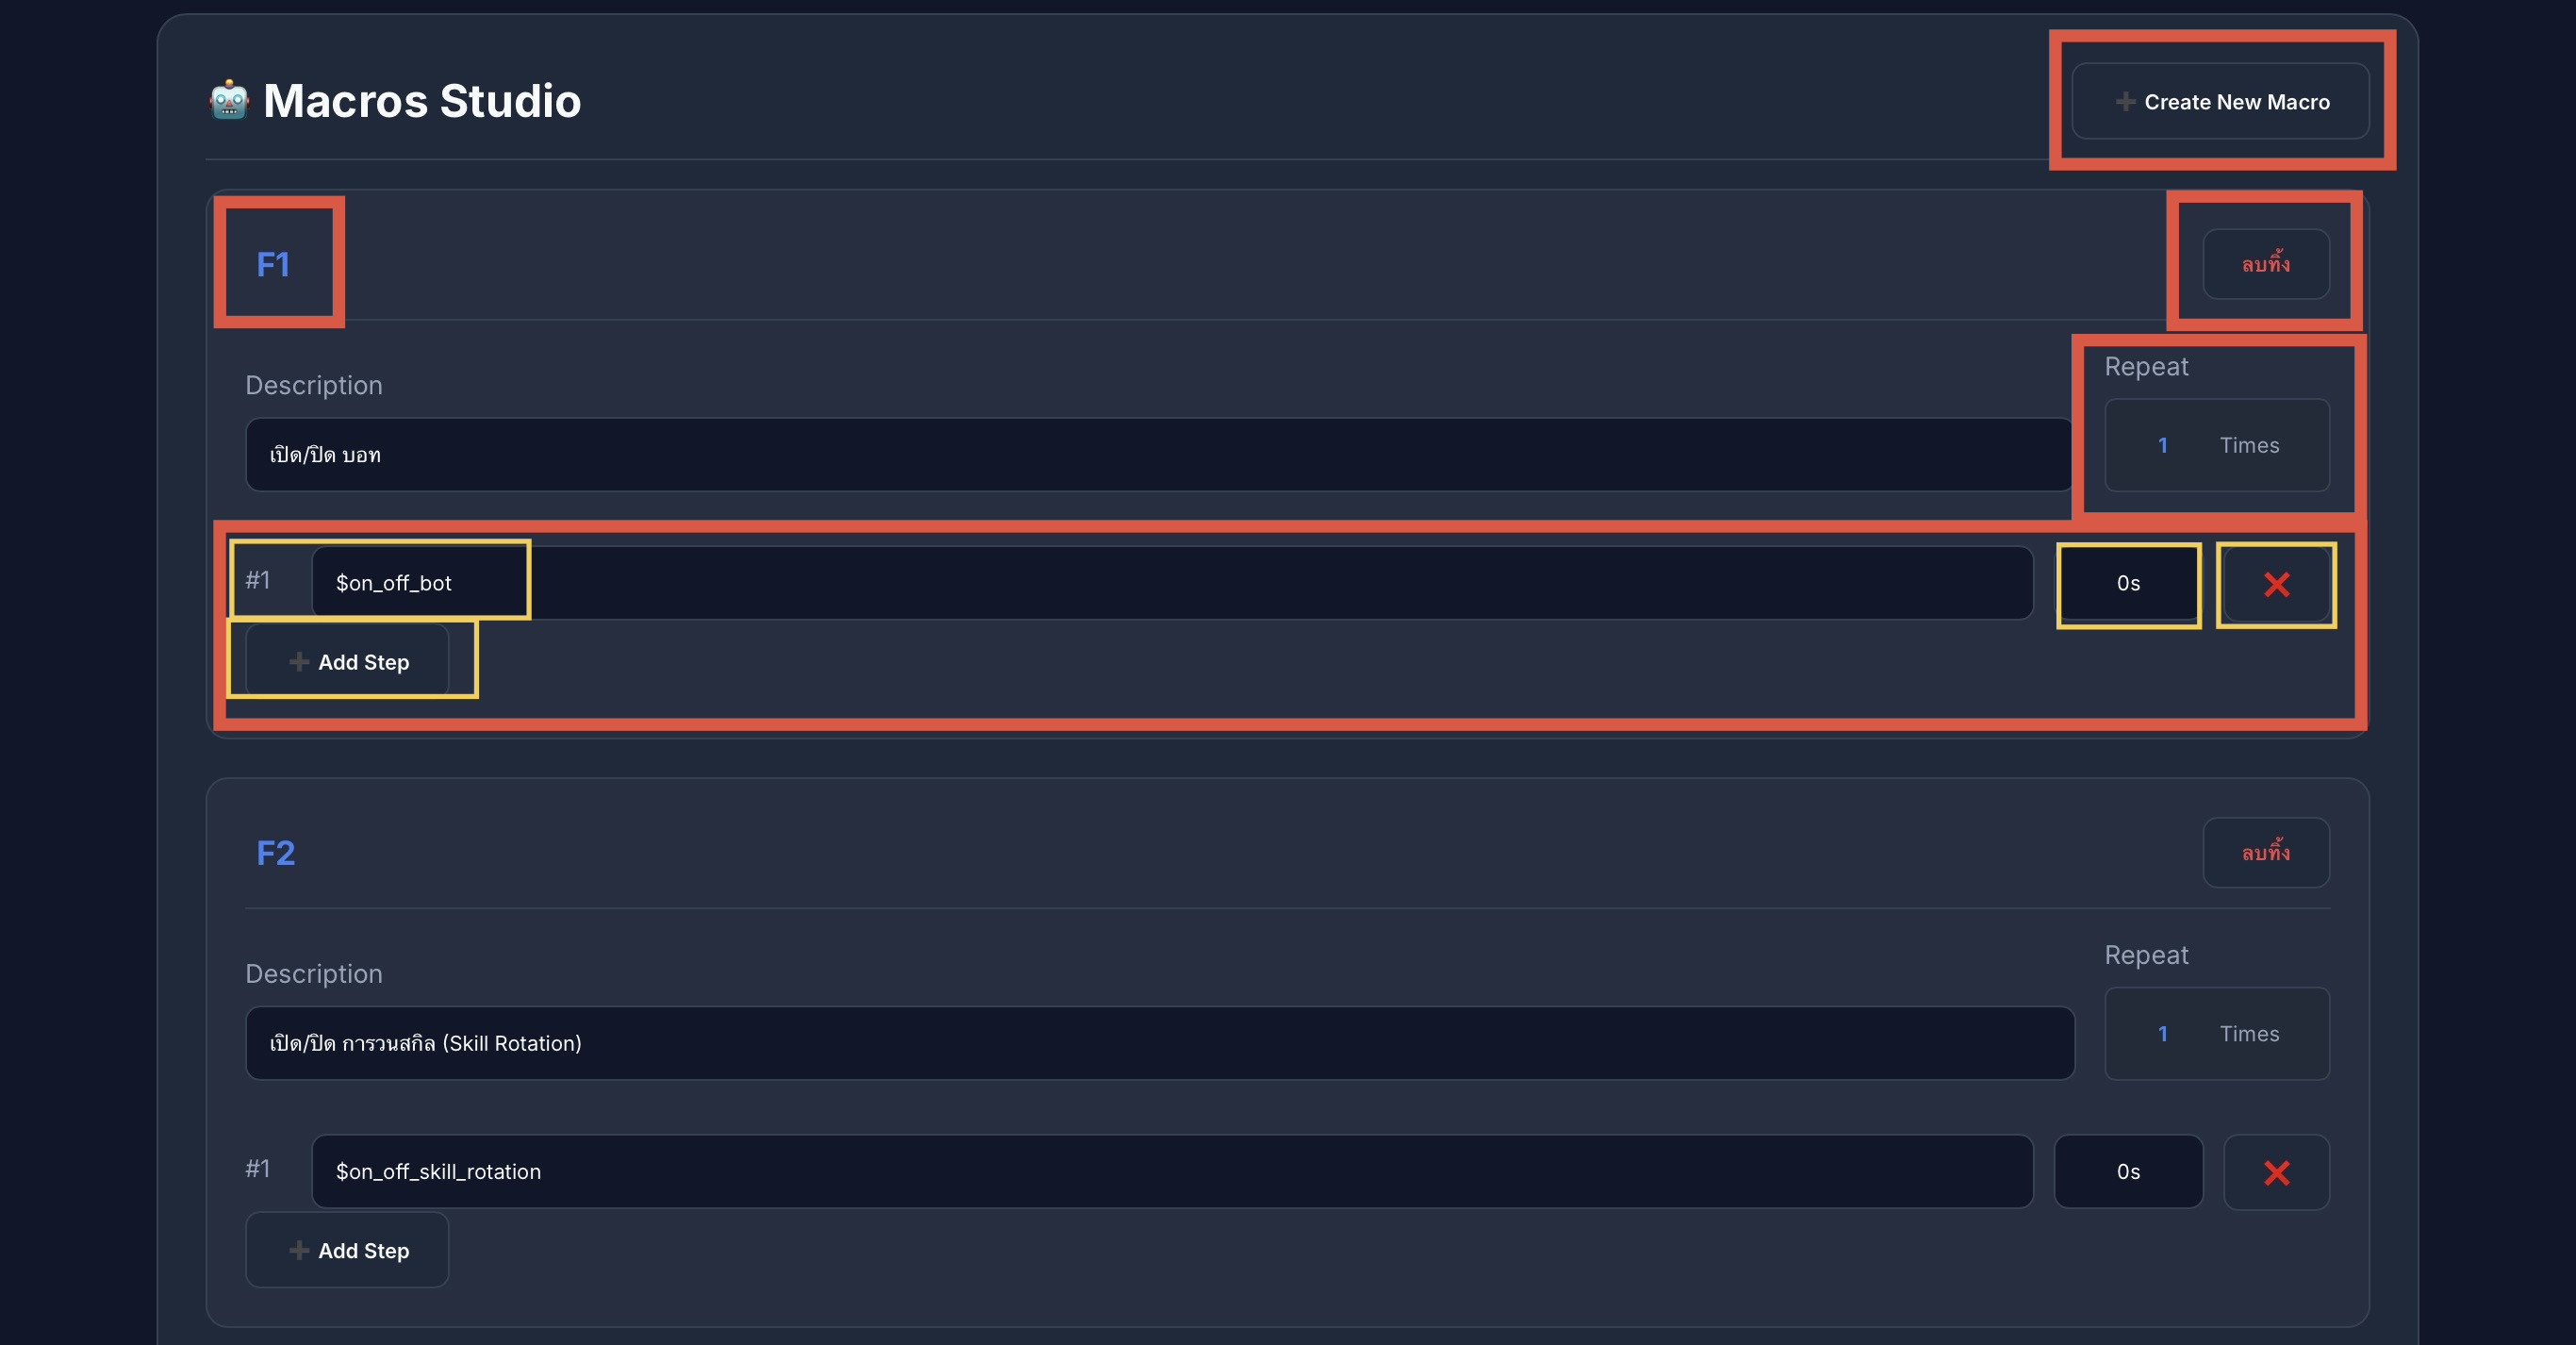
ส่วนควบคุมหลัก (Main Controls)
- ➕ Create New Macro: ปุ่มสำหรับสร้างมาโครใหม่
- ⌨️ F1 / Hotkey: ปุ่มลัดที่ใช้ในการเรียกใช้งานมาโครนั้นๆ
- 🗑️ ลบทิ้ง (Delete): ลบมาโครนี้ออกจากระบบ
- 🔁 Repeat:
0= วนทำงานทุก Step ไปเรื่อยๆ ไม่สิ้นสุดตัวเลขอื่นๆ= จำนวนรอบที่ต้องการให้ทำงาน (เช่น 3 คือกดครบทุก Step 3 รอบแล้วหยุด)
- ➕ Create New Macro: Create a new macro entry.
- ⌨️ F1 / Hotkey: The physical key assigned to trigger this macro.
- 🗑️ Delete: Permanently remove this macro.
- 🔁 Repeat:
0= Infinite loop through all steps.Numbers= Execute the sequence for a specific count (e.g., 3 repeats).
โครงสร้าง Step และคำสั่งพิเศษ
Step Structure & Commands
- 🆔 #1: ลำดับขั้นตอน (Step) การทำงาน
- ⚡ $ คำสั่งพิเศษ: หากระบุชื่อคำสั่งที่มีเครื่องหมาย
$นำหน้า จะเป็นการเรียกใช้ฟังก์ชันของบอทโดยตรง$on_off_bot= สั่งเปิด/ปิดการทำงานหลักของบอท (เช็ค Status แต่ไม่ปิดมาโครอื่น)
- ⏱️ Delay (0s): ระยะเวลารอหลังจากจบ Step นี้ (รองรับหน่วย
sหรือms) - ❌ X: ลบ Step นี้ทิ้ง | Add Step: เพิ่มขั้นตอนการทำงานใหม่
- 🆔 #1: The execution order (Step number).
- ⚡ $ Commands: Keys starting with
$trigger internal bot functions.$on_off_bot= Toggle main bot logic (Status checking) without stopping other macros.
- ⏱️ Delay (0s): Wait duration after this step (Use
sorms). - ❌ X: Remove step | Add Step: Append a new action to the sequence.
- F1: เปิด/ปิด การใช้งานบอทหลัก ($on_off_bot)
- F1: Toggle main bot operation ($on_off_bot)
- F2: เปิด/ปิด ระบบสลับอาวุธบัฟ (Skill Rotation)
- F2: Toggle Skill Rotation system
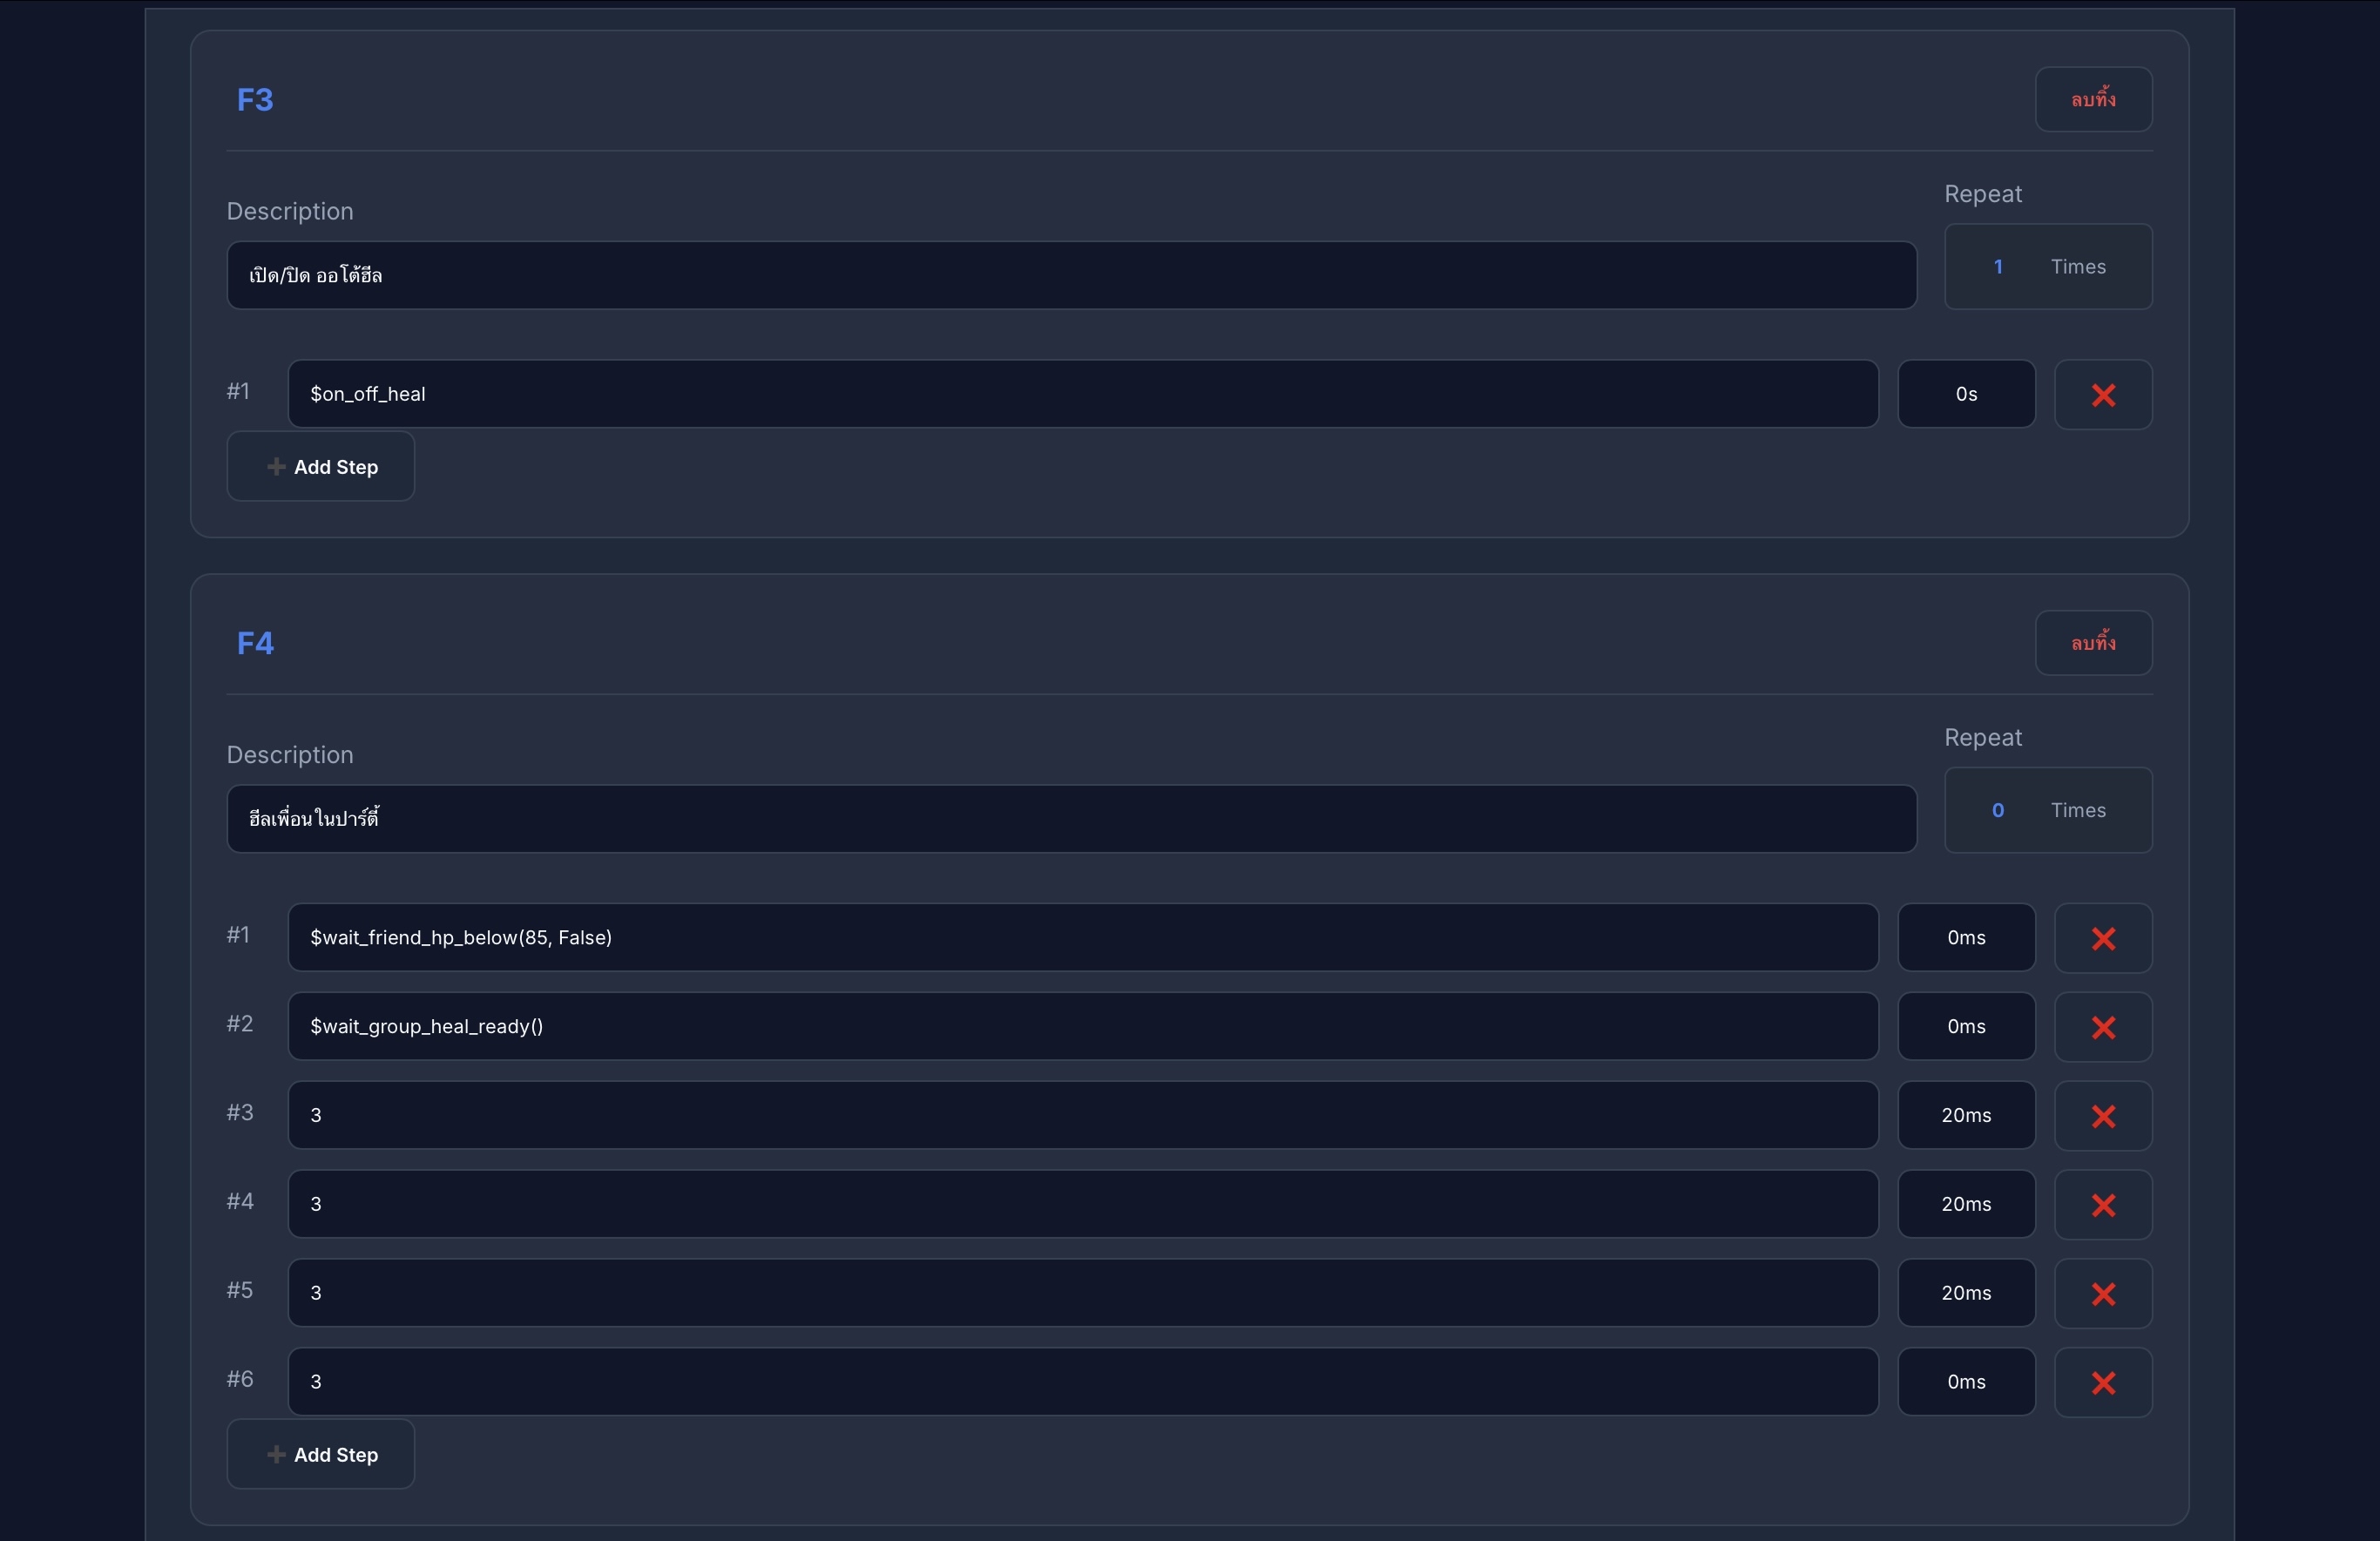
5.2 🩹 มาโครสำหรับการรักษา (Healing Macros)
5.2 🩹 Healing & Support Macros
ใช้สำหรับเปิด/ปิด การใช้ Heal อัตโนมัติ (โดยจะทำงานตาม % เลือดที่ตั้งไว้ใน ข้อ 4.1 และกดปุ่มตามที่ตั้งไว้ใน ข้อ 4.4)
Toggles automatic single-target healing. It operates based on the HP threshold set in Step 4.1 and uses the key assigned in Step 4.4.
ใช้สำหรับเปิด/ปิด การใช้ Heal หมู่เมื่อคนในปาร์ตี้มี HP ต่ำกว่าที่กำหนด (ค่าเริ่มต้นคือ 85% ซึ่งคุณสามารถปรับเปลี่ยนตัวเลขนี้ได้เองในช่องมาโคร)
Toggles area-of-effect healing for party members. Triggers when party members' HP drops below a specific threshold (Default is 85%, which is customizable).
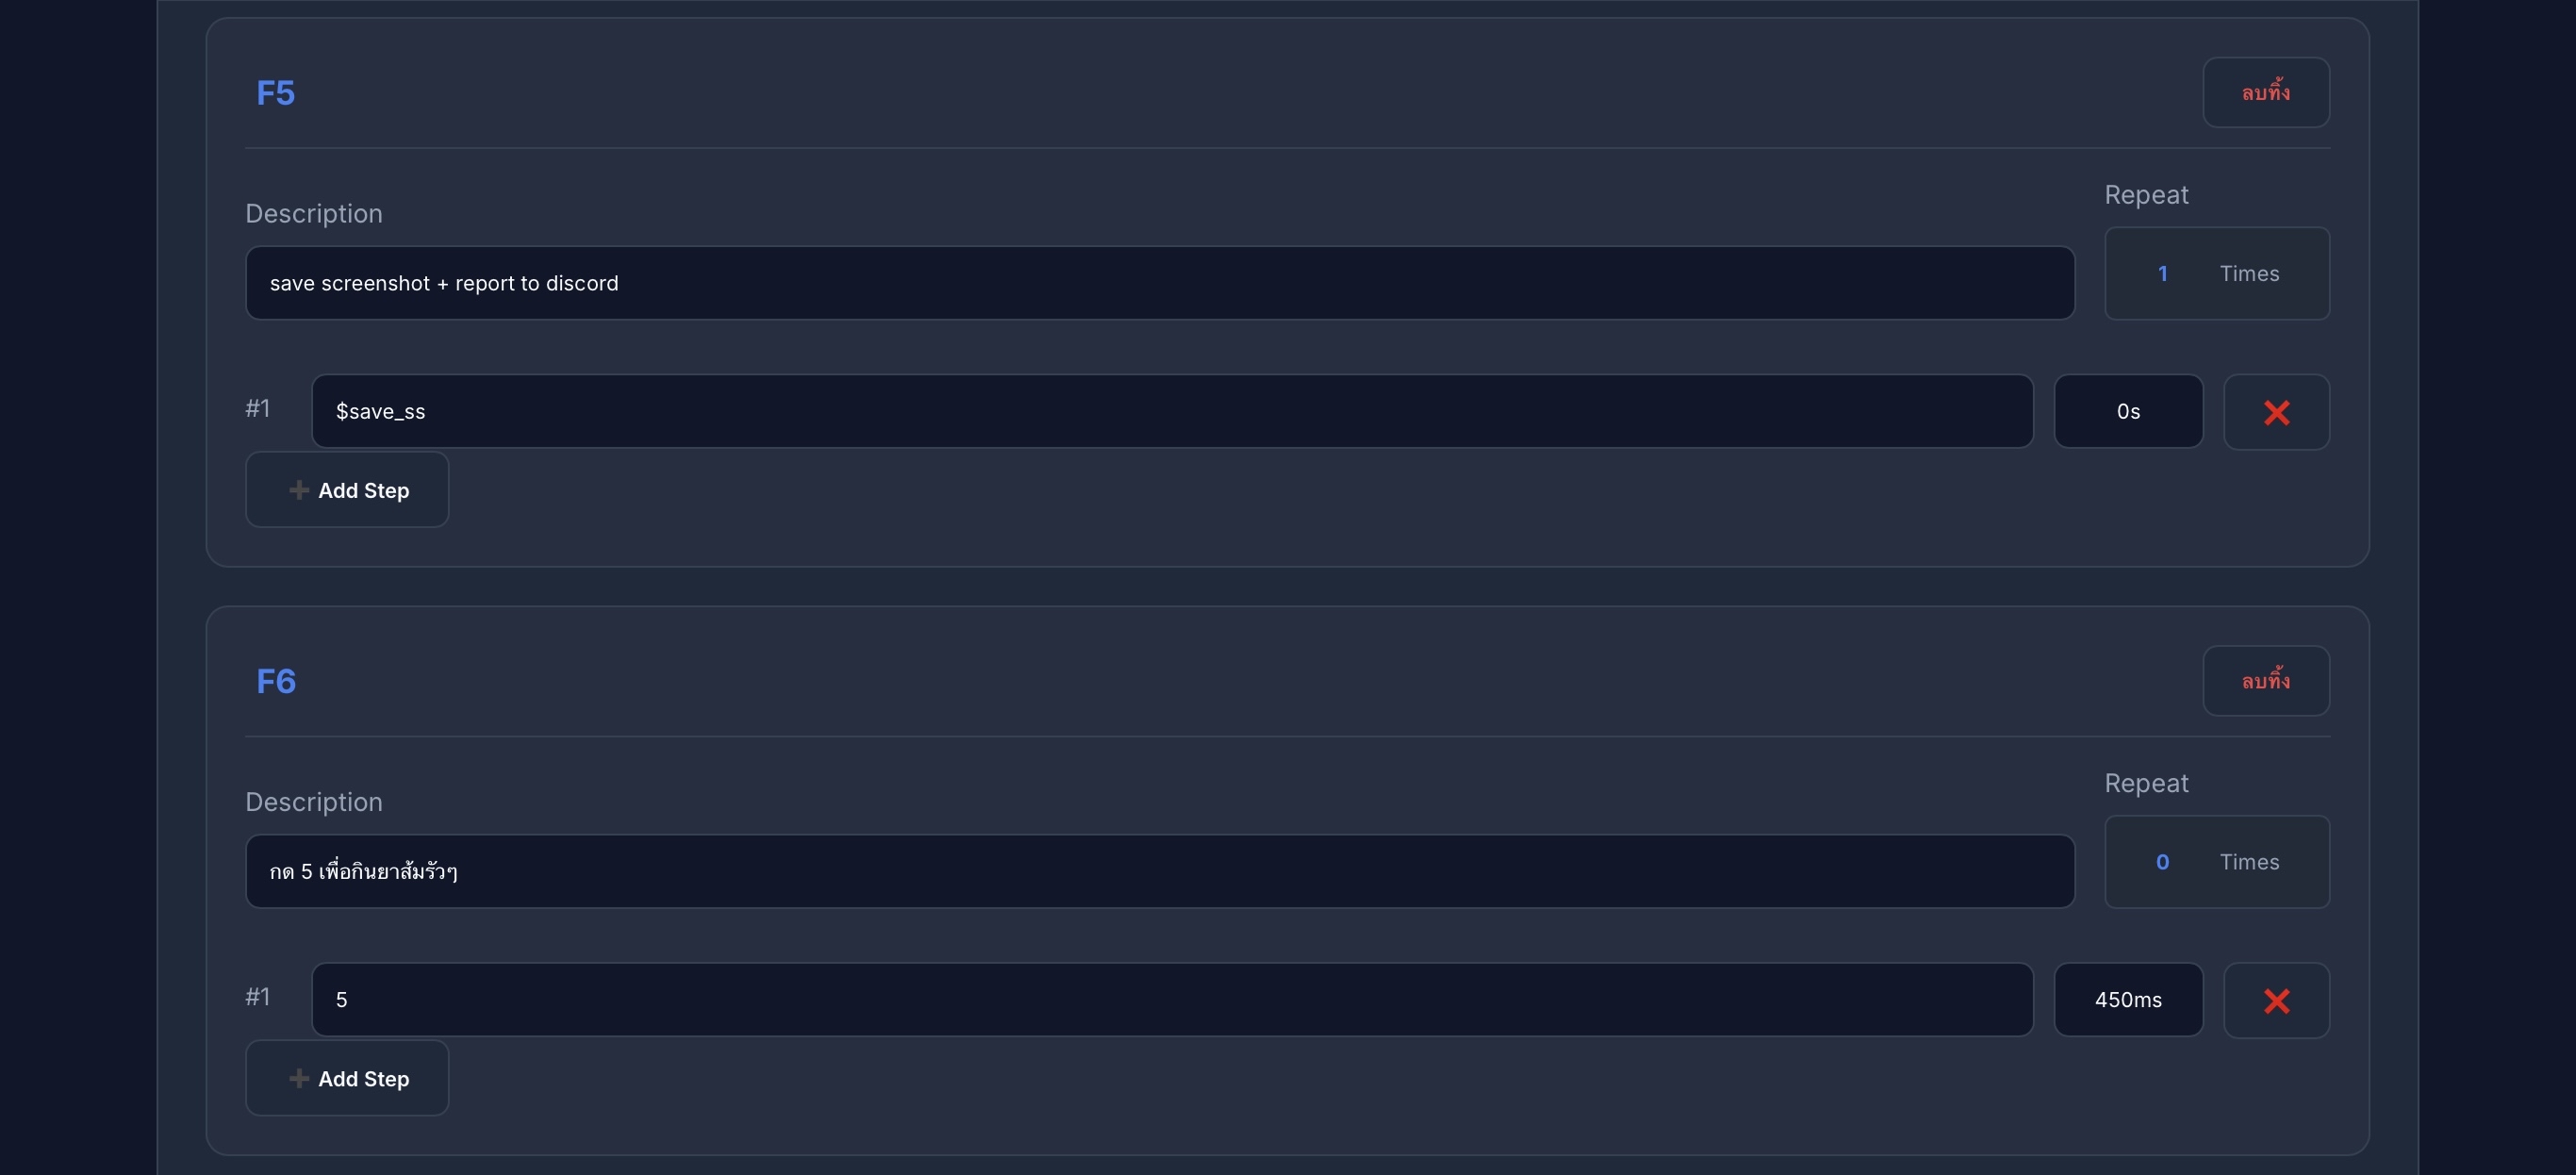
5.3 📸 ยูทิลิตี้และมาโครโจมตี (Utility & Combat)
5.3 📸 Utility & Combat Macros
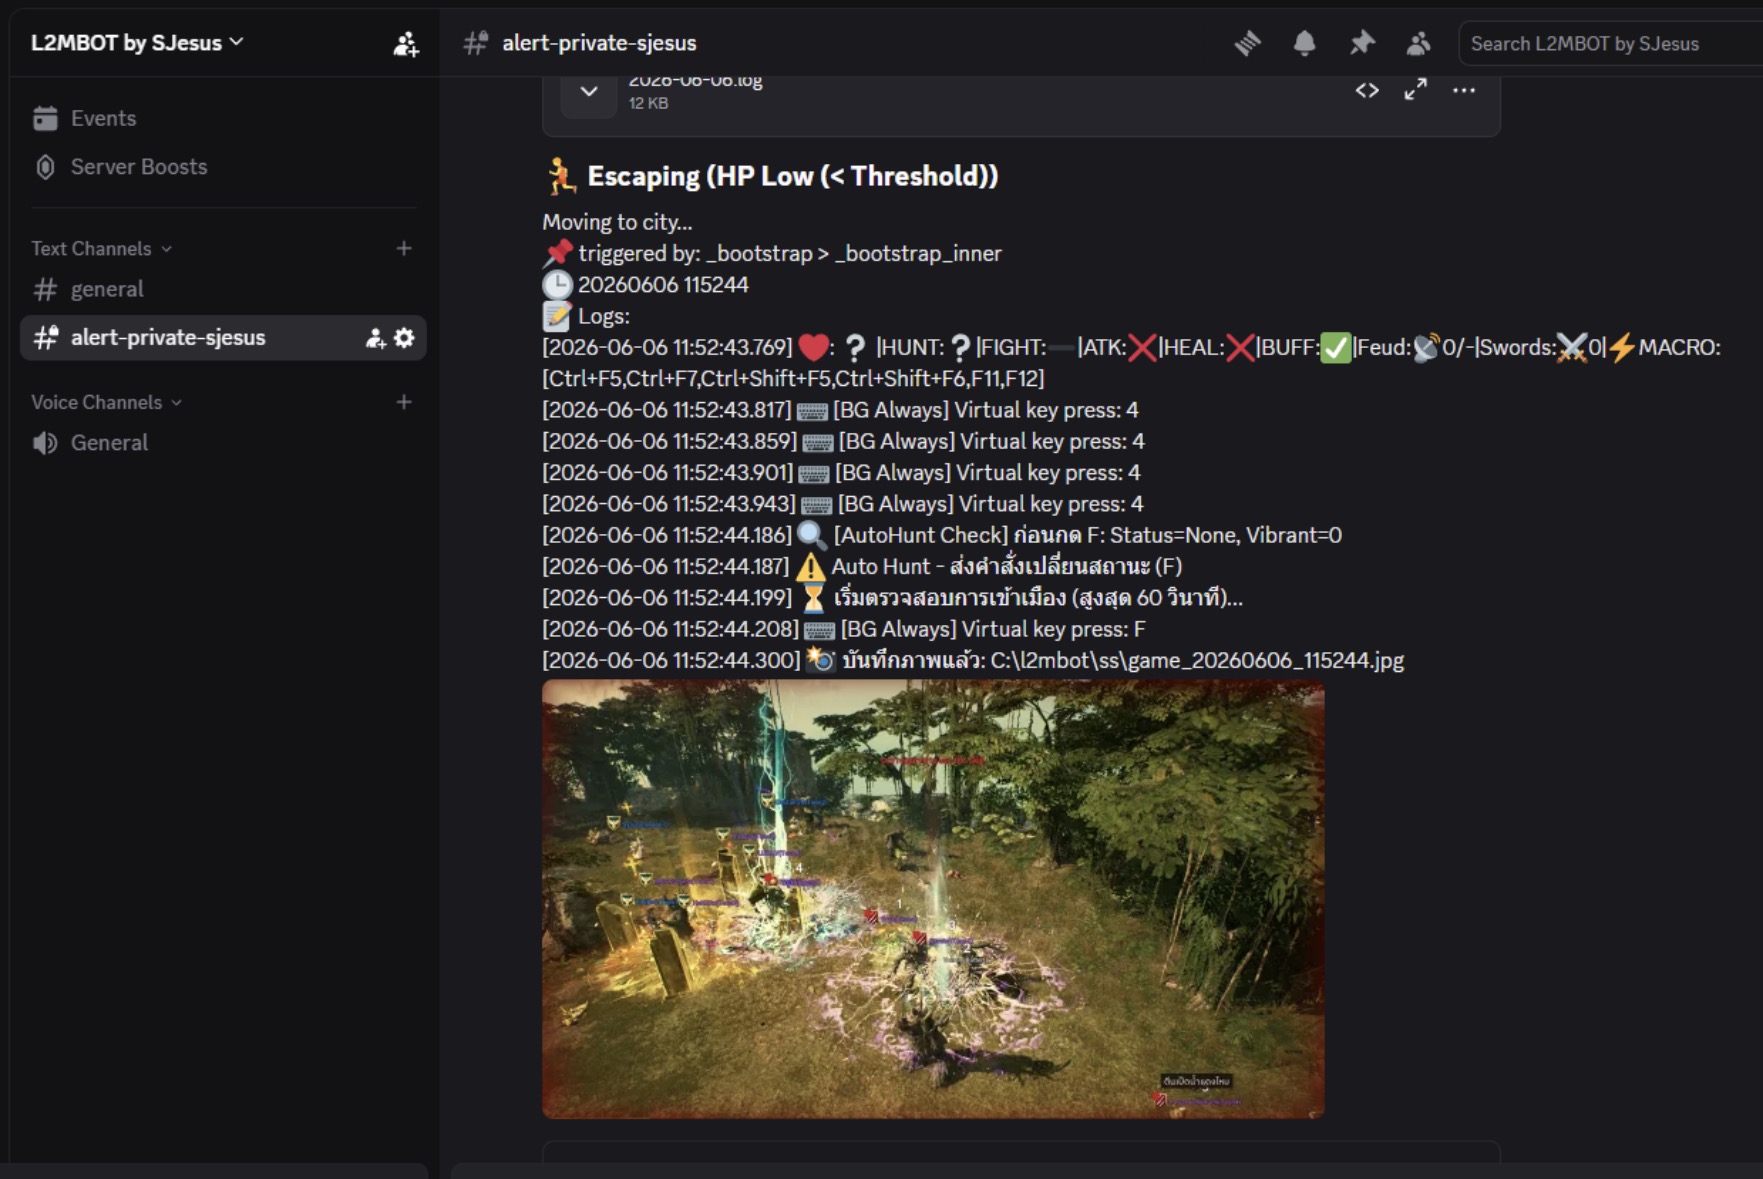
กดเพื่อบันทึกภาพหน้าจอลงในโฟลเดอร์ ss และส่งภาพไปยัง Discord ตามที่ตั้งค่าไว้ใน ข้อ 4.1 ทันที
Saves a screenshot to the ss folder and automatically sends it to your Discord channel configured in Step 4.1.
ใช้สำหรับเปิด/ปิด การกดใช้งาน Skill ช่องที่ 5 โดยอัตโนมัติในทุกๆ 0.45 วินาที
Toggles automatic rapid execution of Skill Slot 5 every 0.45 seconds.
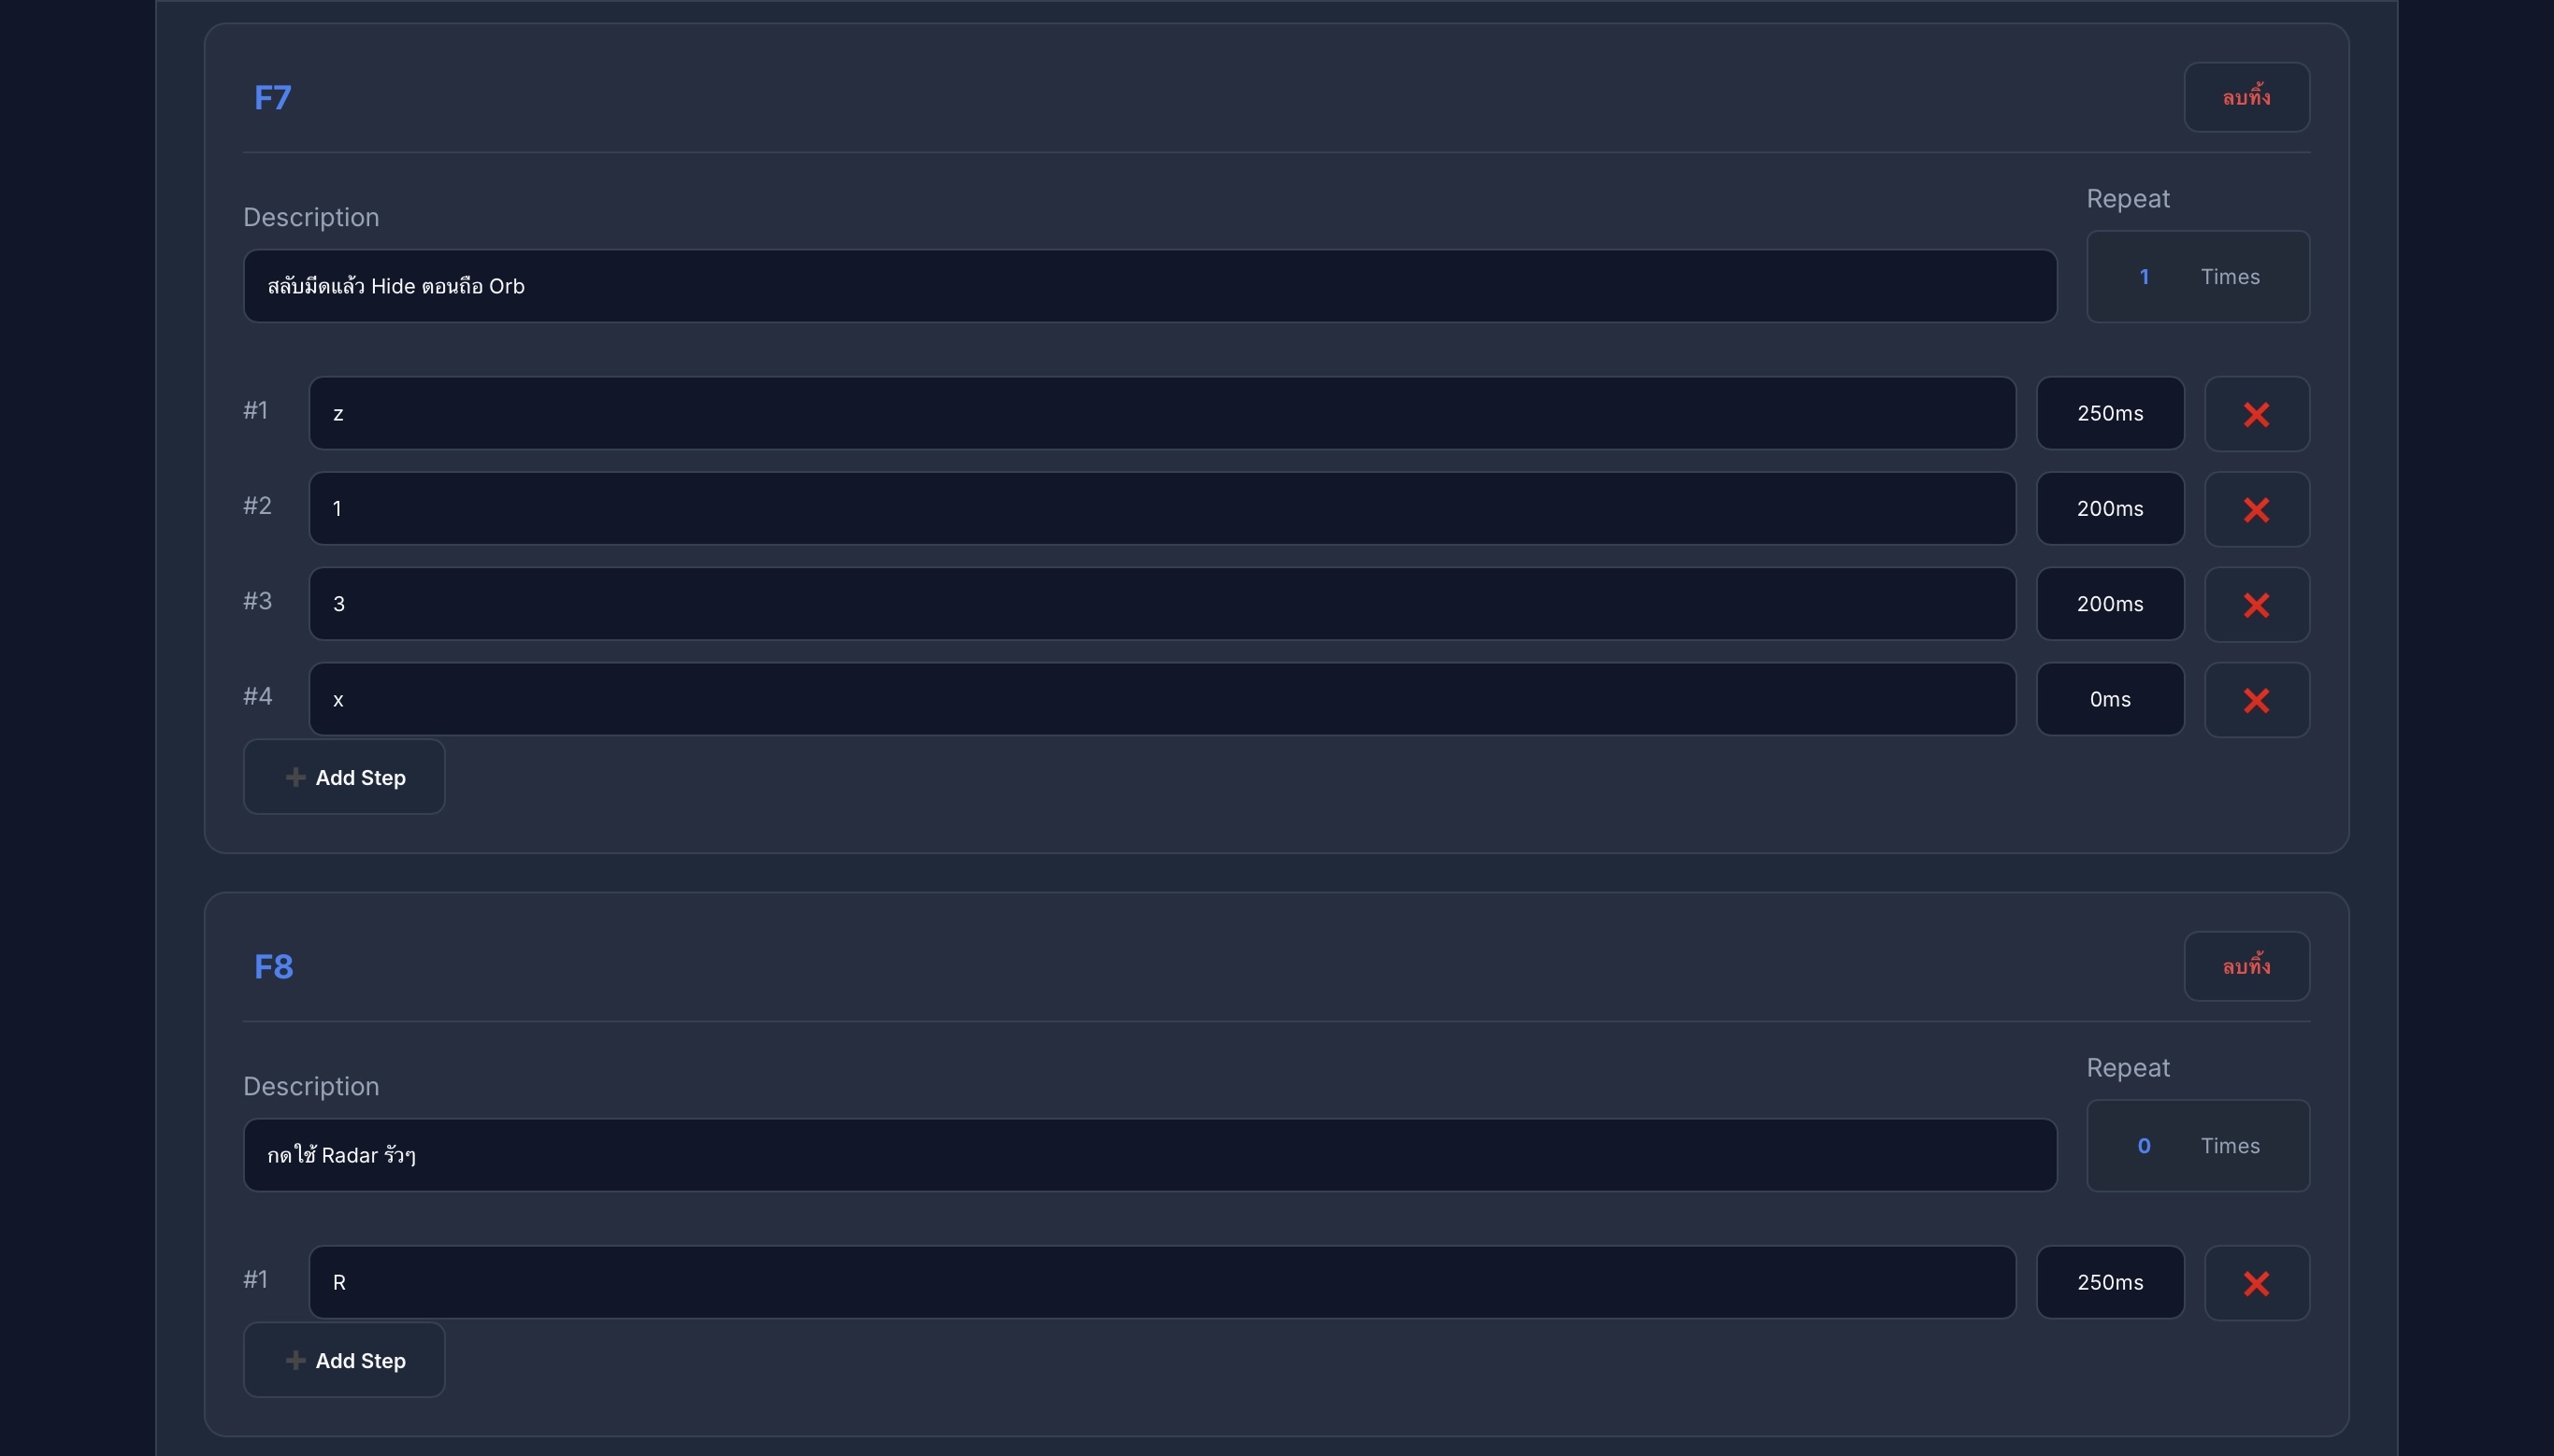
5.4 🕵️ มาโครคอมโบและเรดาร์ (Combo & Radar)
5.4 🕵️ Stealth Combo & Radar Macros
- กด z เพื่อสลับหน้า Quick Slot
- กด Skill 1 (เปลี่ยนเป็นมีด)
- กด Skill 3 (สกิล Hide เพื่อหายตัว)
- กด x เพื่อสลับหน้า Quick Slot กลับมาที่เดิม
- Press z to swap Quick Slot page.
- Use Skill 1 (Equip Dagger).
- Use Skill 3 (Execute Hide skill).
- Press x to swap Quick Slot page back.
ใช้สำหรับเปิด/ปิด การกดปุ่ม R (Radar) แบบรัวๆ เพื่อใช้ในการตรวจหาเป้าหมายอย่างรวดเร็ว
Toggles automatic rapid execution of the R (Radar) key for high-speed target detection.
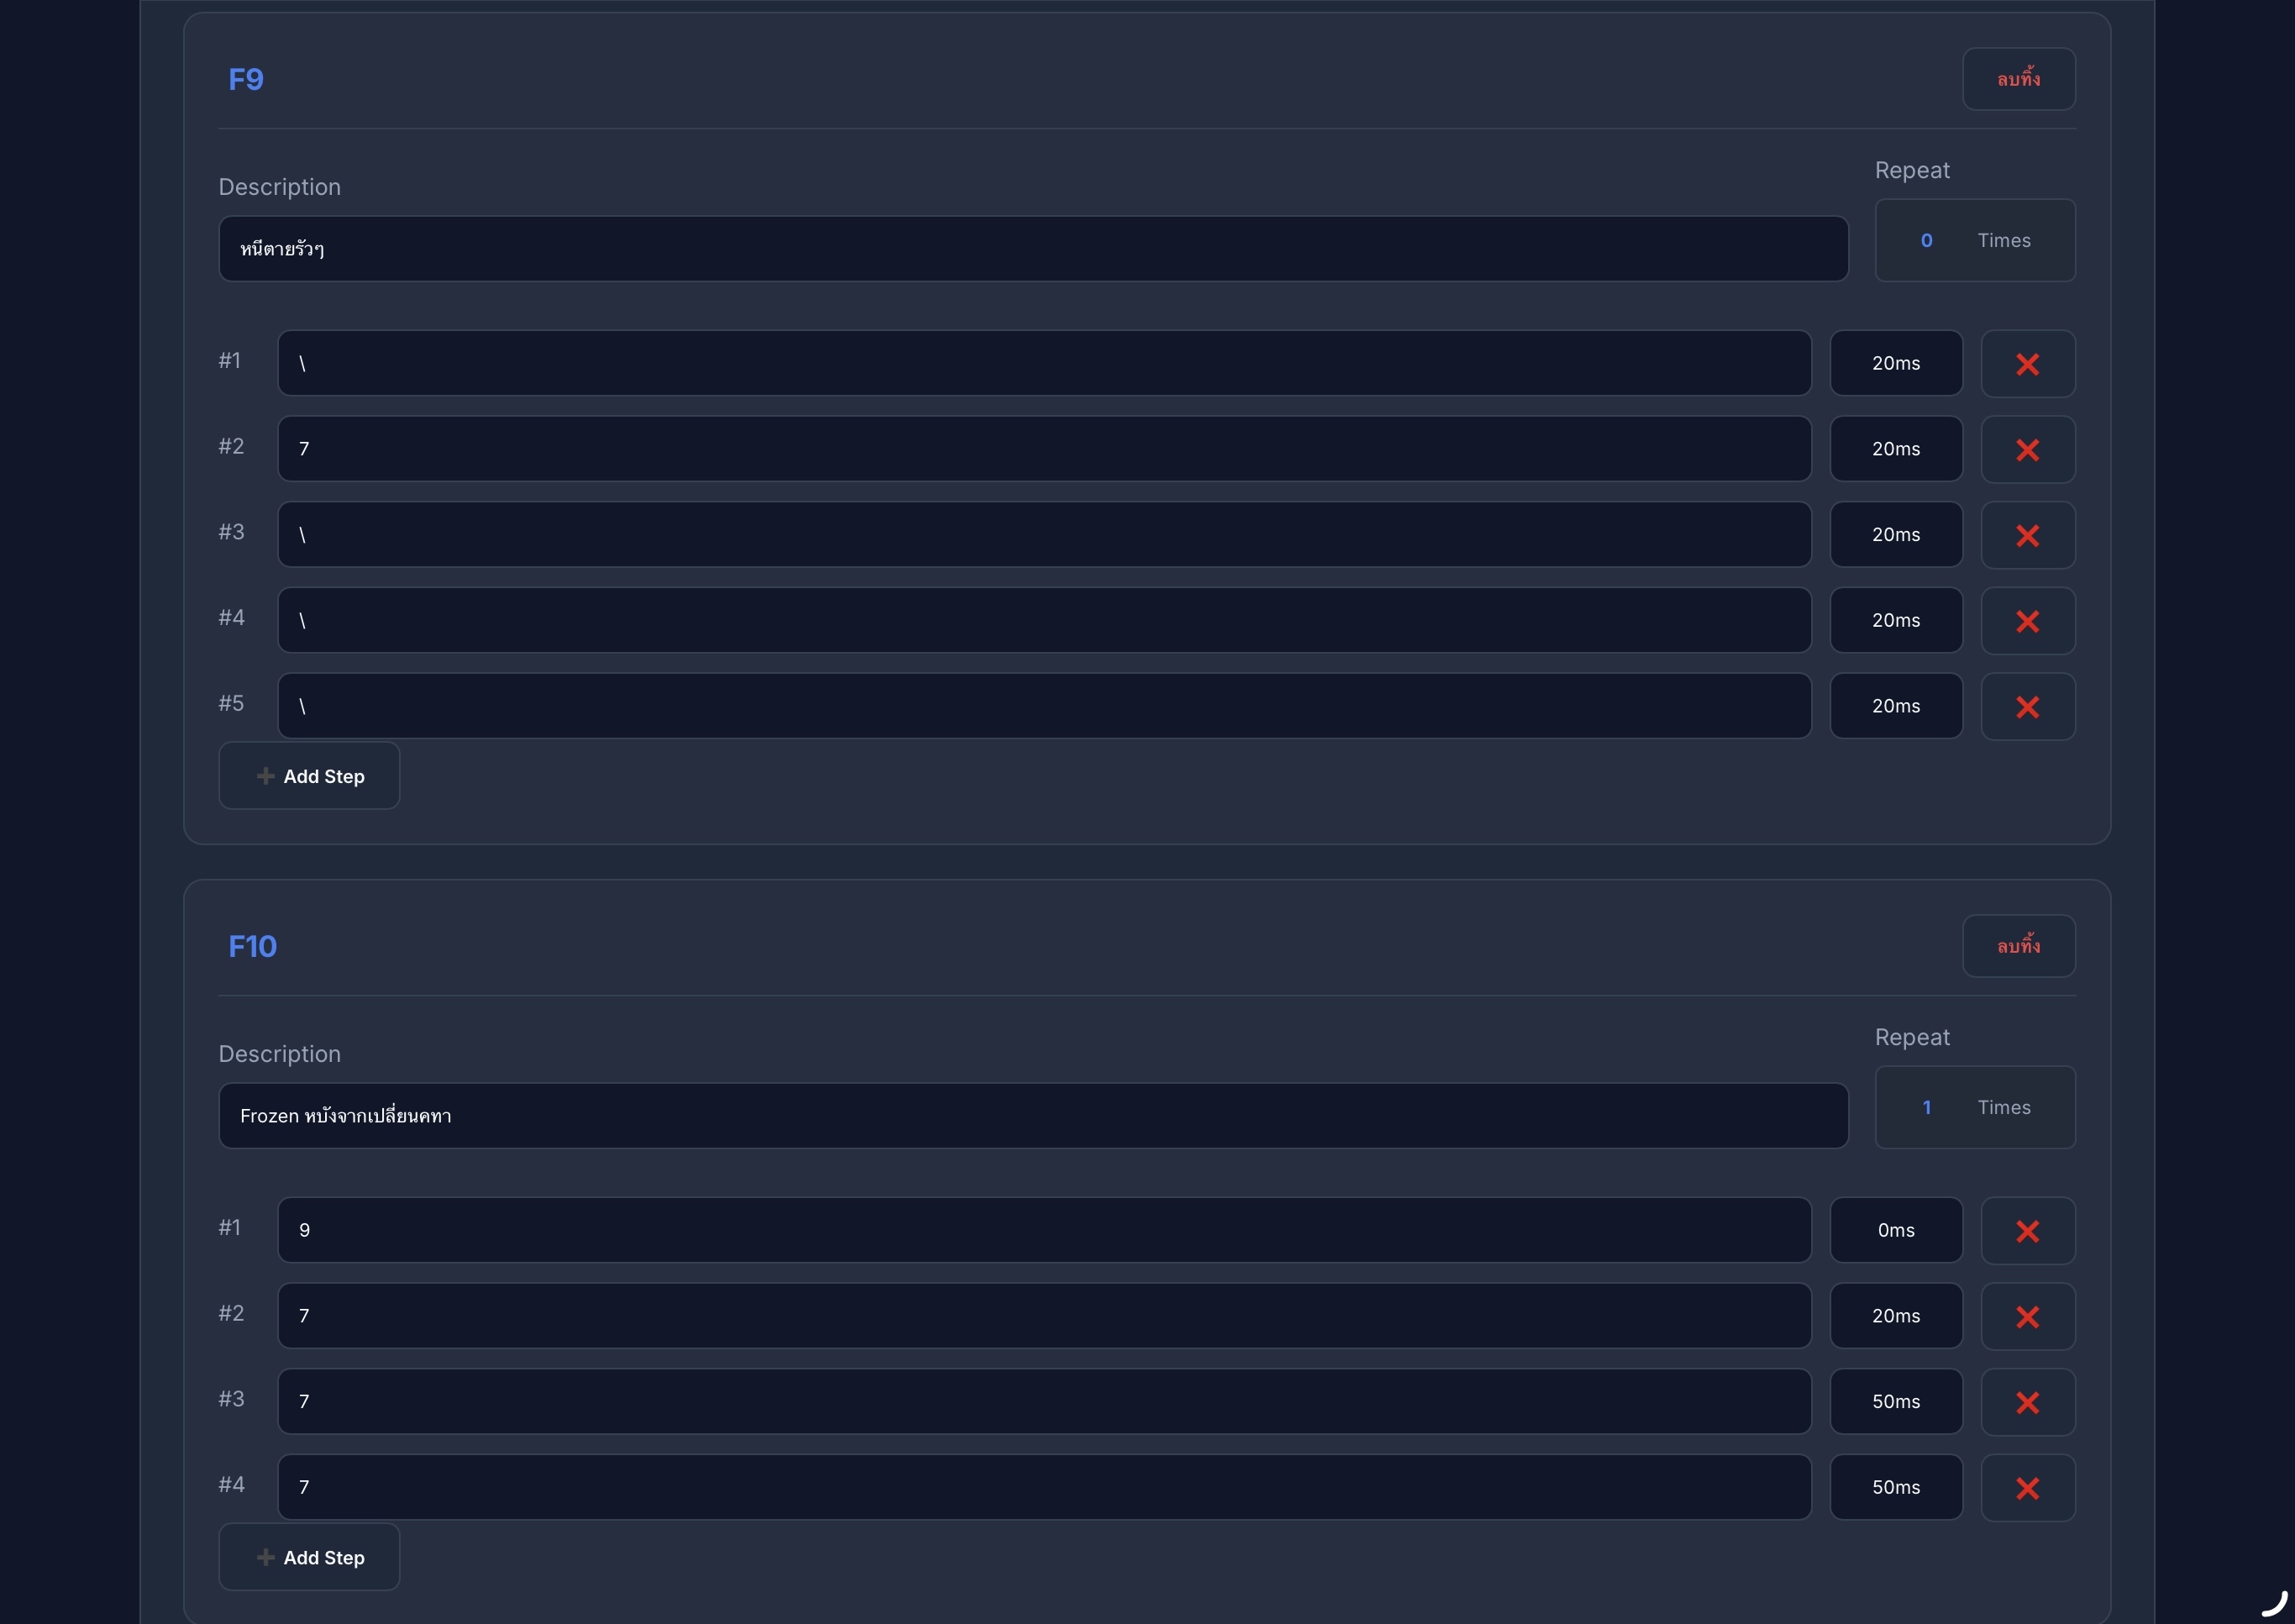
5.5 🛡️ มาโครการเอาตัวรอด (Survival & Escape)
5.5 🛡️ Survival & Escape Macros
ใช้สำหรับเปิด/ปิด การกดวิ่งหนีแบบรัวๆ พร้อมทั้งกด ปุ่ม 7 (Frozen) อัตโนมัติ (⚠️ เมื่อหนีพ้นแล้ว ต้องกด F9 อีกครั้งเพื่อปิดการทำงาน)
Toggles rapid escape movement and automatically triggers Key 7 (Frozen). (⚠️ After escaping, you must press F9 again to disable this mode).
กดเพื่อสลับอาวุธเป็น คทา (Staff) และใช้สกิล Frozen ทันที
Quickly switches weapon to Staff and executes the Frozen skill immediately.
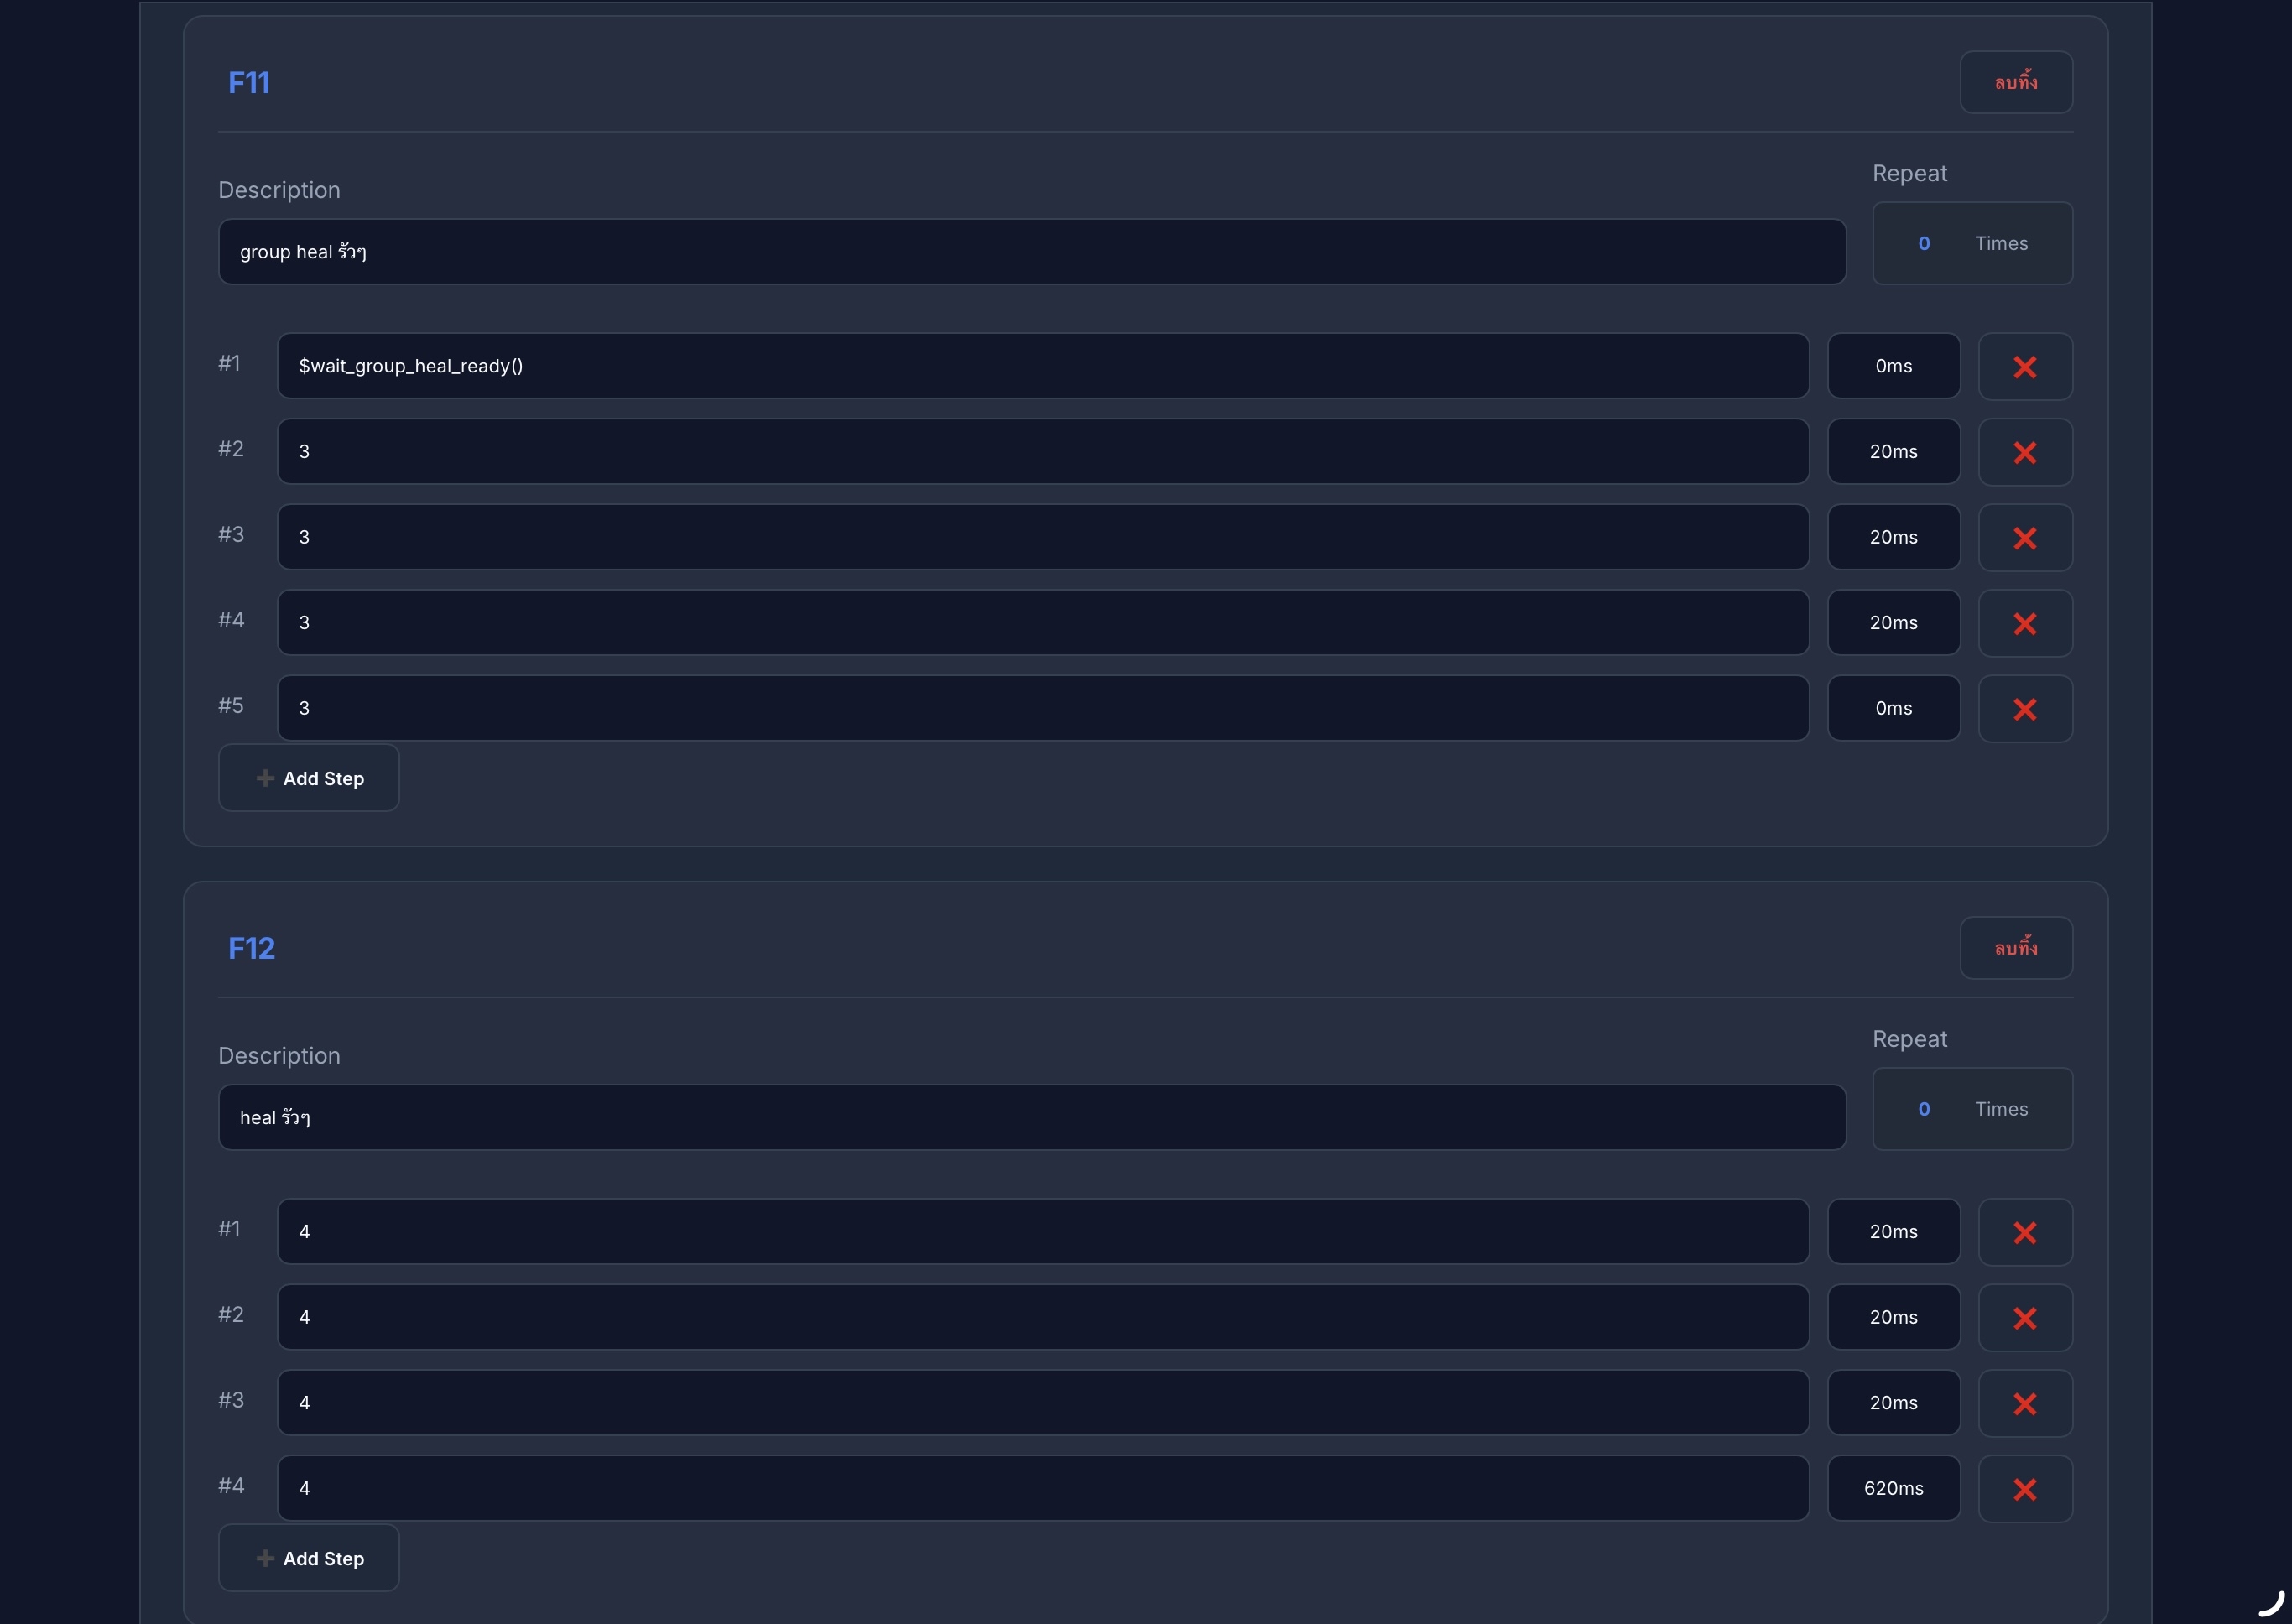
5.6 💉 ระบบสนับสนุนขั้นสูง (Advanced Support)
5.6 💉 Advanced Support & Rapid Healing
ใช้สำหรับเปิด/ปิด การกดใช้ฮีลหมู่โดยอัตโนมัติ โดยบอทจะกดใช้ก็ต่อเมื่อ ตรวจพบรูปไอคอนสกิล Group Heal ว่าพร้อมใช้งานแล้วเท่านั้น
Toggles automatic group healing. The bot will only trigger this action when it detects the Group Heal skill icon is active and ready for use.
ใช้สำหรับเปิด/ปิด การกดใช้งาน สกิลฮีลเดี่ยว แบบรัวๆ ต่อเนื่องเพื่อการรักษาที่รวดเร็วที่สุด
Toggles continuous rapid execution of the Single Heal skill for maximum healing output.
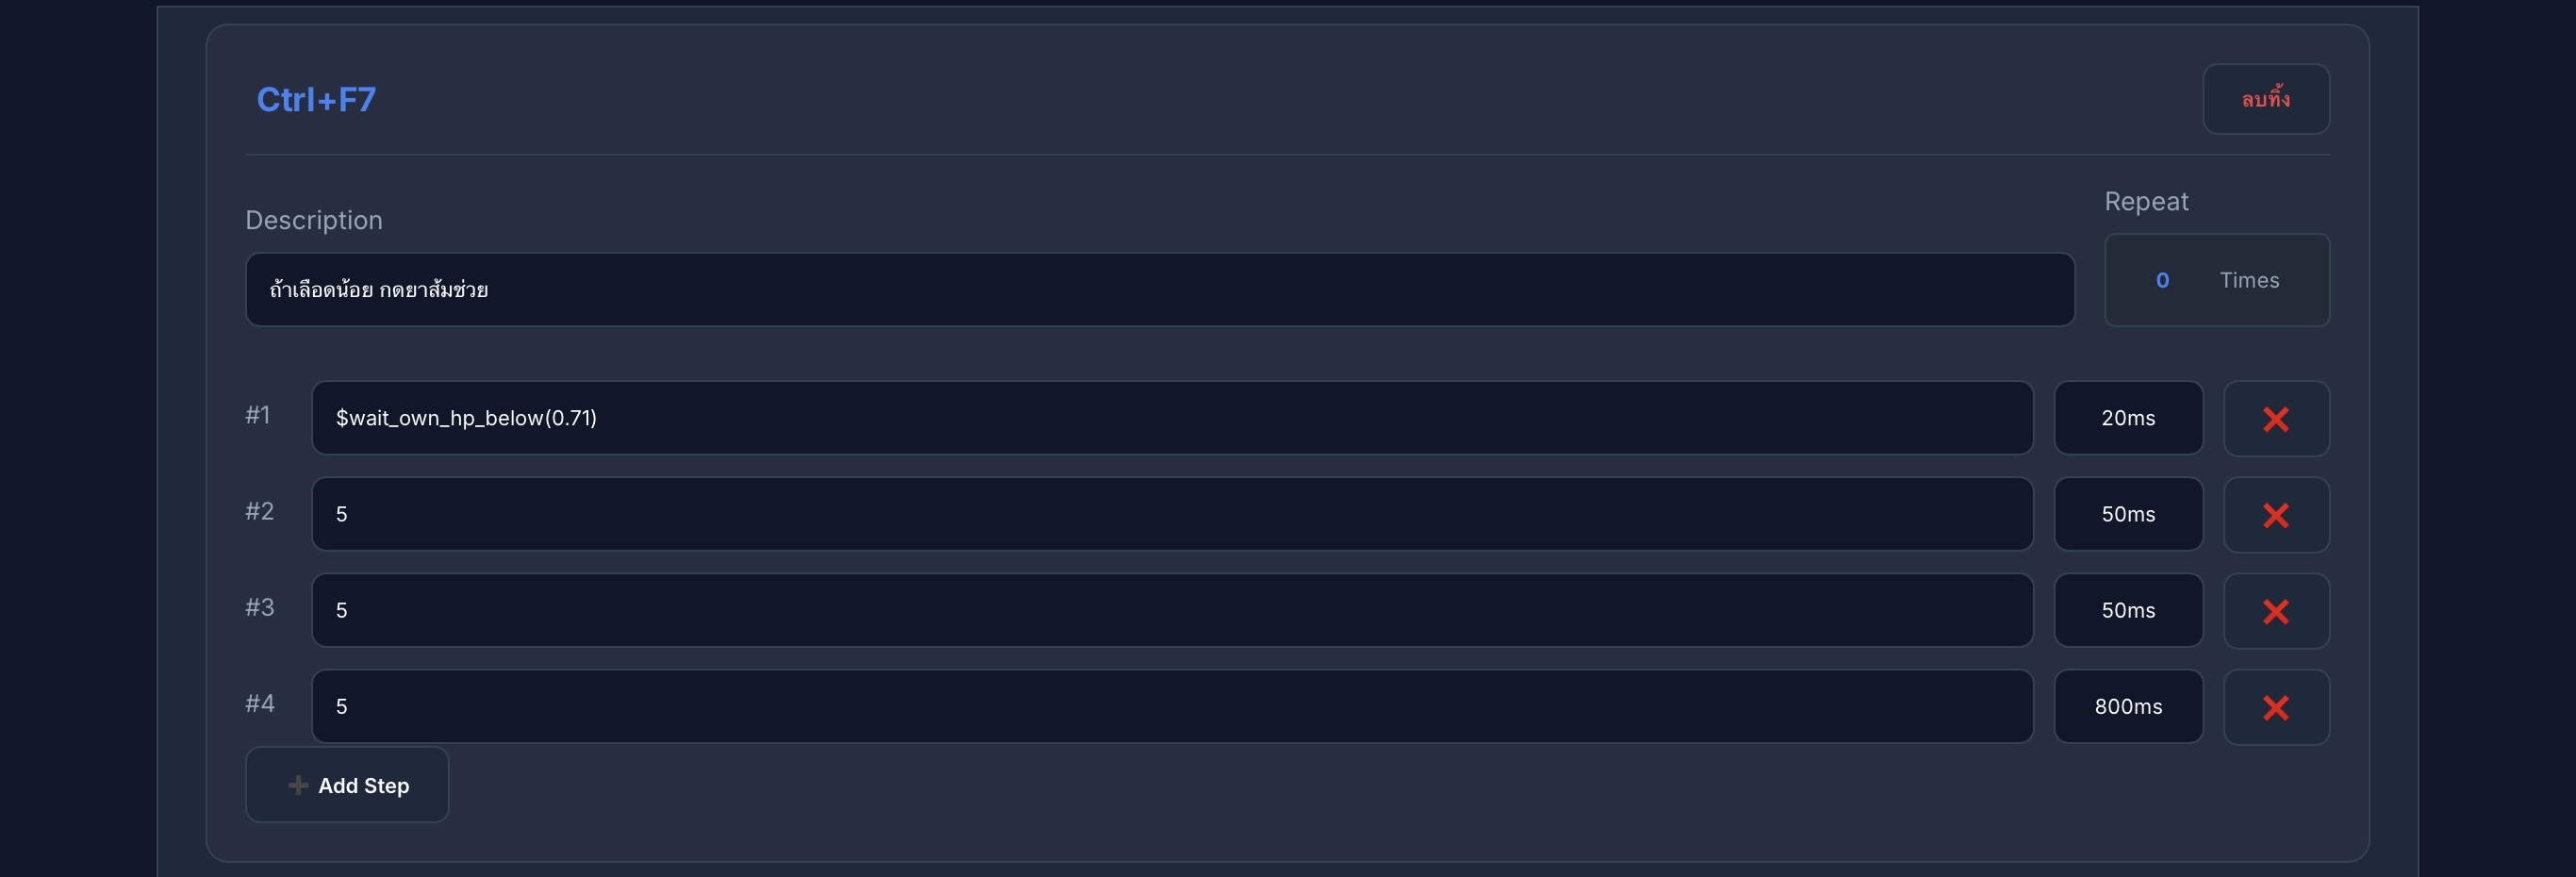
5.7 🩹 มาโครการฟื้นฟูฉุกเฉิน (Emergency Sustain)
5.7 🩹 Emergency Sustain Macros
ตั้งค่าให้กดใช้งาน Skill ช่องที่ 5 (หรือยาส้ม) โดยอัตโนมัติเมื่อ HP ต่ำกว่าที่กำหนด (ตัวอย่างในรูปคือเมื่อ HP < 71% บอทจะเริ่มกดยา/สกิลช่วยชีวิตทันที)
Automatically triggers Skill Slot 5 (or Orange Potions) when **HP drops below a specific threshold** (e.g., HP < 71% triggers emergency sustain).
5.8 🔄 มาโครสลับอาวุธฮีล (Auto Weapon-Swap Healing)
5.8 🔄 Automated Weapon-Swap Healing
- เมื่อ HP ต่ำกว่าที่กำหนด: บอทจะสลับอาวุธไปเป็น Orb
- เรียกใช้มาโคร F11 + F12 เพื่อรันระบบ Heal ทั้งหมู่และเดี่ยวทันที
- เมื่อ HP ฟื้นฟูกลับมาสูงกว่าค่าที่ตั้งไว้: บอทจะสลับกลับไปใช้ อาวุธหลัก และฟาร์มต่ออัตโนมัติ
- When HP is below threshold: Switches weapon to Orb.
- Triggers macros F11 + F12 for immediate rapid recovery.
- When HP recovers above target: Switches back to Main Weapon and resumes farming.
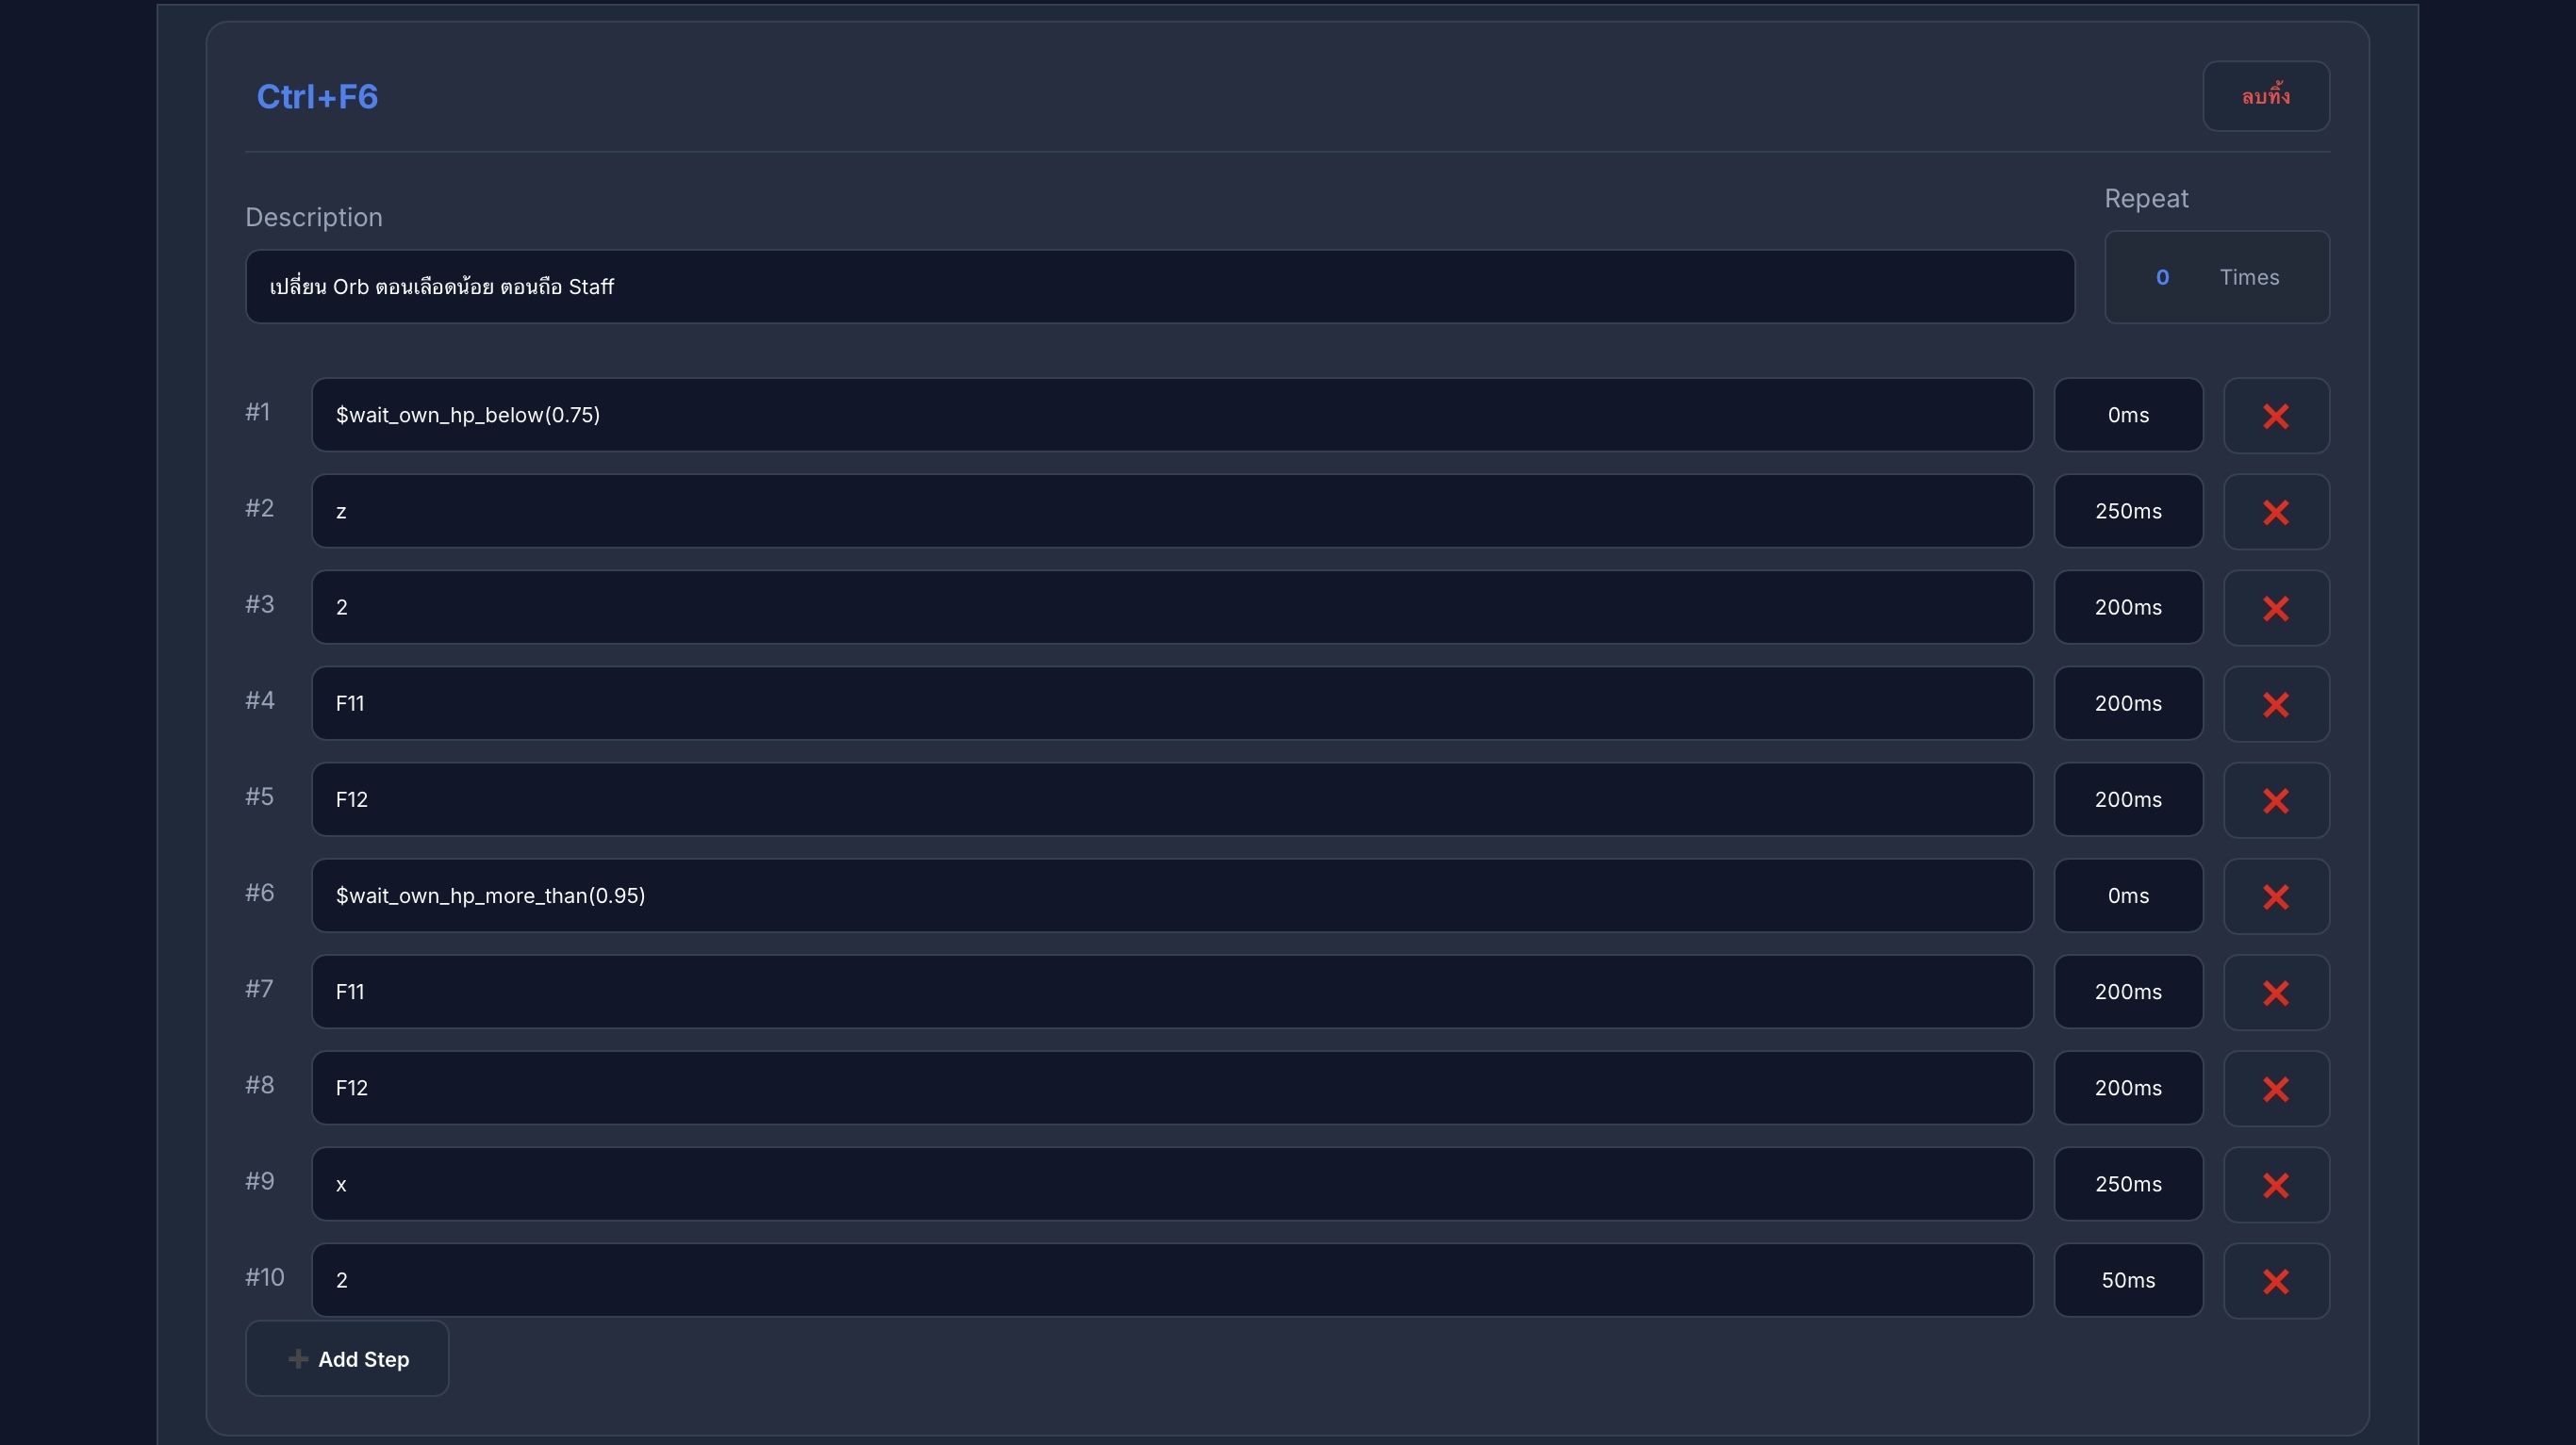
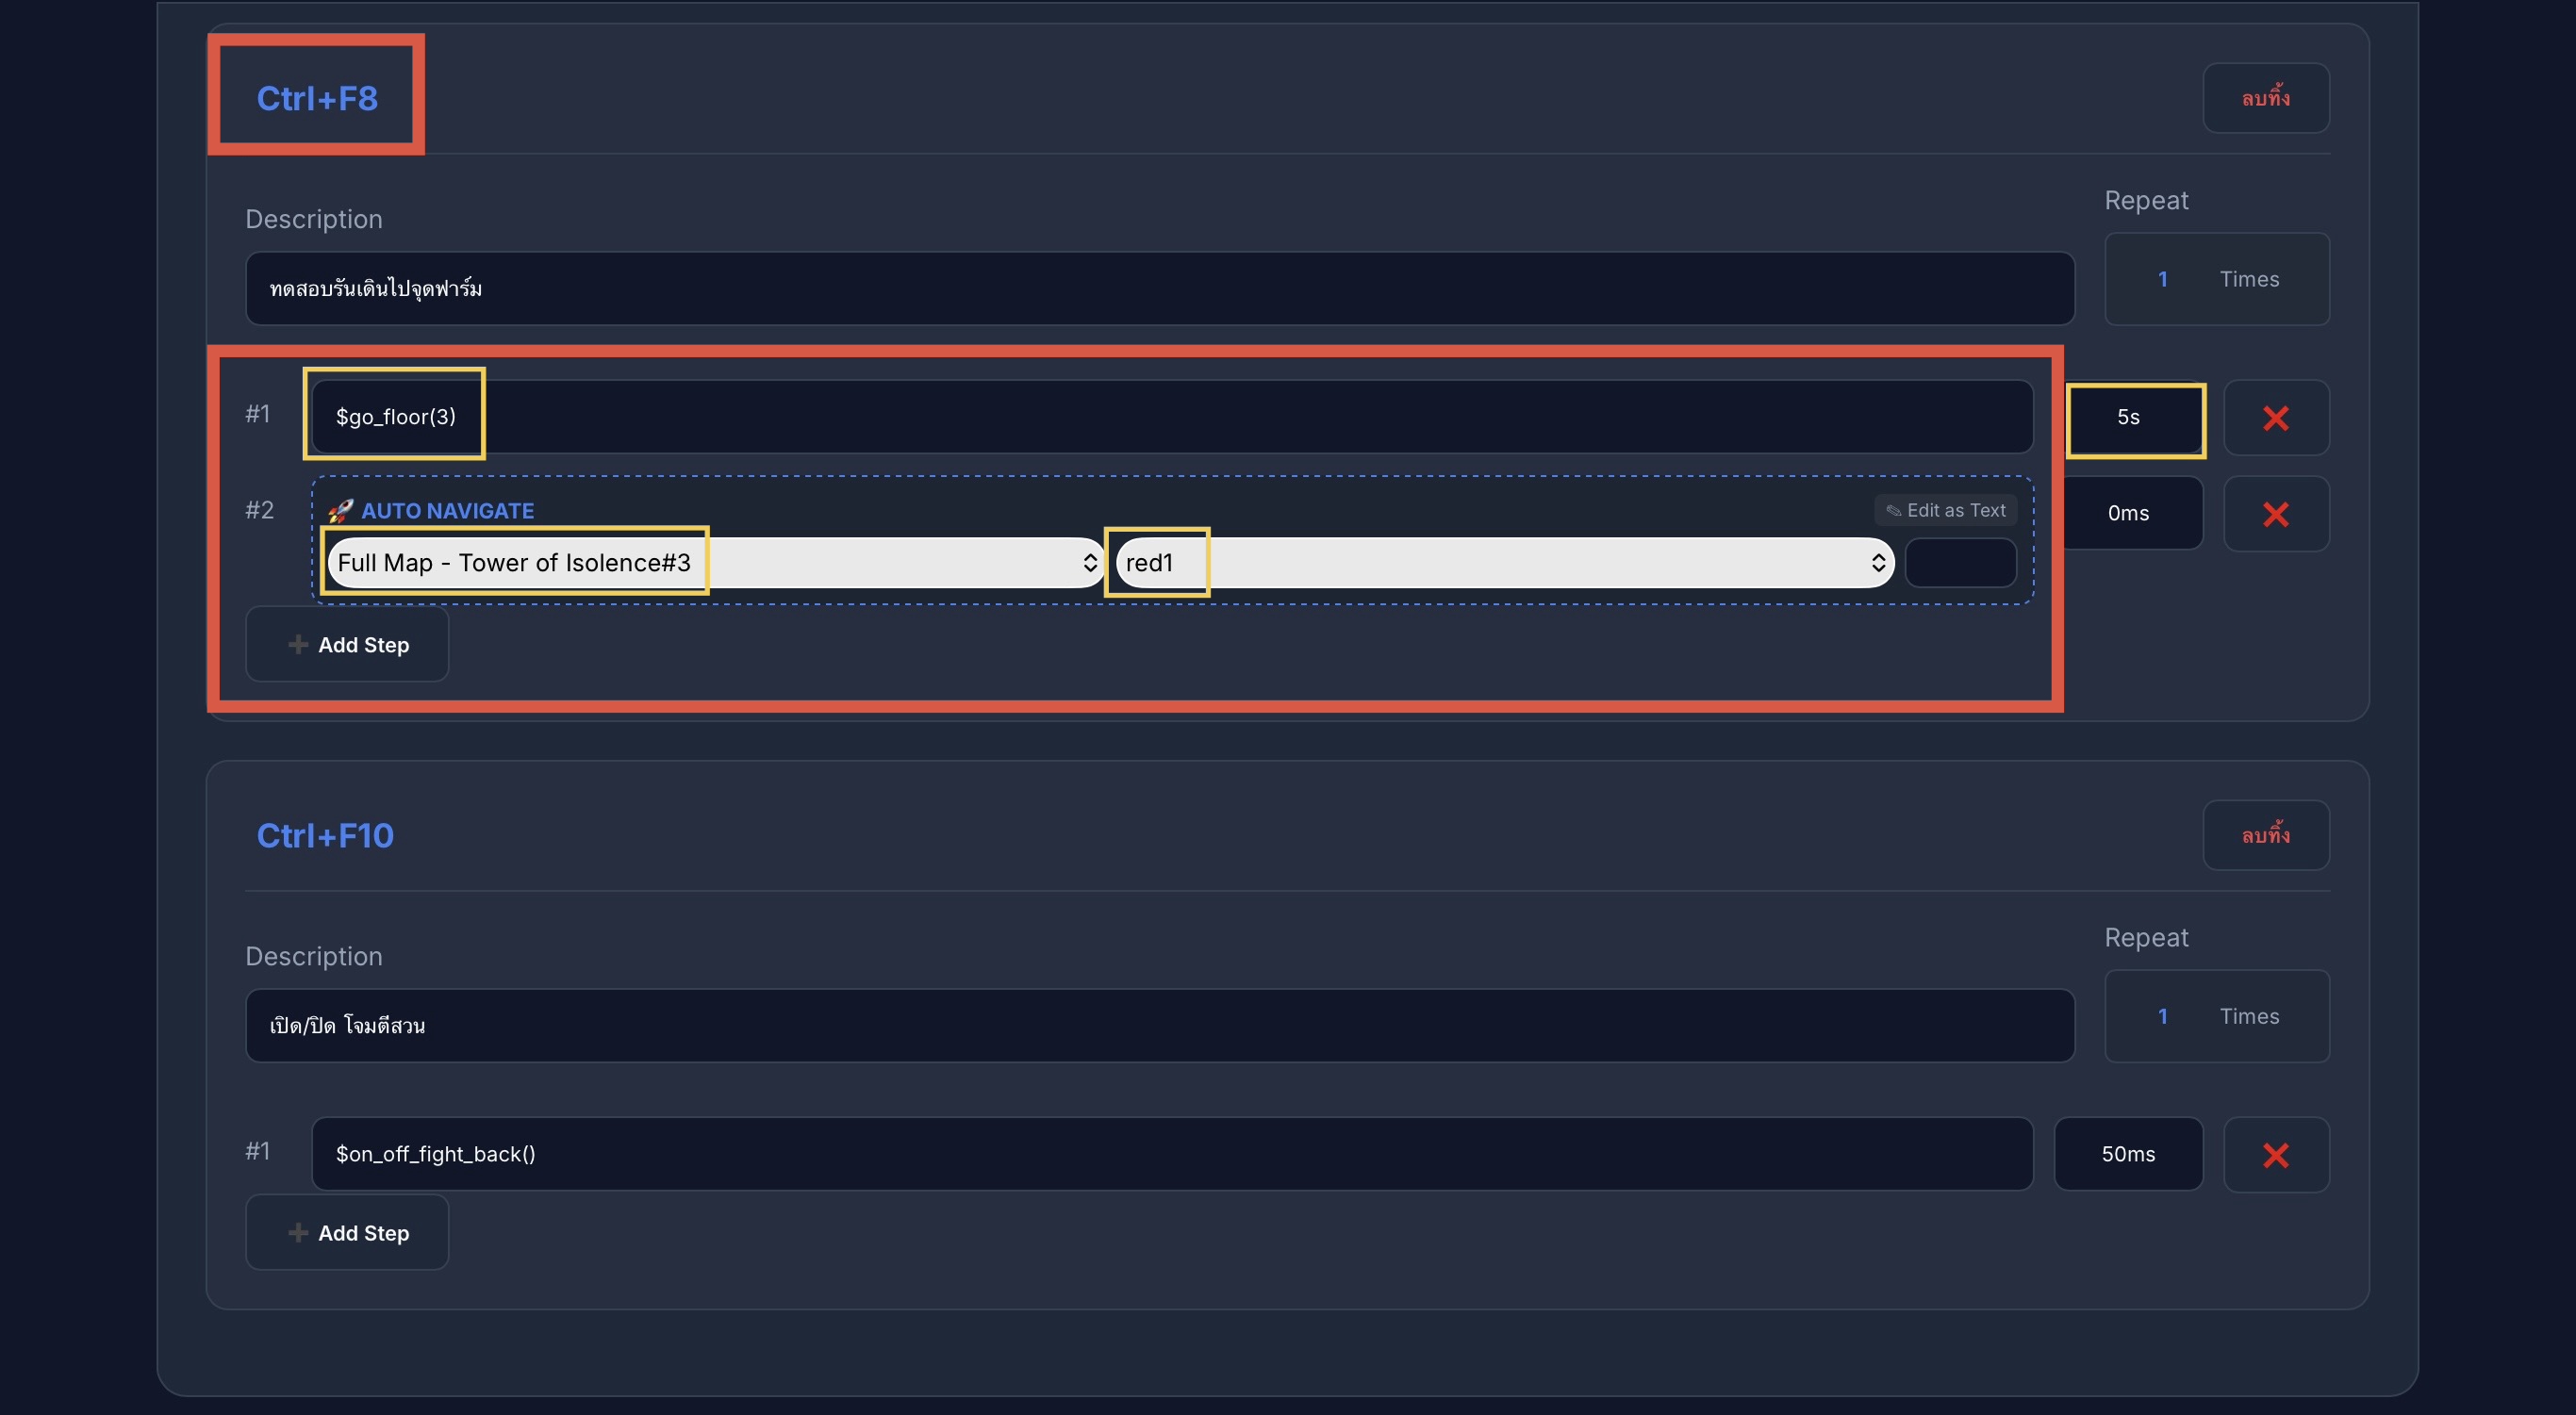
5.9 🗺️ การนำทางขั้นสูงและสถานะ (Navigation & Status)
5.9 🗺️ Advanced Navigation & Status Toggles
- Step#1: ใช้คำสั่ง
$go_floor(x)(เปลี่ยน x เป็นเลขชั้น เช่น 3 เพื่อไปหอคอยโอหังชั้น 3) และตั้ง Delay 5 วินาที - Step#2: เลือก Waypoint ที่ต้องการให้บอทเดินไปฟาร์ม
- Step#1: Use
$go_floor(x)(e.g., replace x with 3 for Tower of Insolence F3) and set a 5s Delay. - Step#2: Select the target Waypoint for the bot to navigate to.
Ctrl+F8 นี้ไปใส่ในช่อง Back to Farm Macro (ข้อ 4.3) เพื่อเปลี่ยนจากการวาร์ปปกติ เป็นการ "เดินไปยังจุดฟาร์ม" แทนได้ครับ
💡 TIP: You can assign Ctrl+F8 to the Back to Farm Macro (Step 4.3) setting to change from teleporting to "Walking back to farm" automatically.
ใช้สำหรับเปิด/ปิด สถานะการโจมตีแบบพิเศษ (โจมตีสวย) ตามความต้องการของผู้ใช้
Toggles the "Graceful Attack" combat status mode on or off.
ข้อ 6. 🎹 ปุ่มลัดลอยหน้าจอ (Yucha Key Panel)
Step 6. 🎹 Floating Overlay Drawer (Yucha Key Panel)
6.1 🎹 แนะนำ Yucha Key Panel (ปุ่มลัดลอยหน้าจอ)
6.1 🎹 Introduction to Yucha Key Panel
Yucha Key Panel คือ แผงควบคุมปุ่มลัดแบบลอยตัวหน้าจอเกม ออกแบบมาเพื่อให้คุณสามารถสั่งรัน มาโคร (Macro) ต่างๆ ที่ตั้งค่าไว้ใน Macro Studio ได้ทันทีเพียงแค่คลิกเมาส์บนหน้าจอ โดยไม่ต้องกดปุ่มบนคีย์บอร์ด เหมาะเป็นอย่างยิ่งสำหรับการใช้งานผ่านแท็บเล็ต หน้าจอสัมผัส หรือสำหรับผู้ที่ไม่อยากจำปุ่มกดบนคีย์บอร์ดครับ
Yucha Key Panel is a transparent floating widget system. It allows you to trigger your custom Macro Studio sequences by clicking floating on-screen buttons instead of pressing keyboard hotkeys. It is ideal for touchscreens, tablets, or players who prefer mouse clicks over memorizing hotkeys.
💡 แผนภาพอธิบายการทำงานร่วมกับ Macro Studio (เข้าใจง่ายที่สุด)
💡 Conceptual Workflow with Macro Studio
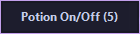
คุณคลิกปุ่มบนหน้าจอ เช่น ปุ่ม "Potion (5)"
You click a floating button on your screen, e.g., "Potion (5)"
ปุ่มลัดจำลองการกดคีย์ "5" ส่งเข้าตัวเกมเบื้องหลัง
The panel simulates pressing the physical key "5" directly to the game client.
Macro Studio ตรวจพบและรันคำสั่งขั้นตอนของคีย์ "5" ทันที
Macro Studio catches key "5" and executes the corresponding script steps.
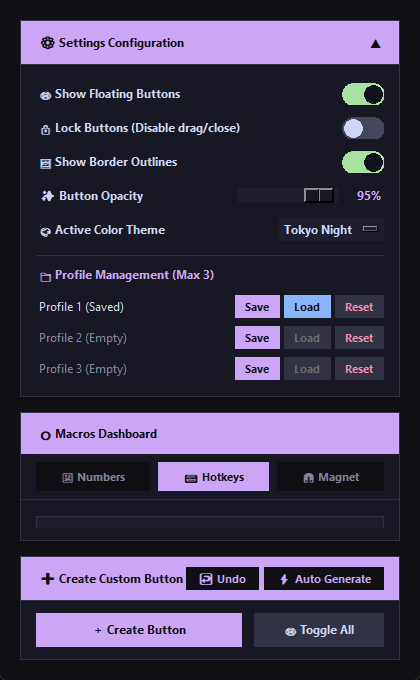
6.2 ⚙️ แผงตั้งค่าปุ่มลอยหลัก (Control Panel Settings)
6.2 ⚙️ Floating Button Control Panel
คุณสามารถเปิดหน้าต่างนี้ขึ้นมาโดยกดปุ่มคีย์ลัด Ctrl+Shift+F1 บนคีย์บอร์ด เพื่อจัดการตั้งค่า แสดง/ซ่อน หรือเพิ่มปุ่มมาโครใหม่ทั้งหมดได้จากหน้านี้ครับ
You can open this control panel by pressing Ctrl+Shift+F1 on your keyboard. It lets you customize global behaviors, show/hide buttons, change themes, or create new floating hotkeys.
- 🔒 Lock Buttons (ล็อคปุ่ม): แนะนำสำหรับการใช้งานฟาร์มจริง เมื่อเปิดใช้งาน จะซ่อนตัวจับย้าย
⠿ปุ่มปิด✖และปุ่มปรับขนาด◢ทั้งหมด เพื่อให้เหลือปุ่มสะอาดตาสวยงาม และป้องกันอุบัติเหตุคลิกไปโดนลากเคลื่อนย้ายปุ่มขณะเล่นเกม - 🔒 Lock Buttons: Recommended for active farming. When enabled, it hides the drag handle
⠿, close button✖, and resize grip◢, keeping the overlay clean and preventing accidental moves during gameplay. - 🔳 Show Borders (แสดงขอบ): เปิด/ปิดการแสดงเส้นกรอบสะท้อนแสงรอบๆ ปุ่มลอย เพื่อเพิ่มมิติและความโดดเด่น
- 🔳 Show Borders: Toggles neon glowing outlines around the floating buttons.
- 🌓 Opacity (ความโปร่งใส): แถบเลื่อนสำหรับปรับความจาง/เข้มของปุ่มลัดทั้งหมดพร้อมกัน เพื่อไม่ให้บังทัศนวิสัยบนหน้าจอเกม
- 🌓 Opacity: Slider to adjust the overall transparency of all buttons on your screen.
- 🏷️ Show Hotkeys (แสดงคีย์ลัด): แสดงข้อความคีย์ลัดในวงเล็บต่อท้ายชื่อ เช่น Potion On/Off (5)
- 🏷️ Show Hotkeys: Displays target trigger key suffix on buttons, e.g. Potion On/Off (5).
- 🔢 Show Numbers (แสดงลำดับ): แสดงตัวเลขลำดับ [1], [2], [3] นำหน้าชื่อปุ่ม
- 🔢 Show Numbers: Displays button sequence numbers, like [1], [2], [3], in front of button labels.
- 🎨 Theme (เปลี่ยนธีมสี): เมนูเลือกชุดสีปุ่มลอยด่วน มีให้เลือกใช้งานกว่า 10 ธีมสีสไตล์โปรเจกต์ระดับพรีเมียม (เช่น Catppuccin, Cyberpunk, Matrix, Nord)
- 🎨 Theme: Switch between 10 high-quality modern themes (e.g. Catppuccin, Cyberpunk, Matrix, Nord) to match your game style.
- 🔀 ลากสลับลำดับ: ที่รายการมาโครด้านล่าง คุณสามารถกดที่สัญลักษณ์
☰ค้างไว้แล้วลากขึ้น-ลง เพื่อจัดเรียงลำดับปุ่มกดบนหน้าจอได้อย่างอิสระ - 🔀 Reorder List: Press and hold the
☰grip on any list item to drag and change the visual order of the buttons. - 🟢 สวิตช์เปิด/ปิด (Visibility Toggle): กดสวิตช์สีเขียว/เทาด้านขวาของแต่ละรายการเพื่อสั่ง แสดง หรือ ซ่อน ปุ่มลอยปุ่มนั้นๆ บนจอเกม
- 🟢 Visibility Toggle: Click the green/grey switch to instantly show or hide that specific button on your screen.
- 🗑️ ลบปุ่ม (Delete Button): กดไอคอนถังขยะสีแดง
🗑เพื่อลบปุ่มลอยที่ไม่ต้องการออกจากระบบถาวร - 🗑️ Delete Button: Click the red trash bin icon
🗑to remove the button permanently.
6.3 🔄 โหมดปรับตำแหน่ง (Unlocked) VS โหมดพร้อมใช้งาน (Locked)
6.3 🔄 Unlocked (Editing) vs. Locked (Gameplay) States
เพื่อให้คุณจัดหน้าจอได้อย่างสมบูรณ์แบบ ปุ่มลอยของ Yucha Key Panel จะปรับเปลี่ยนรูปร่างหน้าตาและเครื่องมือควบคุมตามสถานะ Lock Buttons ดังนี้ครับ
To help you design the perfect layout, floating buttons dynamically adapt their interface elements based on the global **Lock Buttons** setting:
🔧 โหมดจัดหน้าตา (Unlocked)
🔧 Editor Mode (Unlocked)
เมื่อปลดล็อค ปุ่มลอยจะแสดงแผงควบคุมช่วยแก้ไขรอบตัว:
When unlocked, helpers are packed around the button for editing:
⠿ตัวจับย้าย (Left Grip): คลิกซ้ายค้างที่ไอคอนนี้แล้วขยับเมาส์ เพื่อลากย้ายปุ่มไปวางตำแหน่งใดๆ บนจอได้อย่างอิสระ⠿Left Grip: Click and hold this handle, then drag to reposition the button anywhere on your screen.✖ปุ่มปิดด่วน (Close): กดเครื่องหมายกากบาทเพื่อสั่งซ่อนปุ่มลอยปุ่มนี้ทันที (สวิตช์บนแผงตั้งค่าจะปิดลงอัตโนมัติ)✖Quick Close: Click the close icon to hide the button instantly (sets its visibility switch to off).◢ตัวปรับขนาด (Resize corner): คลิกค้างที่รูปสามเหลี่ยมมุมขวาล่าง แล้วลากเมาส์ออกหรือหดเข้า เพื่อปรับความกว้างและความสูงตามต้องการ◢Resize Grip: Click and drag this corner handle outward or inward to change the width and height of the button.
🔒 โหมดล็อคใช้งานจริง (Locked)
🔒 Gameplay Mode (Locked)
เมื่อล็อค ปุ่มจะเก็บตัวช่วยแก้ไขทั้งหมดซ่อนไว้ด้านหลัง:
When locked, all auxiliary editing controls are safely hidden:
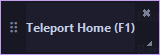
- แสดงเฉพาะปุ่มคลิกอย่างเดียว สวยสะอาดตา ดูล้ำสมัยเข้ากับตัวเกม
- Displays only the clean, clickable button itself. Looks sleek and modern.
- ล็อกตำแหน่งและขนาดถาวร ป้องกันความผิดพลาดจากการลากปุ่มหลุดตำแหน่งขณะกำลังสู้กับมอนสเตอร์หรือคนอื่น
- Locks coordinates and sizes, avoiding accidental cursor drag issues.
- คลิกสั่งงานรันมาโครได้รวดเร็วเต็มพื้นที่ปุ่ม
- Maximize clickable surface area for fast action execution.
- 💡 เทคนิคด่วน: แม้จะล็อกอยู่ คุณก็สามารถ ดับเบิลคลิก (Double-click) บนตัวปุ่มลอยตรงๆ เพื่อเรียกหน้าต่างแก้ไขค่าปุ่มขึ้นมาได้ทันทีครับ
- 💡 Quick Tip: Even when locked, you can Double-click directly on the button to open its settings window instantly.
6.4 🎨 การปรับแต่งเฉพาะปุ่ม (Button Customization)
6.4 🎨 Individual Button Customization
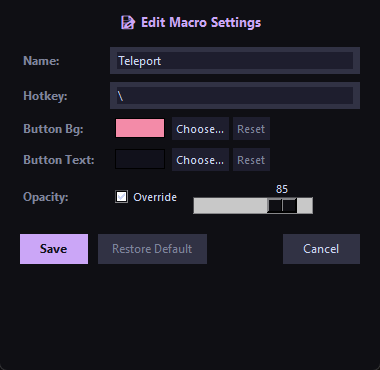
ดับเบิลคลิกที่รายการใน Control Panel หรือบนตัวปุ่มลอย เพื่อเปิดหน้าต่างกำหนดค่าแบบเจาะลึกเฉพาะแต่ละปุ่มได้ครับ คุณสามารถเปลี่ยนสี และความโปร่งใสแยกเฉพาะปุ่มได้ด้วย
Double-click a list row or double-click the floating button itself to open individual configuration settings. You can set custom colors and opacity levels for each button.
- 📝 Name (ชื่อปุ่ม): ข้อความที่จะเขียนแสดงอยู่บนปุ่มลอย
- 📝 Name: The label text displayed on the floating button.
- ⌨️ Hotkey (ปุ่มคีย์ลัด): คีย์ลัดแป้นพิมพ์ของคอมพิวเตอร์ที่ต้องการให้ปุ่มนี้กดแทน (เช่น
5,F1,Ctrl+F5) **ต้องสะกดและเขียนให้ตรงกับ Hotkey ของมาโครนั้นๆ ใน Macro Studio** - ⌨️ Hotkey: The keyboard key simulated and sent to the game window (e.g.
5,F1,Ctrl+F5). **Must match the Hotkey of the macro in Macro Studio** - 🎨 Button Bg (สีปุ่ม): คลิกปุ่ม Choose เพื่อเลือกสีพื้นหลังปุ่มลอยเฉพาะปุ่มนี้ ทำให้ปุ่มสำคัญโดดเด่นแยกจากปุ่มอื่น (เช่น ยาสีแดง วาร์ปสีฟ้า บัฟสีม่วง)
- 🎨 Button Bg: Set a custom background color for this specific button to differentiate it (e.g. Red for potions, Blue for escape warps).
- 🔤 Button Text (สีข้อความ): คลิก Choose เพื่อเปลี่ยนสีตัวอักษรของปุ่มนี้โดยเฉพาะ เพื่อให้คมชัดอ่านง่าย
- 🔤 Button Text: Customize text label color for this button.
- ⚡ Active Bg (สีขณะปุ่มทำงาน): คลิก Choose เพื่อเลือกสีพื้นหลังปุ่มลอยขณะที่มาโครนั้นกำลังทำงาน/เปิดใช้งานอยู่ (เช่น ปุ่ม F1 ตรวจสอบกับสถานะ Bot ทำงาน, และปุ่มอื่นๆ ตรวจสอบตาม macro_flags ในหน้าบอท) ทำให้คุณเห็นสถานะการทำงานของบอทได้ชัดเจนในหน้าจอเกมทันที
- ⚡ Active Bg: Click Choose to customize the button's background color when that macro is actively running (e.g. F1 checks if the main script is running, and other keys check their respective running flags in macro_flags), providing instant visual feedback on active tasks directly on your screen.
- 🌓 Opacity (ความโปร่งใสพิเศษ): ติ๊กถูกที่ช่อง Override จากนั้นเลื่อนแถบความโปร่งใส เพื่อตั้งค่าความโปร่งใสแยกต่างหากเฉพาะปุ่มนี้คนเดียว (ไม่ใช้ค่าความโปร่งใสร่วมกับส่วนกลาง)
- 🌓 Opacity Override: Check Override to assign a custom transparency level for this button only, independent of the global setting.
- 🔄 Restore Default (ปุ่มคืนค่าเริ่มต้น): ลบสีธรรมดา สีข้อความ สีขณะทำงาน และค่าโปร่งใสพิเศษทั้งหมดที่ตั้งไว้เฉพาะปุ่มนี้ และปรับกลับไปใช้ธีมสีหลักและค่าความโปร่งใสส่วนกลางของระบบทันที
- 🔄 Restore Default: Erase custom background, text colors, active background color, and opacity overrides, returning the button back to the global theme colors.
6.5 📐 การปรับขนาดปุ่มลอย & ระบบแม่เหล็กดูดจัดตำแหน่ง (Resizing & Magnet Snapping)
6.5 📐 Resizing Buttons & Magnet Snapping System
ในโหมดจัดหน้าตา (Unlocked) คุณสามารถปรับขนาดของปุ่มลัดลอยได้อย่างอิสระเพื่อให้เข้ากับขนาดหน้าจอหรือความถนัดของคุณ และยังมีระบบ Magnet (แม่เหล็กดูด) เพื่อช่วยจัดเรียงปุ่มให้ตรงเป็นระเบียบอย่างง่ายดายอีกด้วย
In Editor Mode (Unlocked), you can freely resize any floating button to match your screen layout or preferences. The panel also includes a Magnet snapping feature to help align your buttons perfectly.
🔍 เปรียบเทียบขนาดปุ่ม (Button Size Comparison)
🔍 Button Size Comparison
คลิกเมาส์ค้างที่มุมขวาล่าง ◢ ของปุ่มในสถานะ Unlocked แล้วลากเพื่อยืดหรือหดขนาดปุ่ม:
Click and drag the bottom-right resize grip ◢ in Unlocked state to resize:

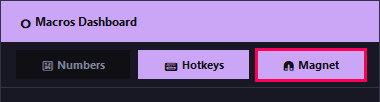
🧲 ระบบแม่เหล็กดูดขอบ (Magnet Snapping)
🧲 Magnet Snapping System
เมื่อคุณเปิดใช้งานปุ่ม Magnet (แม่เหล็ก) จากหน้าต่างแผงควบคุมหลัก:
When you enable the Magnet toggle button from the main Control Panel:
- ดูดติดขอบจอ: เมื่อลากปุ่มเข้าใกล้ขอบจอภาพฝั่งใดก็ตามในระยะ 12 พิกเซล ปุ่มจะถูกดูดเข้าไปแนบชิดติดขอบจอทันที
- Snap to Screen Edges: Moving a button within 12 pixels of any screen border snaps it perfectly flush with the edge.
- ดูดติดขอบปุ่มอื่น: เมื่อลากปุ่มเข้าใกล้ปุ่มลอยปุ่มอื่นๆ ปุ่มจะดูดติดขอบและจัดระดับความสูง/กว้างให้ระนาบเดียวกันโดยอัตโนมัติ
- Snap to Other Buttons: Dragging near neighboring buttons snaps them flush side-by-side or stacks them cleanly.
6.6 📁 การจัดการโปรไฟล์ปุ่มกด (Profile Management)
6.6 📁 Layout Profile Management
อำนวยความสะดวกด้วยระบบ **โปรไฟล์ (Profiles) จำกัดสูงสุด 3 โปรไฟล์** ให้คุณสามารถบันทึกตำแหน่ง ขนาด สี และธีมของปุ่มกดลอยทั้งหมดเก็บไว้ เพื่อสลับใช้งานตามสถานการณ์ต่างๆ เช่น โปรไฟล์สำหรับการต่อสู้ทั่วไป โปรไฟล์สำหรับลงบอส หรือโปรไฟล์สำหรับตัวละครอื่นๆ โดยระบบจะอัปโหลดข้อมูลเหล่านี้ซิงค์เข้ากับ **Cloud Config** ของบัญชีคุณโดยอัตโนมัติเมื่อกดบันทึกครับ
Manage your custom setups with the **Profile Management** system (up to 3 profiles). Save coordinates, sizes, overrides, and themes for different scenarios—like a PvP layout, boss hunt setup, or alt character positions. All profile data is automatically synced to your **Cloud Config** database when saved.
- 💾 Save (บันทึกโปรไฟล์): คัดลอกปุ่มลอยและพิกัดตำแหน่งทั้งหมดในปัจจุบันไปเก็บไว้ในช่องโปรไฟล์ที่เลือก และอัปโหลดขึ้นคลาวด์ทันที
- 💾 Save: Copy your active layout configuration into the selected profile slot, triggering an instant automatic cloud sync update.
- 📂 Load (โหลดใช้งาน): ดึงข้อมูลปุ่มและตำแหน่งที่เคยบันทึกไว้ในโปรไฟล์นั้นๆ กลับมาแสดงผลแทนที่เลย์เอาต์ปัจจุบันทันที
- 📂 Load: Restore the selected profile's settings, layout coordinates, and active theme to your gameplay screen.
- 🔄 Reset (ล้างค่าโปรไฟล์): ลบข้อมูลโปรไฟล์ดังกล่าวออกจากฐานข้อมูลคลาวด์ เพื่อเคลียร์ช่องให้ว่างพร้อมสำหรับการบันทึกค่าใหม่
- 🔄 Reset (Restore Default): Erase the saved layout settings inside that profile slot, restoring the slot to default (empty) state.
✨ 7. ฟีเจอร์ใหม่ในเวอร์ชัน V2.6.0 (New Features)
Step 7. V2.6.0 New Features
🗺️ 1. ปรับระบบการเดินไปจุดฟาร์มแบบอัตโนมัติ (Auto-Navigation to Farming Spot)
🗺️ 1. Auto-Navigation to Farming Spot
ระบบนำทางกลับจุดฟาร์มใหม่ได้รับการยกเครื่องให้มีประสิทธิภาพมากขึ้น สำหรับแผนที่ชั้นสูง (เช่น หอคอยโอหัง (Tower of Insolence) หรือ สมรภูมิโบราณ (Ancient Battleground)):
The new return-to-farm navigation system has been overhauled for end-game maps (such as Tower of Insolence or Ancient Battleground):
- กำหนดแค่จุดฟาร์มปลายทาง: จากเดิมที่คุณจำเป็นต้องบันทึกจุดเส้นทางเดิน (Waypoints) หลายสิบจุดด้วยตัวเอง ตอนนี้เปลี่ยนใหม่เป็น กำหนดเพียงพิกัดปลายทางสุดท้ายจุดเดียวพอ! บอทจะทำการคำนวณและเดินหลบหลีกอุปสรรคนำทางกลับไปยังเป้าหมายให้โดยอัตโนมัติ
- Set Destination Only: Instead of manually defining dozens of waypoint steps for your path, you now only need to **specify the final farming spot destination**. The bot automatically calculates the route and steers around obstacles to get you there safely.
- ความแม่นยำสูง (6 พิกเซล): มีการปรับปรุงขีดความแม่นยำปลายทางสุดท้ายลดลงเหลือช่วง +-6 พิกเซล เพื่อให้การส่งท้ายสเต็ปนำทางไปเข้าโหมดออโต้ล่าทำได้อย่างรวดเร็วและเป็นธรรมชาติที่สุด
- High Precision (6px Tolerance): Destination precision has been fine-tuned to a tight 6-pixel limit, assuring natural, fast target landing and transition to auto-hunting.
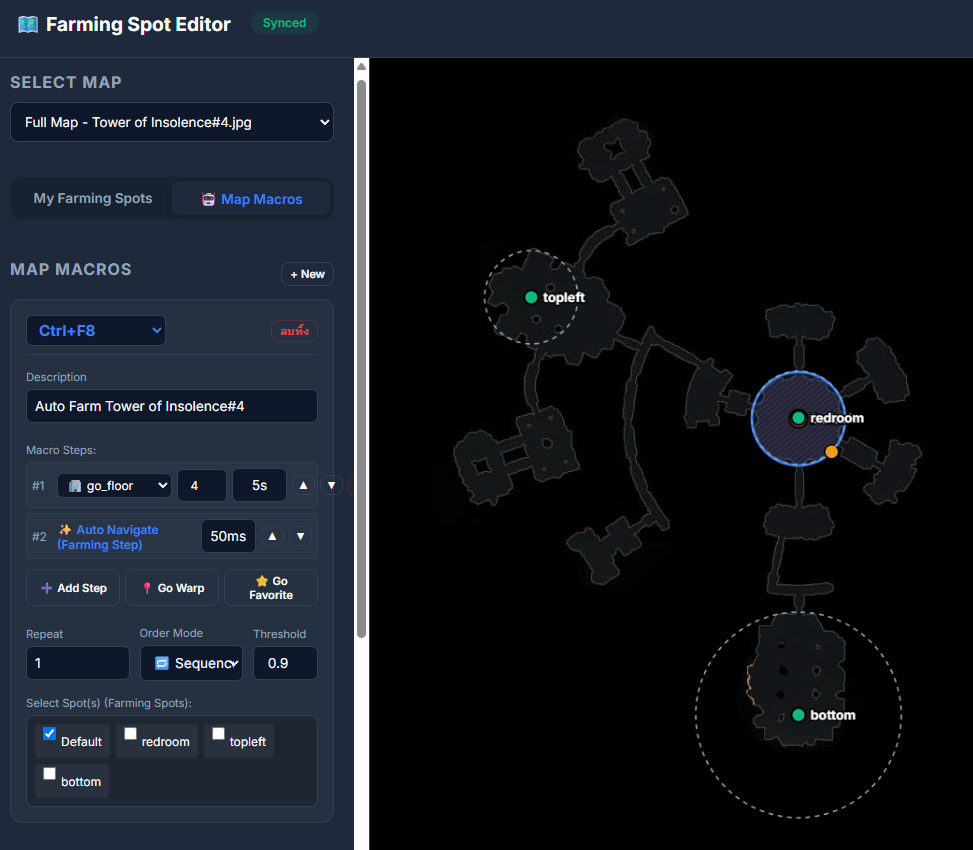
ภาพตัวอย่าง: แผนผังการตั้งค่าพิกัดจุดเดินกลับบน Map Editor (บันทึกภาพหน้าจอของคุณไปวางที่โฟลเดอร์ img/v260_auto_navigate.png)
Preview: Map Editor coordinate layout (save your capture as img/v260_auto_navigate.png)
⚔️ 2. ปรับระบบการสู้กลับ (Smart Fighting Back Options)
⚔️ 2. Smart Fighting Back Options
เพิ่มความฉลาดและความคล่องตัวในขั้นตอนสู้กลับ (สวมหมวกกันน็อคและตอบโต้) เพื่อรับมือกับผู้เล่นอื่นที่มารบกวนการฟาร์มของคุณ:
Expanded combat handling options for fighting back against enemy players interrupting your farm:
🏃♂️ 6.a หนีเมื่อมองไม่เห็น HP
🏃♂️ 6.a Escape when HP Hidden
(เปิดใช้งาน = หนี / ปิดใช้งาน = ไม่หนี) บอทจะกดใบวาร์ปหนีทันทีหากถูกโจมตีแต่ระบบไม่สามารถอ่านค่าระดับเลือด (HP) บนจอได้ เช่น โดนผู้เล่นอื่นใช้สกิลสาดสถานะปิดตา (Blind) เพื่อความปลอดภัยสูงสุดของตัวละคร
(ON = Warp Away / OFF = Stay) Triggers an immediate emergency warp if attacked but your HP bar becomes unreadable (e.g., when blinded by an enemy player's status skills).
⚔️ 6.b สลับอาวุธสู้กลับ
⚔️ 6.b Switch Weapon on Fightback
อนุญาตให้บอทกดสลับอาวุธสำหรับต่อสู้กับคนได้ โดยบอทจะเรียกชุดคำสั่งปุ่มมาโคร Ctrl+Shift+F10 อัตโนมัติเมื่อตรวจพบการต่อสู้ และจะสลับกลับเป็นเซ็ตเดิมให้อัตโนมัติหลังสู้เสร็จ
Enables automatic weapon swapping for PvP fightback. The bot executes macro Ctrl+Shift+F10 immediately when starting combat, and reverts your weapon back after the combat concludes.
📍 6.c กลับจุดฟาร์มอัตโนมัติ
📍 6.c Auto-Return after Combat
เมื่อจบการต่อสู้และไม่มีการโจมตีซ้ำซ้อน บอทจะใช้ระบบนำทางอัตโนมัติ (จากข้อ 1) เพื่อประคองตัวละครเดินทางกลับไปยังจุดฟาร์มหลักทันที ป้องกันตัวละครถูกลากออกนอกพิกัดฟาร์ม
Upon combat resolution, the bot runs the auto-navigator to automatically pilot your character back to the original farming coordinates, keeping your farming zones secure.
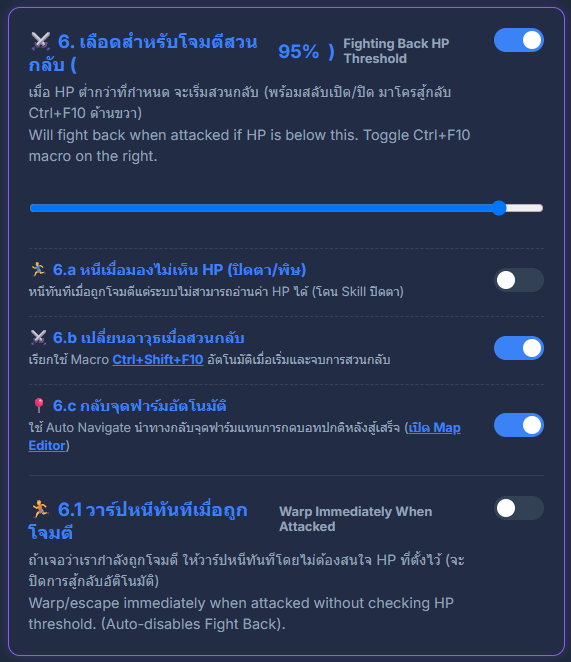
ภาพตัวอย่าง: ช่องการเปิดใช้งานและสับสวิตช์ย่อยใต้ข้อ 6 ในแผงควบคุมหลัก (บันทึกภาพหน้าจอของคุณไปวางที่โฟลเดอร์ img/v260_fight_back.png)
Preview: Fighting Back configuration toggles in Config Editor (save your capture as img/v260_fight_back.png)